[NA] Car's A/C not blowing cold

asicer

Touchdown! Greaser!
Joined
Jan 1, 2015
Messages
11,765
Display Name
asicer
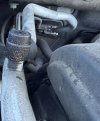
So the car's A/C stopped blowing cold. I can see the compressor engaging/turning and it makes that familiar "whoosh" sound common to all A/C systems whenever I hit the switch. I'm thinking that it's leaking out the Schrader valve on the low pressure side. The cap is oily and there's what looks to be a track of dirt leading out of it. See pic below. The area around the Schrader valve on the high pressure side is not oily but it is a little dusty (maybe because it's much nearer to the front of the car).

Should I simply tighten the valve core and top off the R134? Or do I need to evacuate, replace the valve core and refill?

ac.jpg
 
I guess the “correct” fixed would be to replace the valve, evacuate the system, then refill.

Or, do what I’m about to do in 20 minutes and just top it off. Mine has a very small leak somewhere in the system. It needs a once a year top-off. For a 32 year old car, it’s a tolerable fix for me.
 
How old is the car? Do you have the tools for an evac? Vacuum pump, manifold gauge set with r134 connectors...
If it's older, I would consider replacing the o-rings and pulling a vacuum then adding r134a. I replaced a compressor on one of my old 2011 Subaru Outbacks last month and did that. It took 2 cans r134a. Air out the vents was 39 degrees when completed.
A simpler and faster approach would be to just try topping it off with some r134. That may work for a while. Be careful topping it off; don't tip the r134 upside down and introduce liquid rather than vapor as you could damage the compressor.
 
How old is the car?
2014. This is the first time the A/C has failed to blow cold.
Do you have the tools for an evac? Vacuum pump, manifold gauge set with r134 connectors...
No, but apparently the auto parts store will lend me a pump and manifold gauge for free (after putting down a quite sizeable deposit).
 
2014. This is the first time the A/C has failed to blow cold.

No, but apparently the auto parts store will lend me a pump and manifold gauge for free (after putting down a quite sizeable deposit).
Yeah, 12 years old is likely long enough the o-rings are getting stiff. If you're going to take the time to pull a vacuum (I leave the vacuum pump running for about an hour) I would replace those and install new schrader valves before doing it. That will decrease the likelyhood of having a leak later on. Amazon has attractive pricing on r134a and even manifold gauges. You'll want to watch a youtube probably if you're not familiar. After pulling a vacuum you want to fill the lineset with r134a before opening the valve to your system under vacuum.
 
How long do you plan on keeping the car? If more than a year, then yeah, inject the dye, find the leak, and fix it.
 
So the car's A/C stopped blowing cold. I can see the compressor engaging/turning and it makes that familiar "whoosh" sound common to all A/C systems whenever I hit the switch. I'm thinking that it's leaking out the Schrader valve on the low pressure side. The cap is oily and there's what looks to be a track of dirt leading out of it. See pic below. The area around the Schrader valve on the high pressure side is not oily but it is a little dusty (maybe because it's much nearer to the front of the car).

Should I simply tighten the valve core and top off the R134? Or do I need to evacuate, replace the valve core and refill?

View attachment 152092


Finding the leak is often the hardest part. If you already suspect it is leaking through the low side schrader valve, it may be worth simply tightening it (be careful not to push on it and release the contents on your face). Then add some refrigirent. Because you are not starting from empty you have to guess how much to add. I would also add some UV dye in case it continues leaking.
 
Yeah, 12 years old is likely long enough the o-rings are getting stiff.
The top-off kits are advertised as having o-ring conditioners that will stop these sorts of leaks. Snake oil?
How long do you plan on keeping the car?
No immediate plans to dump it, but with me that could pretty much change any given year or three.
 
The top-off kits are advertised as having o-ring conditioners that will stop these sorts of leaks. Snake oil?
I wouldn't put much confidence in that especially given how easy and accessible those o-rings are. Super easy to change them; it's fast and cheap long term insurance. For my money it's a choice of @Half Fast approach of just topping it off and hoping for cool air for a while, or change out a few o-rings, pull vacuum and fill.
 
I wouldn't put much confidence in that especially given how easy and accessible those o-rings are. Super easy to change them; it's fast and cheap long term insurance. For my money it's a choice of @Half Fast approach of just topping it off and hoping for cool air for a while, or change out a few o-rings, pull vacuum and fill.
Yeah, having never done it before I'm envisioning that doing it right will be an all-day affair at minimum versus a few minutes re-tightening the Schrader valve and topping off.
 
Yeah, having never done it before I'm envisioning that doing it right will be an all-day affair at minimum versus a few minutes re-tightening the Schrader valve and topping off.
It really isn't hard or time consuming. There's o-rings at the hose connections to the compressor, to the firewall near your low side valve in that pic, and at the condenser connections. Connect your manifold gauge lines, set the vacuum pump and walk away for an hour. Come back, turn off vacuum pump, connect a r134 can to gauge hose, open hose valve momentarily to bleed r134 into hose to manifold, turn on car ac on full cool, open low side manifold valve to bleed r134 into car lines, add likely 2 full cans r134 (look up your cars r134 capacity) don't tip the can upside down during the fill, close all valves and you're done.
 
Last edited:
It really isn't hard or time consuming. There's o-rings at the hose connections to the compressor, to the firewall near your low side valve in that pic, and at the condenser connections. Connect your manifold gauge lines, set the vacuum pump and walk away for an hour. Come back, turn off vacuum pump, connect a r134 can to gauge hose, open hose valve momentarily to bleed r134 into hose to manifold, turn on car ac on full cool, open low side manifold valve to bleed r134 into car lines, add likely 2 full cans r134 (look up your cars r134 capacity) don't tip the can upside down during the fill, close all valves and you're done.

I’ve done it many times, and yes, it is fairly easy, as you described. However, properly recovering and disposing of the old refrigerant is an important step. You will need to take it to a shop to do that, or have an appropriate recovery system. So that part can be time consuming, and not so easy. Simply releasing the old gas into the atmosphere is illegal.
 
I’ve done it many times, and yes, it is fairly easy, as you described. However, properly recovering and disposing of the old refrigerant is an important step. You will need to take it to a shop to do that, or have an appropriate recovery system. So that part can be time consuming, and not so easy. Simply releasing the old gas into the atmosphere is illegal.
Valid. I have a recovery machine and cylinder. Of course having a known leak and simply continuing to top it off without fixing the leak doesn't help either.
 
Ah, after doing a little more research it turns out that it doesn't have to be a choice of avoiding an evac/refill OR changing the valve core. Looks like doing both is an option with the right tool ($400 from Snap-On or $20 from Amazon).
 
Adding more refrigerant and tightening the schrader if you can just kicks that can down the road. The correct way is to recover the refrigerant, change out both valves, draw a vacuum and recharge the system. The o rings in the schrader valves are worn out. Find a shop that will recover and give you credit for what they recovered while you pay for only what is added instead you paying for the full amount. That’s a good way to rip off customers and a lot of shops will not give you credit for what you already owned that they put back in the system. You should only pay for the amount you lost because of the leak.

Thank you Rainman Ray
 
Last edited:
Adding more refrigerant and tightening the schrader if you can just kicks that can down the road. The correct way is to recover the refrigerant, change out both valves, draw a vacuum and recharge the system. The o rings in the schrader valves are worn out. Find a shop that will recover and give you credit for what they recovered while you pay for only what is added instead you paying for the full amount. That’s a good way to rip off customers and a lot of shops will not give you credit for what you already owned that they put back in the system. You should only pay for the amount you lost because of the leak.

Thank you Rainman Ray
Have you ever used a tool like the one in post #17? Any tips/gotchas?
 
Check with Oreilly auto if you have one nearby. They have loaner tools (A/C gauges/manifold , vacuum pumps, flush kits, etc) that don't cost you a dime other than the deposit. If you do pull the refrigerant out, I'd replace the orifice tube as well as they get gunked-up over the years. Don't overcharge the system with refrigerant, use gauges to set proper drop.
 
The important thing that no one has mentioned is the amount of refrigerant needed to refill the system. That information is on a label affixed to the under hood or core support of the vehicle. It's usually around 3 lbs and a few more ounces. It's critical to get the right amount for proper operation.

A simple battery powered scale will suffice, you'll just need to stabilize the can and manifold hose on the scale while filling.
 
While I am fully aware of all the HVAC vacuum/fill requirements, otherwise the AC won't cool properly, will corrode/fall apart in six months or the sky will turn green and fall on your head, here's a personal story on how much an automotive AC system can be mishandled and still do well:

It happened when @AV8R_87 was young, dumb and more or less broke. Barely able to afford flying lessons, and with no real disposable income left to do a proper AC fix.
Hit some snow and ice, ended up in the ditch on the opposite side of the road, with a smashed bumper cover. Picked up most large pieces, drove home for a more thorough inspection, which revealed a bent AC condenser mount, and a hissing sound accompanied by oily residue. You know where this is going. It was winter time, so this problem was going to be MEL'd until late spring. Used some scrap aluminum, pop rivets and speed tape to get that bumper cover reassembled, followed by a parking lot spray can paint job. Looked good from 10 feet away.

Anyway, back to the AC issue, May came along and things got warm. AC is dead, new condenser plus all service gets quoted at some eye-watering number, no way I'm paying that. You can tell from my bumper cover fix that I'm willing to MacGyver stuff if needed. So the light bulb started flickering dimly.
Yes, I had bought the can with hose and useless gauge combo to rejuvenate the AC on another car previously. Add stuff until it blows cold enough, right?

I had a few problems, so how did I fix them? Cracked condenser fitting... hmm, can I 2-part epoxy it? I coul see the crack, it was about a third of the way around the fitting. Epoxy on just the surface wouldn't do it, I knew that much. I'd need to evacuate the air from the system, so that required a vacuum pump and a set of AC manifold gauges. Harbor Freight had gauges for cheap and a venturi (compressed air powererd) vacuum pump for a price I was willing to pay.
Cleaned and degreased the condenser around the crack and covered the crack area and all around it with epoxy. Waited a bit and then hooked up the vacuum pump and started pulling a low vacuum, about 7 inches, waited a couple hours. The idea was to pull epoxy into the crack. No change in pressure. Started the pump again, I was able to get the vacuum down to about 28 inches. Nowhere close to what an HVAC tech will tell you, which is at least 2000 microns (or 29.84 in aviation terms). Anyway, max possible vacuum achieved, closed the system, waited a few days, measured again. No change that I could measure.
Time for the big test. The system was rated for 2 pounds of refrigerant, but I didn't trust my epoxy job with the full pressure. So I decided to add only one pound (since it was a full can) and see what happens. Compressor kicked on, cold air started coming out of the vents. Did I measure superheat and subcool? Nope! Cold enough for my needs, that was the measurement. Now, was that epoxy job going to last? That was the convern over that first summer. But it held on. Kept that car for another 10 years, the expoxy (a WM special, nothing fancy) never failed. And despite not replacing the drier in a system exposed to ambient pressure and humidity for months, the system never corroded and developed masdive leaks. 7 years later, the air wasn't as cold as before. Decided to add the second can of refrigerant, by that point I trusted my expoxy job. That kept the AC going until I got the car replaced.

The moral/TL;DR of this (long) story?
Despite what the HVAC mafia is telling us, AC systems aren't that delicate. They can tolerate imperfect vacuums, a bit of moisture and less than ideal refrigerant charges, while providing adequate performance. Just don't overcharge it, make sure your high side pressure stays below the limit. Efficiency might be below peak, but in an automotive environment the impact will be low.

 
Last edited:
If it’s oily around the low side valve there’s a good chance it’s leaking there. I wouldn’t just tighten it blindly tbh. Best fix is usually recover the refrigerant, replace the valve core, vacuum it down and refill properly.
 
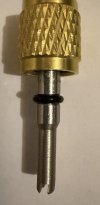
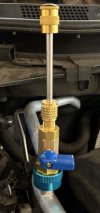
So the fork on the end of the shaft in that $20 tool set from Amazon needed to be pried open with a screwdriver. Right out of the package, I couldn't get it over the valve core. The hole for the valve core stem also needed to be chased with a drill bit.

0.jpg

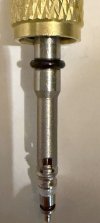
The fork was still too loose and could probably use more fine tuning with the channels locks, but the hole in the shaft was good enough to hold a valve core.

1.jpg

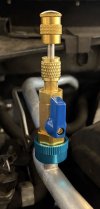
From there it was a simple matter to put the tool on the port and unscrew the old valve core...

2.jpg

...followed by closing the ballcock and unscrewing the shaft which is now holding the old valve core.

3.jpg

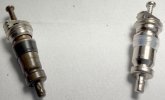
As they say, install is the reverse of removal. Here's what the old one looked like next to a new one.

4.jpg

I topped up the R134a according to low-side pressure and all is well in the world (cabin) again. I'll also be replacing the plastic port caps for good measure, whenever the auto parts store gets them back in stock.
 
Check with Oreilly auto if you have one nearby. They have loaner tools (A/C gauges/manifold , vacuum pumps, flush kits, etc) that don't cost you a dime other than the deposit.
While they (and the other parts stores) loan out the manifold and vacuum pump, they don't give you everything else needed for recovery. That's why I went with a top off.
 
Find a shop that will recover and give you credit for what they recovered
Easier said than done. Prove that there isn't any dye/snake oil in the system first. Then you have to pay shop fees and costs to use that $10 credit they gave you.

Recovery machines are a few grand, not homeowner level cost, plus now you have an expensive tank of refrigerant to store forever.

Vent it, do the repair, refill. For all the pearl clutchers.... tell me about that 100LL you are dumping on the ground during preflight.
 
Vent it, do the repair, refill. For all the pearl clutchers.... tell me about that 100LL you are dumping on the ground during preflight.
I don't dump 100LL on the ground, which is why I spent $20 on a tool that allowed me to repair without venting.

I probably got that $20 back by topping off instead of doing a complete refill.
 
Vent it, do the repair, refill. For all the pearl clutchers.... tell me about that 100LL you are dumping on the ground during preflight.
Not sure if you’re calling me a pearl clutcher but it doesn’t hurt to ask if they give you credit for what they recover from your system only to give it back along with the new refrigerant they add to bring it up to spec. And I don’t dump 100LL onto the ground. I use a fuel bottle designed to pour it back into the tank.
 
Kind of the same analysis when you consider Harbor Freight -- "Do I plan to have to do this job/use this tool more than once?"

Most of the hand tools I've bought from HF have been decent, and they warranty them the way Sears used to. I took back a broken torque wrench a while ago, and they just tossed it in a box and told me to go grab a new one. Easy peasy.

Their power tools are another story, but for infrequent use they seem to do okay. Avoid their welders.
 
Not sure if you’re calling me a pearl clutcher but it doesn’t hurt to ask if they give you credit for what they recover from your system only to give it back along with the new refrigerant they add to bring it up to spec. And I don’t dump 100LL onto the ground. I use a fuel bottle designed to pour it back into the tank.
Unless I specifically stated your name, I'm not call YOU a pearl clutcher. No need to be internet offended.

I've asked a lot of shops and they all said the same thing: no. Any dye or snake oils in the refrigerant will spoil their system and require cleaning also contaminating their supply.. If you have a new car and never messed with the AC then the black light will be clean. But a used car with an unknown history, if any dyes were used they are easy to spot under the black light. Also you are paying shop time for a minor credit that you have to pay MORE shop time to cash in.

Finding a leak without dyes can be very simple: look for the wet spot. AC systems have oil in the lines and wherever there is a leak there should be some oil. Changing a line, dehydrator or a pump is simple. The hard part is the evaporator in the dash. That's were the pain will come from. The orifice can be either dead simple or a major project depending where it is and what kind it is. My Caravan had rear AC and a common issue a corrosion and a leak at the evap block. I simply got the right size Dorman caps and cut/sealed the line. The lines alone are $350 not including a new evap, block and orifice. Total was $800+. Dorman caps were $10 each.

Maybe some shady places will take whatever you give them.. but then they are gonna shoot it right back into your system when you try and reclaim your credit.

If your system is low/not cold the amount of gas in your lines is trivial and will leak out anyway. So what is the difference between releasing an ounce or two vs letting it leak out? Yes one way is not correct, but the other way still releases the exact same gas into the air.

If you can find a shop to take it, you should let them reclaim it. I have just never found one.

If you do crack open your system, be sure to add the correct amount of compressor oil back in. And also ALWAYS change your dehydrator, its cheap and will get the last bit of moisture your vacuum doesn't get. Also changing the orifice and screen is a PM task you should do if the system is open.. but like I said before, that's either dead simple or a major PITA.
 
Last edited:
Back
Top