Maintenance Puzzle

WDD

Final Approach
PoA Supporter
Joined
Oct 16, 2019
Messages
8,855
Location
Atlanta / Marietta
Display Name
Vintage Snazzy (so my adult children say)
Home Airfield
KPUJ
I have a cowl lever knob that I cannot remove.

Need to install a new center pedestal plastic cover over the fuel selector, trim wheels, and cowl lever. To do this, need to remove the cowl lever knob so I can slide the new plastic over the lever. I can't seem to get the knob off of the lever. It has a Philips head on the left side. Unfortunately it just freely turns (both ways), as if the internal bolt is just spinning on stripped threads on the metal lever. Odd though, as if it was stripped you'd think the Philips screw/bolt could just slide out.

I could super glue a Philips bit to the head, grab it by some vise grips and tap with a hammer. More drastic, I could try and drill it out from the other side. I am a bit puzzled.

Thoughts?
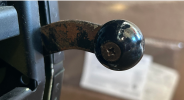
1771037766873.png
 
Have you tried prying behind the screw head with the tip of an exacto knife while turning - could be the threads are messed up on the screw and with a little help you can engage the treads beyond the steel lever. Possibly. With luck. YMMV. I do not play a doctor on TV.
 
Drill the screw out, maybe destroy the plastics. Purchase a replacement knob (or 3D print one).
 
I'm guessing the threads are in the plastic. Try slipping something sharp like a chisel tip between the screw head and the plastic, then use that to apply outward leverage while spinning the screw CCW with a drill driver. A lot of times that pressure will cause the threads to bite.

Don't do anything to destroy the plastic until you find a replacement knob.
 
Last edited:
If plastic threads, small hole right side and push.

If a threaded insert molded into plastic, which has come loose and seized onto screw… problems. Tiny hole on right side perpendicular, thin CA glue. Kroil SPARINGLY applied to head in hopes it wicks its way to threads.
 
If you can get purchase on the screw head a pair of Vampliers might work to pull the screw out while twisting.
 
Thoughts?
Is the knob split around the metal bar or is it only cut out at the bottom of the knob?
Can the screw be still tightened or does it spin in that direction also?
How sentimental is that plastic knob?
 
It’s been a while since I replaced the center console on my 182-RG, but I think the metal bar was drilled and tapped.

So, as mentioned, if you can get a piece of thin metal between the knob and steel, you may be able to back the screw out far enough to grab it with pliers. That assume the screw is only long enough to engage the threads in the metal. If the screws extends past the metal, it could be a bit more challenging.
 
Is the knob split around the metal bar or is it only cut out at the bottom of the knob?
Can the screw be still tightened or does it spin in that direction also?
How sentimental is that plastic knob?
Only cut out/slotted on bottom
Screw spins freely in both directions.
I can replace knob - I found a place I can order it from.
 
Drill the screw out, maybe destroy the plastics. Purchase a replacement knob (or 3D print one).
Jamming the tip of an exacto knife under the screw head can help keep it from spinning if you want to drill the head off.

Once you do get the screw out, you will want to replace the plastic part with a 3d printed dragon.
 
I can replace knob - I found a place I can order it from.
If you want to try and save the knob, locate and drill a small hole opposite the screw head. Using a metal pin punch apply pressure to backside of the screw while turning it back and forth to remove the screw. Sometimes they would embed a nut for the screw which breaks loose so this may not always work. If it does work you can reuse the knob with a longer screw and rabbit-eye or acorn nut on the opposite side. If it doesn't work, not a fan of 3D stuff on TC'd aircraft and would recommend a proper replacement knob.
 
If a new knob is available, I'd just take a pair of vise-grips and crush the thing. Once all the plastic is broken away, cut the screw and take it out. There is likely an embedded nut that has broken free and is just spinning in there.
 
Once you do get the screw out, you will want to replace the plastic part with a 3d printed dragon.
If we're at the stage where we're offering replacement suggestions...
il_1140xN.6462718891_k7oq.jpg
 
Order the replacement first. Examine it to see whether there’s an embedded nut, threaded plastic, whatever. Then you’ll know what method to use to remove the old one.
You read my mind. Tried this afternoon, no luck with grabbing the screw head even with the super glue trick. I’ll wait a week or so for it to arrive, and see what we’re dealing with.
 
Pull on knob while loosening screw?
 
It may be the metal arm is threaded with just clearance holes in the plastic knob. That's likely how I would have designed it. In that case trying to pull the knob off the arm may let the screw bite enough to back it out, and then you'd need to drill and tap for a larger screw.
 
Update: I ultimately used a multi tool cutter to get the knob off. I could see from the replacement knob that the threads are in the plastic knob, not the lever. Could not get the threads to bite to get the old screw out, so took to cutting it in half. To ad insult, the screw then just vibrated out on its own during the cut.

After hours of cutting and trimming, got the new center console installed. Looks mostly respectable.

Now, does anyone have trick to getting the new decals to actually stay on? An old school A&P said to use clear finger nail polish. Any tips?
 
Now, does anyone have trick to getting the new decals to actually stay on? An old school A&P said to use clear finger nail polish. Any tips?
Are these required placards? Are they DIY or store bought?

If the actual adhesive is not sticking to the new plastic then you may want to hold off on sealing the edges at this point. If store bought placards perhaps contact the vender for some adhesive primer recommendations. Regardless, you need to get the placard to stick on its own first. Otherwise you'll end up with a mess if you seal the edges and the placard completely unbonds.

And your mechanic is showing his age as at one time glue technology had a finite timelimit and it was required to seal the edges of all placards, especially the mandated ones, to ensure they stayed installed with a mil-spec edge sealer... which most people simply used a clear laquer paint. However, need watch out with clear nail polishes on plastics due to the highly volitale solvents used by some mfr's.
 
I got the decals from Vantage at the same time I bought the center console cover from them.
 
Now, does anyone have trick to getting the new decals to actually stay on? An old school A&P said to use clear finger nail polish. Any tips?
Make sure the surface is perfectly clean first. Clean it with a solvent that won't attack the plastic (test it on a scrap first) and don't touch it (the oils in your skin will interfere with adhesion) before applying the sticker.
 
I got the decals from Vantage at the same time I bought the center console cover from them.
I've never bought from Vantage, but I'd contact their tech support for recommendations since both items are their products. In the past, I've had to locate the placard, mask off the underlying area, prep, and apply a glue primer to make them a permanent install. And to note, if you want to practice on the same plastic, use the interior surfaces for the practice.
 
In the past, I've had to locate the placard, mask off the underlying area, prep, and apply a glue primer to make them a permanent install.

What kind of glue do you recommend? I've got a couple of foil data tags I need to reapply.
 
In the past, I've had to locate the placard, mask off the underlying area, prep, and apply a glue primer to make them a permanent install.
I've done that, using contact cement. The decal sticks to that like crazy. The lacquer thinner and MEK in the cement fuses it to the plastic.
 
I’ll try some old fashioned contact cement. Thanks
 
What kind of glue do you recommend? I've got a couple of foil data tags I need to reapply.
What material will the tags be attached to?
Will the tag still have traces of the original glue?
 
I’m doing simple vinyl decals on black plastic trim / center console. IE, “Cowl Flaps”, “Rudder Trim”, “Nose Left”, etc.
 
Powdercoated metal. I think I cleaned all the tags with acetone.
I usually used Loctite products specific to the application I needed. Not saying they're the best, but they never let down nor never failed to answer my questions when I needed assistance. However, if you're looking for a general all-around adhesive I've had great success with a gel type super glue in most cases.
 
Back
Top