Teach me about prop dings

NealRomeoGolf

En-Route
PoA Supporter
Joined
Apr 12, 2016
Messages
4,954
Location
Illinois
Display Name

Display name:
NRG
My mechanic is oftentimes slow to get to me so I'm grounded until he looks at my prop. Anyone want to armchair quarterback this one?

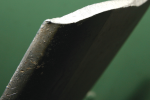
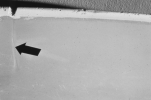
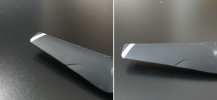
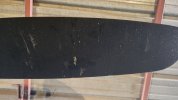
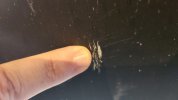
During my flight training I was taught all about leading edge dings. But I fail to recall being taught about surface dings. I found this one while changing my oil last week. Must've happened on my last flight.
20231007_140749.jpg20231007_140815.jpg20231007_140809.jpg

It seems shallow to me. Run your finger nail over it and you feel ridges.

There are size limitations and depth limitations right? How do you measure depth on the surface? It's so shallow nothing would measure it. It's a Hartzell if that matters. Haven't flown it since but would've loved to shoot some approaches this morning in actual. We need new mechanic blood here if anyone wants to move here. @Bell206 :p
 
AC 20-37E:

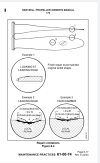
For nicks, dents, pits, and cuts in the leading or trailing edges of blades, ensure that the bottom of the damage is removed first by rounding out and fairing in the repair only slightly deeper than the damage. Initial removal of material should be done using a fine cut file. All traces of file marks in the repaired area should be removed with number 240 emery cloth followed by polishing with number 320 emery cloth, then finished with crocus cloth or 600 grit emery cloth, and then visually inspected. An individual edge repair should not exceed a depth of 3/16-inch. The repair length should be 10 times longer than the depth of the repair.

For gouges, cuts, and small dents on blade faces, ensure that the bottom of the damage is removed first by rounding out and fairing in the repair to form a saucer-shaped depression only slightly deeper than the damage. The initial repair should be accomplished by filing with a fine cut file parallel to the damage and finishing with 240 and 320 emery abrasive cloth, as in the manner of damage removal from blade-leading edges. Final polishing of the repair should be done with crocus cloth or 600 grit emery cloth. An individual repair should not exceed 1/16-inch in depth and the surface radius of curvature of the repair must not be less than 3/8-inch. Repair width should be 30 times the repair depth.
 
Did it get into the aluminum on the prop, or is it just a paint gouge? If it's the paint that's scratched you will still feel it with your fingernail.
 
I walked past a Queen Air one time and did an actual double-take…somebody had apparently filed out prop nicks by taking a rat-tailed file and sawing U-shaped notches in the leading edges of the blades. :eek:
 
Did it get into the aluminum on the prop, or is it just a paint gouge? If it's the paint that's scratched you will still feel it with your fingernail.
It seems to be more than paint to me.
 
An individual repair should not exceed 1/16-inch in depth and the surface radius of curvature of the repair must not be less than 3/8-inch. Repair width should be 30 times the repair depth.
30 times the depth in the prop's spanwise direction, and 10 times chordwise. The AC43.13 reference is valid here. That source will also show the allowable depth of repair at various stations along the blade span. That 1/16" could be disastrous in the inboard sections near the hub, for example.

There are many wrong ways to fix it, and only one right way. It's not for the average owner to do. They can end up with an unrepairable propeller if they mess it up.
 
Hartzell says "nicks, gouges, and scratches on blade surfaces or on the leading or trailing edges of the blade, that are greater than 0.031 inch (0.79 mm) wide or deep, must be removed before flight."

It's definitely longer than 0.031 inches. Guess I'm grounded until my mechanic can get to me.
 
my engine mount says you'll be ok, even if you lose the blade at that span. Sorry, AOG doomerism is gonna my poison of choice now UFN. ;)
Luckily not AOG on this one. This week is my 2 year anniversary of AOG in Pierre, SD on a 40 hour alternator. They certainly dont make them like they used to.
 
My mechanic is oftentimes slow to get to me so I'm grounded until he looks at my prop. Anyone want to armchair quarterback this one?

During my flight training I was taught all about leading edge dings. But I fail to recall being taught about surface dings. I found this one while changing my oil last week. Must've happened on my last flight.
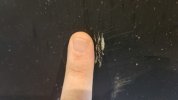
View attachment 121413View attachment 121415View attachment 121414

It seems shallow to me. Run your finger nail over it and you feel ridges.

There are size limitations and depth limitations right? How do you measure depth on the surface? It's so shallow nothing would measure it. It's a Hartzell if that matters. Haven't flown it since but would've loved to shoot some approaches this morning in actual. We need new mechanic blood here if anyone wants to move here. @Bell206 :p
I’m not an expert, but that looks fine to me and I would continue to fly until your mechanic can have a look. I’d be more concerned about chunks being taken out (that doesn’t look deep), as long as the edges are smooth it’s fine.
 
Are you sure that' a scratch and not a bug carcass? Maybe try cleaning it off, perhaps with a scotch pad? I've seen similar things on the back of my prop which cleaned right off with a little elbow grease.
 
Are you sure that' a scratch and not a bug carcass? Maybe try cleaning it off, perhaps with a scotch pad? I've seen similar things on the back of my prop which cleaned right off with a little elbow grease.
That would be one crispy carcass. I've run my finger over it plenty. It's a scratch.
 
Are you sure that' a scratch and not a bug carcass? Maybe try cleaning it off, perhaps with a scotch pad? I've seen similar things on the back of my prop which cleaned right off with a little elbow grease.
That was my thought as well.
 
Hartzell says "nicks, gouges, and scratches on blade surfaces or on the leading or trailing edges of the blade, that are greater than 0.031 inch (0.79 mm) wide or deep, must be removed before flight."

It's definitely longer than 0.031 inches. Guess I'm grounded until my mechanic can get to me.

It’s not the length that matters, it’s the width and depth, so it doesn’t matter if it’s longer than 0.031, right? That’s 1/32”. Is that exceeded? And how many of them can you have? Again, I think it’s the depth or width of one of any. Same way with nicks in the leading edge, you can have dozens, as long as they are small.
 
It’s not the length that matters, it’s the width and depth, so it doesn’t matter if it’s longer than 0.031, right? That’s 1/32”. Is that exceeded?
Which way is the width? Does something define that? Side to side or up and down? And which way is up?
 
Think of a 1” long cat scratch on your arm.

Its depth is going to define if you bleed or not, or need stitches.

Its width is how wide the cat’s nail was - kitty, big ol’ alley cat, or a cougar (if cougar, was it her pinky or thumbnail that scratched ya? That’s width).

Not an A&P, don’t fly cuz of me, lol.
 
It's definitely longer than 0.031 inches. Guess I'm grounded until my mechanic can get to me.
In most cases the location, depth and type of damage are the critical issues and not the length. Damage with sharp features is especially an issue.

Get the appropriate Hartzell owners manual and see what it says on working damage and by who. Some items can be taken care by a pilot however if you're not comfortable with this then wait.

Cant really determine from the pics at the moment or post any references. Maybe get a 10x glass and place a dime next to for comparison? Dime is about .050" in thickness or just under double your .031" limit.
We need new mechanic blood here
Que? No hablo ingles....;)
 
I’m not an expert, but that looks fine to me and I would continue to fly until your mechanic can have a look. I’d be more concerned about chunks being taken out (that doesn’t look deep), as long as the edges are smooth it’s fine.
1697381497075.png

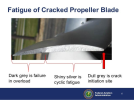
That broken blade started with a small nick on the leading edge.

This is a bit more extreme:

1697381569883.png

Look at the rest of that leading edge. The owner did not take propeller nicks seriously at all. Nor did his mechanic.

The depth of the nick has a bearing on how soon the blade will crack. This blade likely got that deep nick not long before. The fact remains that a nick interrupts the stress lines in that prop, and there are at least nine different force on the prop, and so the lines have to squeeze around the damage. They bunch up and the accumulated forces are too much and the prop cracks.

Read about this one:

1697381929519.png
https://saflyer.com/broken-propeller/

1697381969662.png

1697381990952.png

Dismissing the risk does not mitigate it. It's just wishful thinking. Some of you guys need to read the A&P textbooks.
 
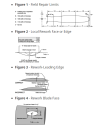
The Canadian Regulations have a diagram outlining field repair limits. Unfortunately, it's way too small and nearly unreadable, but here it is:

1697395586302.png
In Figure 1, the area near the blade root is limited to polishing out superficial scratches only. Section B is 1/64th of blade width or thickness. Area C is 1/32nd of blade width or thickness, and Area D is 1/16th of width or thickness, with the last 2% having no limit. You can see that a 1/16" deep repair near the root is forbidden.

These are field repair limits, Damage requiring any more metal removal than this has to be done at a certified prop shop.

The prop manufacturers' maintenance manuals have tables of minimum widths and thicknesses at various stations along the blade span. These are to prevent the prop becoming too narrow or thin, which can cause blade flutter and immediate failure. Canadian law requires a propeller corrosion inspection every five years, and a check of those dimensions.
 
You should see some of the stuff that comes out of the far north!
 
Back
Top