Sprung a fuel leak: P28R

ArrowFlyer86

En-Route
PoA Supporter
Joined
Jul 17, 2019
Messages
3,285
Location
Around
Display Name
Flight
Evening cruise cancelled.

Upon hangar entry I was greeted with a strong Avgas aroma. Upon opening the door, the cabin reeked of gas too. Uh oh. That's a new one. Had 2 flights last weekend 2.5h each, no issues. I was surprised as hell to see this...

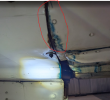
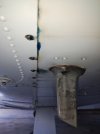
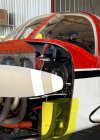
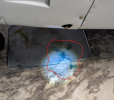
On LH side of airplane I see this delightful sight. Red highlighting around the avgas residue which should not be there. Thankfully some mixed with the oil residue in the drip tray which makes it easier to see.
1757207071816.png

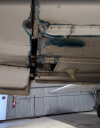
Get underneath LH side of plane... Ruh roh. No trace of any issue on the RH side.
1757206905198.png
1757207872797.png

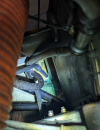
When searching for leak sources I try to find the highest point it exists at and the furthest forward. In this case the furthest forward point for the leak is just inside the lower cowl (LH side) [see pic below], the highest point it exists at is the lower cowl (LH side) on the outside -- just above where it's visible inside the cowl (highlighted in red in the above pic).
1757206839305.png


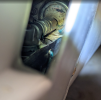
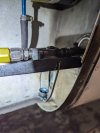
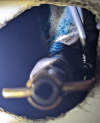
W/O removing lower cowl I took a peek inside the forward fuel drain valve/gascolator/boost pump compartment area, since it's right next to where the avgas is spotted inside the lower cowl and it looks like there's some in there
1757207198403.png
1757207462835.png
Had to come back home to grab some tools, but headed back to hangar to pop off the cowl again and poke around. Going to see if the mech is available on Monday to take a look.

Any pointers for likely culprits or places to look?

(for my aircraft)
1757209178578.png
 
Last edited:
If you have an electric door, consider yourself very lucky. The relays produce sparks that can ignite the flammable air fuel.

Fuel selector off, drain all the fuel you can from the lowest point possible, so no more leaks out on the floor. If possible, leave the door open a foot for ventilation, until the leak is fixed.

That said, What is that black tube that ends near the quick drain, and above the stain?
Thanks.

Nope, no electric door. Old fashioned manual latch door.

Yep, when I identified there was an issue I set fuel selector to OFF, drained the few drops of remaining fuel from the forward drain valve/gascalator. Left door cabin open for ventilation.

Will positively identify the tubes shortly once I'm back at the hangar with my manual.
 
Last edited:
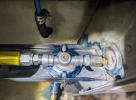
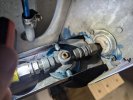
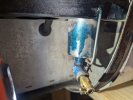
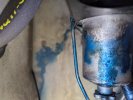
This is looking down on top of the gascolator in the engine compartment...
That looks leaky... Not sure why the wall leading into the cabin also has some blue stains. Concerning. And you can see faint blue underneath the gascalator too, by the drain valve at bottom of pic.

1757221459718.png
 
Last edited:
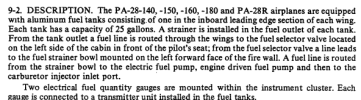
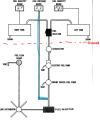
I've never seen the fuel lines during annual when the plane was apart, but from the manual here's the description:
1757223331436.png

If my fuel selector valve were leaking, that would explain why the cabin all the sudden reeks of gas. But it wouldn't explain how the gas leaked forward into the engine compartment and then onto the bottom of the plane, right?

If something firewall forward is the cause (which appears to be the case from where the blue avgas residue is seen), then it'd explain the avgas on the bottom of the plane. But it wouldn't fully explain why the cabin smells awful, unless the intense cabin gas smell is by mere proximity to the leak.

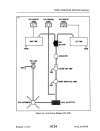
If I'm reading this diagram right (that's a big IF), then if there were a problem with the fuel pressure gauge line, which runs from the engine compartment into the cabin to the gauge -- then that could impact both the cabin and the engine compartment area. But that also seems unlikely based on where the gas is observed...
1757224544461.png

Sorry -- just thinking out loud here since I've never had to work on a fuel issue.
Anyone smarter or more well versed on this topic is welcome to opine :) . Plane is obviously grounded until my A&P fixes. Will update as I know more in case its helpful for anyone.
 
Last edited:
Ain't no expert, but fuel could run along the bottom of the fuel line and get through the firewall. Could be leaking on either side?
Personally, I would turn the fuel back on and see where it gets wet first. Some paper towel wrapped around the fuel line where it comes through the firewall will keep the fuel from migrating to the other side.
Is it possible that the fuel line has chaffed against the bulkhead fitting?
 
This is looking down on top of the gascolator in the engine compartment...
That looks leaky... Not sure why the wall leading into the cabin also has some blue stains. Concerning. And you can see faint blue underneath the gascalator too, by the drain valve at bottom of pic.

View attachment 144850
Bear in mind that there's a LOT of air moving in there, so leaked fluids can do weird things. That gascolator looks red handed to me. Is the bottom of it loose perhaps?

I crawled under my plane last week to see how piper mounted the pitot. I found this:

IMG_20250827_170950328.jpg

It never ends...
 
Bear in mind that there's a LOT of air moving in there, so leaked fluids can do weird things. That gascolator looks red handed to me. Is the bottom of it loose perhaps?

I crawled under my plane last week to see how piper mounted the pitot. I found this:

View attachment 144854

It never ends...
Ever had the tanks out and replace the hoses? The ones on my 180 were hard as a carp. Hopefully you don't need to bust out the proseal again.
 
I'd clean that gascolator off and put the selector on the fullest tank and see if it gets wet.
 
This is looking down on top of the gascolator in the engine compartment...
That looks leaky... Not sure why the wall leading into the cabin also has some blue stains. Concerning. And you can see faint blue underneath the gascalator too, by the drain valve at bottom of pic.

View attachment 144850

I would venture to say that gasket on the gascolator is old and worn out. Probably hasn't been changed in years. Those other fuel stains are from airflow and the leak migrating around.
 
Ever had the tanks out and replace the hoses? The ones on my 180 were hard as a carp. Hopefully you don't need to bust out the proseal again.
I had the inner tanks rebuilt 2 year ago. At that time we also removed the outers, did the spar corrosion SB, and replaced all the rubber (it was original). Hoping this is just a fuel sender gasket or something. We'll find out at annual. At least the screws are new so it should be easy to get off.
 
The original gascolators were of pot metal and prone to warpage.
If you put the bowl in place you may notice some “rock”. This leads to
a cycle of over tightening and more warpage in attempts to get a good seal.
The “ Steve’s” replacement is excellent if approved on your aircraft.
 
Magman has it right. Those gascolators have upper bodies cast of soft zinc, and they deform with repeated tightening (and overtightening) of the bail nut. They get so bad that a new gasket won't help, and if you try to straighten that bent body it will probably crack. Those gascolators were made for very old vehicles and tractors. The oldest ones had a glass bowl.

Steve's is the solution.
 
Pull the cowl so you can get a better look and trace the lines. Might be more than one source.
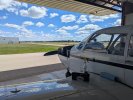
Doing that as I write this! Top cowl is easy to remove of course, but getting the bottom one off is a little more challenging...

Edit: thankfully I couldn't ask for better weather as I spend some time at the hangar!

PXL_20250907_173410771.jpg
 
Last edited:
Cargo strap works great to support the lower cowl while removing the screws. Run it over the engine mount and cinch it tight. Then with all screws removed, ease the lower cowl down. Do it on the gascolator side to get it past the sump drain.
 
Got lower cowl off. Thanks Hang4 for the recommendation, I used straps to lower it down in a controlled (if not totally graceful) manner. Put some empty cardboard boxes beneath it too, just because if it is going to drop that's better than slamming into concrete hangar floor.

The gascolator seems to be the guilty party. As Dan, Doc and Magman suggested, it appears to have a leak at the top. Once I cleaned it up and switched fuel valve back on, there was a creeping blue streak of fluid over the bracket and it was dripping onto the ground almost immediately.

Everywhere else in the engine compartment seemed to be OK.

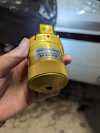
Here's some photos from it:
PXL_20250909_005031154.jpg

Side:
PXL_20250909_005035095.jpg

From a more rear angle
PXL_20250909_005039557.jpg

Going to get the new part tomorrow and see if my mech can come out to install at my hangar. And hopefully they'll stick around to help me get the lower cowl back on, because I don't think it's possible as a one man job!
 
Last edited:
Take the cowling off, there’s a box connected to the firewall, there’s the boost pump in there, my guess is the leak is coming from there. Something loose perhaps.

I remove and install the bottom cowling myself, I get under the airplane, put the nose wheel between my legs and I use my knees to support the cowling as I lower it to the ground. Remember to unplug the landing light wire first, and to install the landing light wire when reinstalling the cowling (ask me how I remember this now haha).

Take your time doing this, I’m not super picky but you could put towels down too. Also there’s basically two bolts at the bottom that will hold the cowling on. So you can remove all the other screws until you’re ready to loosen those two bolts and lower the cowling. The landing gear doors will touch the ground, just do it slowly and its fine. Also for the landing gear bolts, I disconnect from the door and put the bolts right back on so I don’t loose them. Better to put the screws back where they came from if you can.
 
Last edited:
Also those sump valves are a poor quality product I guess, and will randomly fail or get stuck. I had a small fuel leak, I guess some particles get stuck in there and will cause a leak. Also guessing that different air pressures or flying in rain or clouds can affect this too.

My hangar neighbor uses an air compressor to clear out the sump valve now and then, given the problem valve I think is connected to the boost pump, exercise caution to not damage your boost pump, usually my hangar neighbor did it to the main tank sump valve which seems harmless. I guess you can try this, or to replace the sump valves too. Check your fuel caps have tight rubber seals and use a bit of fuel each time to put on the gas cap to act as a bit of lubricant for the seals and not rip the rubber off, that’s my thought at least.

Gascolator like the other post said sounds right too, I’m going to have a closer look next time I take the cowling off, I’ll learn about a new part ;)

It's not a quality thing, it's just inherent to the design. Grit settles to the lowest point and gets trapped under the o-ring that seals the valve plunger.

When you service the gascolator at annual, you should take the bowl off to inspect and clean the screen. That is a good time to clean the sump valve. Turn it upside down, hold the valve open, back flush with solvent, then rinse the bowl and blow dry. Can do same on condition if you get a drippy valve. I would not blow out any valve while mounted on the fuel system, unless you know the system very well.
 
Last edited:
It's not a quality thing, it's just inherent to the design. Grit settles to the lowest point and gets trapped under the o-ring that seals the valve plunger.

When you service the gascolator at annual, you should take the bowl off to inspect and clean the screen. That is a good time to clean the sump valve. Turn it upside down, hold the valve open, back flush with solvent, then rinse the bowl and blow dry. Can do same on condition if you get a drippy valve. I would not blow out any valve while mounted on the fuel system, unless you know the system very well.
Is it easy to reinstall? Is this owner mx?
 
When you service the gascolator at annual, you should take the bowl off to inspect and clean the screen.
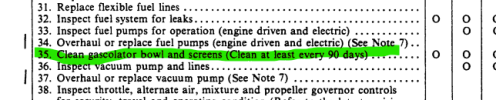
Actually, it turns out I'm supposed to do this every 90 days...
(Never knew that.. Not in the POH. But it's in my service manual)
1757440247137.png

Though I'm guessing I'm not permitted under preventative mx to remove and reinstall a new unit...
 
Though I'm guessing I'm not permitted under preventative mx to remove and reinstall a new unit...
If you check Part 43 Appx A(c) I think you will find you can perform that task under prevent mx.

Never knew that.. Not in the POH. But it's in my service manual
Outside a preflight which is not considered maintenance, most OEMs only list maintenance requirements in the maintenance manuals or in bulletins. But this is one of those tasks that you should have your mechanic show you how its properly done then just winging it as there are a few tricks to this in most cases.
 
But this is one of those tasks that you should have your mechanic show you how its properly done then just winging it as there are a few tricks to this in most cases.
Yeah, I messaged my shop to see if they can pop over to my hangar in the next couple days and help me put a new unit in.
Good to know it could be covered under that. But yeah, I am not comfortable doing the work myself and hoping I get it right. The downside of doing it wrong seems like it could be severe. And flammable.
 
If you check Part 43 Appx A(c) I think you will find you can perform that task under prevent mx.


Outside a preflight which is not considered maintenance, most OEMs only list maintenance requirements in the maintenance manuals or in bulletins. But this is one of those tasks that you should have your mechanic show you how its properly done then just winging it as there are a few tricks to this in most cases.
Curious -- is Part 43 a(c)-23 the one you would say it falls under?
1757443604168.png
 
Is it easy to reinstall? Is this owner mx?

Super easy and definitely owner PM. On the one pictured here, just shut off the fuel upstream of the gascolator, then loosen the thumbscrew at the bottom and flip the bail out of the way, and bowl comes right off. Reverse to reinstall.

My A&P buddy showed me a gascolator filter screen the other day that was 80% plugged with some kind of deposit. It had probably been decades since it was checked. :oops:
 
The downside of doing it wrong seems like it could be severe. And flammable.

Oh man, I mauled the crap out of my first attempt at installing a new gascolator. Overtightened it, then tried to back off and galled the threads. Cast aluminum on stainless fitting. It was stuck at an angle. What a mess. But ultimately easy to fix ... leveraged it off and bought another one.

But it's not as scary as it looks. Use the right thread lube, and don't overtighten the nipples and risk cracking the head. If you do it wrong, you'll see a leak as soon as you turn on the fuel. Like Bell says, get an A&P to show you how to deal with NPT fittings.
 
BTW this is what happens when you don't service your gascolator screen EVER. This is real, just pulled off a PA28 yesterday:

IMG_20250909_162237.jpg
 
Alright, so I'm probably just dumb... But I picked up the new part (SA3-00 per the STC list for my plane) and I'm wondering when we install it how is the drain valve going to work?

The old one has the drain valve mounted at an angle:
PXL_20250909_204643612.jpg

This one has the drain valve on the bottom, but that's also where they swing-latch thing screws to fasten it in place.

Am I missing something super obvious?
PXL_20250909_204649098.jpg
PXL_20250909_204655798.jpg
 
Alright, so I'm probably just dumb... But I picked up the new part (SA3-00 per the STC list for my plane) and I'm wondering when we install it how is the drain valve going to work?

The old one has the drain valve mounted at an angle:


This one has the drain valve on the bottom, but that's also where they swing-latch thing screws to fasten it in place.

Am I missing something super obvious?

It is not an identical drop-in replacement. Steve's does not use the bail (swing latch-thing). The bowl is fastened to the head with a threaded bayonet mount. It might use a different bracket too. Google your aircraft and Steve's and you will probably find some pictures.

If you are using the STC as install authority, you need to get the STC drawings. If there is a different bracket, Steve's may offer an STC kit for common aircraft types. Your A&P is going to need the STC documents to log it.

Dan or Bell have probably installed them; I am sure they can elaborate. But IMO you waded into non-owner territory when you changed parts.
Thanks!

And yeah, I'm not doing the actual installation or signing off on the work. Just making sure I have what's needed so when the A&P drops by were not hung up on a parts issue.

Seeing how it's going to work and get installed is more for personal edification. In the past I've been too content to get things done that I don't fully understand.

On that note... When I read the instructions the first time it didn't explicitly say to remove the bail - so I thought it would remain. Re-reading it seems like what happens is we expand the existing bail attachment holes to 3/16", and then we supply (2) 10-32 screws. Which I suppose I'll need to pickup since they were not included.

Near 100% odds your A&P has 10-32 screws handy.

Steve's website says it uses the existing Piper bracket, so good news there. If you had a Cessna, it looks like you would need a bracket adapter.

Your existing 45 degree NPT fitting and drain valve should screw right into the bottom of the new bowl. You'll have to play with the rotation of the fitting and the bowl to get it to line up on the hole in your cowling. You might consider ordering a new valve and fitting from Spruce while you are at it, so everything is shiny and new.
 
Last edited:
Back
Top