Painting Interior Plastics

WDD

Final Approach
PoA Supporter
Joined
Oct 16, 2019
Messages
8,855
Location
Atlanta / Marietta
Display Name
Vintage Snazzy (so my adult children say)
Home Airfield
KPUJ
I need to replace a couple of trim pieces around my two windshield air vents. Ordered the two pieces from Vantage, and I think I can get them trimmed by matching the drill holes, vent opening from old trim pieces, using them as a template. I say "I think I can" because I've not done this before. Any tips on this also appreciated. (Also installing new vents, the ones from Sporty's).

But - how does one go about painting these pieces? I assume the plastics need painting to match the other trim in the plane? Other pieces are Ivory/tan colored, so maybe trim pieces don't need to be painted? If painted, scuff, prime, color coat? Go to automotive paint store? I need maybe a few ounces of paint, so can I get a touch up small sample? Color matching?

Advice appreciated from those who are plane plastic wiser than me.

Thanks!
 
Other pieces are Ivory/tan colored, so maybe trim pieces don't need to be painted?
This. Painting plastic trim is more about aesthetics than a requirement. One trick is to replace trim equally on noth sides of the cabin to match even if one side is not broken. But yes there is paint for plastics if that is the route you want to take.
 
  • Like
Reactions: WDD
I painted my interior. The SEM recommended paint can be bought in rattle cans or quart. Buy it by the quart and use a spray gun; it's just too thin from the rattle cans and I had some color issue (I customized my color).
 
If you use SEM paints, use them exactly as instructed. They are applied quite a bit differently than other paints, because they have to fuse to the plastic so that they stay put. They actually have to melt into the surface a little. There are YouTube videos on using them.
 
An auto paint shop can color match SEM plastic paint to your existing interior. Bring in a sample piece and get it mixed to match. Works really well.
Also, expect to have to trim the pieces to fit. Suggest using one of the old pieces to get a feel for it. A Dremel works well, but can also quickly cut into places you don't want it to.
It's amazing how brittle the old plastic gets after 50 years.
Tried that 2 years ago, price will take your breath away. Think they quoted me $200 for a quart. Ended up buying from Eastwood and NPD in spray cans.
 
Honestly, cleaning with Dawn and water and painting with cheap Walmart spray paint works as good as anything.
 
I painted the rear plastic spoiler on my car with Krylon Fusion paint last spring for $7.00
Satin was just right. One can was more than enough even with 5 coats just to be sure.
It still looks like new after being in the sun/outdoors everyday since. If you can match the color close enough, I can't imagine it not being good enough for interior, but as always YMMV.
 
When I've painted those plastic parts, I start with a couple of light fogging coats, like 25% coverage, and let that dry. The third coat is a little heavier, and the fourth full coverage.

This gives a better adherence to the topcoat, and the finished product looks really good.
 
Tried that 2 years ago, price will take your breath away. Think they quoted me $200 for a quart. Ended up buying from Eastwood and NPD in spray cans.
My store did it in spray cans. It was about $30 if I remember correctly.
 
My store did it in spray cans. It was about $30 if I remember correctly.
Yes that's an option, but I could order the exact color in factory pack spray cans. Just thought it might be cheaper and a better product in quarts. Paint stores in my area are not about taking care of the public, they only want to supply body shops.
 
Hoping when the trim pieces arrive although unpainted they are already matching / close enough to the other trim. Would prefer to not paint if I can get away with that.

I’ll have enough to keep me busy trying to cut / trim to fit.
 
Looks like OP is a lucky guy. The solution is just around the corner. Just reach out to Vinyl Pro, 1935 Davis Lane, Marietta, GA 30067. (www.vinylpro.com). They have everything you need and they color match SEM products on site. Take your parts with you and let them select the proper adhesion promoter.

I personally would not try to color match the new parts with the old ones. Just give all parts a layer of fresh paint. Saturday afternoon project.
 
How did you pull up this tip? Thanks!
 

Hoping when the trim pieces arrive although unpainted they are already matching / close enough to the other trim. Would prefer to not paint if I can get away with that.

I’ll have enough to keep me busy trying to cut / trim to fit.
I didn't paint any of my interior replacement plastic. Like said the color was close enough in my case. I had planned to get it all fitted and installed, then remove it and paint it.
Never did paint it. Removed it a few times during annuals but never took the time to paint it.
It's been 6-7 years now, the bare plastic is holding up well so far.
The plane stays inside. If it was exposed to the elements then paint would be more important.
 
Last edited:
I have repainted several car and truck plastic door panels, etc. I used the Sem products. The plastic must be very clean and dry. Then I used a adhesive promoter first which is a clear coating to soften up the base plastic. Then the paint over that in the right time frame was how we did it then. Held up pretty good for years.
 
Last edited:
They have that 2X stuff at the hardware store that works on plastic but I swear it takes about a month to dry.
 
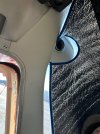
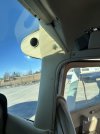
Update - after praying, trimming, wanting to get a hammer, trimming, walking away and coming back, trimming, questioning my life’s choices, I’m done. Color is too close to get any better with painting, so leaving it unpainted.

Need to reinstall right visor, and insert the new vents.
IMG_1272.jpegIMG_1271.jpeg
 
Update - after praying, trimming, wanting to get a hammer, trimming, walking away and coming back, trimming, questioning my life’s choices, I’m done. Color is too close to get any better with painting, so leaving it unpainted.Need to reinstall right visor, and insert the new vents.
You ought to consider hydro dipping.
 
  • Wow
Reactions: WDD
My project is changing the color of the panel and other plastics in my 75 Archer to a beige from an old green. I started by painting the new flap handle and fuel selector cover (new part from Plane Plastics) using color matched acrylic spray I got from Sherwin Auto Finishes shop in Irving, Tx. The paint goes on and dries beautifully but will chip when dropping the seat belts on it. I use adhesion promoter and clear satin overcoat, but they still chip. Before I go further with new panel plastics, I need to find the right product. I've read about SEM, but a friend was not impressed when he painted his Bonanza parts as they chipped too. I think the best would be 2 part urethane paint but I really want to stay away from that stuff because it's hard to spray, hell to clean up, doesn't cover well (needs min. 2 coats), slow to dry, can fisheye very easy and runs like water. And it's expensive, but it's tough as nails. Almost as tough as powder coating.
So what are my options?
 
Yes, SEM products are not cheap. To get a satisfying result you have to pick a suitable product line and follow their instructions religiously. This is especially true when it comes to the adhesion promotor. Different plastic material - different promotor.
No one-size-fits-all solution here.

There is a reason why SEM has been something like the gold standard in this industry for decades.

In post #14 I included a link to a vendor, who carries all different SEM product lines, including the SEM Aerospace line.

Paint is 95% prep work and product selection. The rest is proper application.

Based on your description of your previous experience and the properties of urethane paint, I am not sure, If you are really familiar with some basic prep and application techniques. Looks like you try to get the job done with one thick layer. Big mistake, especially with SEM. Several very thin layers, kind of mist, are the key to success.
 
Update - after praying, trimming, wanting to get a hammer, trimming, walking away and coming back, trimming, questioning my life’s choices, I’m done. Color is too close to get any better with painting, so leaving it unpainted.

Need to reinstall right visor, and insert the new vents.
View attachment 148970View attachment 148971
Looks good. I didn't paint mine either.
Did you have the light on the pillar?
82e82c85-4045-4714-be34-42f21ec1a0f5.jpg

I did remount my light, I still use it at night. There's a AD on it.
a8ddbfa8-7972-4fb5-9428-4953e53c849c.jpg

I put new decals on the new plastic.
Made my vents out of PVC.
f5b36ffe-0637-4df7-9815-0bb5f2ceab28.jpg
 
As for new holes…

One at a time. Seems using an old part as a template and drilling them all isn’t as reliable as it would seem.

Drill one, using old part as a template. Mark next hole, probably opposite with template AND fit the part to try and locate the next hole that way… screw in the drilled location, put a short screw in next hole, head cut off, maybe sharpened, with something to indicate its placement (dab of ink or paint).

Compare the mark and indication, proceed slowly and cautiously.
 
No pillar light. As far as using old as a template, that didn’t work at all for some reason. Just fit and trim a little, rinse and repeat. And the left needed different trimming than the right.

I ”splurged” and bought the Sporty’s swivel nozzle air vents. Fun fact. Although installation consists of sliding them into the vent outlets, they are considered a major modification with an STC. So I have to have the A&P slide the in, file the STC in the log book, and file a 337.
 
Although installation consists of sliding them into the vent outlets, they are considered a major modification with an STC. So I have to have the A&P slide the in, file the STC in the log book, and file a 337.
Why does your mechanic consider it a major alteration? Just because a part has an STC does not mean it is a major.
 
The instructions from Sporty’s lists it as a major modification, and directs filing a 337. Doesn’t make sense to me, but that’s was was in in the box. Plane is in annual this week, so easy enough for some extra paper work.

Did I mention it doesn’t make sense? Eh - if this is the worse “odd rule” thing this year, not a bad year.
 
The instructions from Sporty’s lists it as a major modification, and directs filing a 337.
The vendor does not dictate Part 43 maintenance. The installer does. Plenty of examples of STC installs as a minor alteration.
 
  • Like
Reactions: WDD
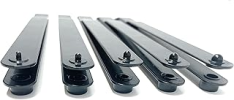
When drilling this stuff, you can't use the old part as a template. When you fit the old one over the new one, it is offset due to its thickness and other differences in profile. You need one of these strap duplicators:

1768934763936.png
A #40 works ok for sheet metal screw holes. It's the smallest one. Fit the new part in place in the airplane and locate the holes. You will need to drill the plastic a bit larger once the #40 hole is drilled in it. Don't oversize the hole in the aluminum structure. Take the plastic off to increase the hole size.

A video on using it:

 
The vendor does not dictate Part 43 maintenance. The installer does. Plenty of examples of STC installs as a minor alteration.
The STC holder is the one who created the instructions, not Sporty. Sporty's just shipped the box with the included STC and poorly photocopied instructions. I'm assuming part of the creation of the STC was getting it classified, and thus their instruction for the 337. I'm thinking the installer doesn't have the option to change something that is tagged as Major Alteration. Thoughts?
 
The STC holder is the one who created the instructions, not Sporty.
I wasn’t talking about Sportys. Part 21 vendors, which include any STC holders, do not control any Part 43 maintenance requirements. You’ll find quite a few Part 21 vendors will use an STC-AML process to approve their parts when they can be installed across multiple type certificates as it is cheaper and more streamlined than the PMA process.

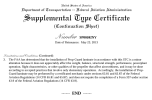
So just because a part comes with an STC does not automatically mean it meets the Part 43 definition of a major alteration. That’s for the Part 43 installer to determine. For example, here is a condition of one STC which states it is a minor alteration right on the certificate. But this is an exception and merely shows not all STCs are a major. Questions?

1768940299898.png
 
This is a good way to do it
When I've painted those plastic parts, I start with a couple of light fogging coats, like 25% coverage, and let that dry. The third coat is a little heavier, and the fourth full coverage.

This gives a better adherence to the topcoat, and the finished product looks really good.
 
Back
Top