Ok, explain the roll and tip method. This is intriguing.
A variation of the roll & tip method is what I used on my experimental. Here's a a copy of a post I put on another site describing the method used:
****************************
Had a few requests for information about the painting process for my Corvair powered Sonex air frame. Here is a brief description of the process and products.
This paint process is done with paint rollers. The reasons for choosing this process:
1) I didn’t have permission to use the hangar as a paint booth.
2) I did not have an adequate compressor to run a paint gun.
3) The cost was less than 1K complete.
4) It’s much easier to control the amount of paint applied.
5) Finish concerns (runs, drips, trash) can be dealt with easier.
6) I did it all myself, by myself.
7) Acceptable finish, good shine, quality paint, and I was not the first to use this method.
The Sonex is constructed of 6061-T6. The paint manufacturer assured me that this paint required no primer as it is designed to be used on aluminum boats. This would save weight and labor. The manufacturer also noted that no serious prep work was needed but I followed a fellow builder and did prep the surface. First the entire aircraft was washed several times using Dawn dish washing liquid. Dawn is excellent for removing oils and grease. This was followed by washing again with a product from Aircraft Spruce called “PREKOTE© SURFACE PRETREATMENT” and using a red Scotchbrite to scour and rough up the surface. Note that it is very important to remove all of the Prekote when rinsing and that none be allowed to dry on the surface (see Prekote instructions). Once cleaned and dried the use of a well cleaned and dry hangar is highly recommend. My aircraft was still fully assembled when painted. I used 3M blue painter’s tape to mask off areas not to be painted and used 3M Fineline tape for striping lines.
The paint is an Acrylic Urethane Enamel consisting of paint, catalyst, and flow fluid (thinner). For my application the recommended mix was 8-2-4 i.e. 8 parts paint, 2 parts catalyst, 4 parts thinner. I applied it in temps down to near freezing and the manufacturer claims application temps in the mid-teens.
Application of the initial coatings were to roll on a light coat on a small area and then using a dry roller you then would “stretch” the paint out to a larger area. It was amazing to me how far a little paint went. Manufacturer said to apply one coat per day for the three coat method. You can lightly sand between coatings (red scotchbrite or 1500) but take care with raised rivets or corners as the paint is still soft. Using the Scotchbrite tends to leave trash on the surface so be sure to clean it well before the next coat. The first coat will have uneven color coverage. The second one will be much better and by the third the color of the overall paint job should be very consistent and even. You will get some orange peel, dust nibs, and trash in the paint. I did notice that all of the surfaces that were either painted vertical or overhead (the bottom) have a much better flow out with higher shine and less dust to settle on it. If you are painting an un-assembled aircraft, paint the surfaces in the vertical position as much as possible. Using a tack rag before any coating is applied is a must. NEVER use flow fluid on the painted surface unless you want to remove the paint.
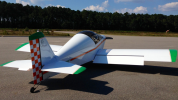
This process added 20 pounds to my aircraft. All of the colors and markings are paint with the exception of the N-number, “Experimental”, and the tail graphics. One lesson learned on striping … once the paint has become tacky remove the striping tape. If the paint is allowed to dry the tape can pull paint off with it as you remove it. In order to have the paint match the N-number a sample of the material from the graphics company was sent to the paint supplier. He did a great match! The checkerboard tail was done using a paint mask that you can order from any good graphics supplier. The jury is still out on how well the adhesion will hold up with this primer-less paint system. But it is used on high dollar yachts, I suppose it will hold on at LSA speeds. Costs in 2012 dollars was in the $800 range that included all the supplies & graphics.
*********************************
Photo shortly after the paint job was completed:
FWIW ...



 And I agree with you 100%. As well, in my opinion, the Patina is on par with fake bullet holes and shark mouths. To each their own, but ......


