Ordered Fabric

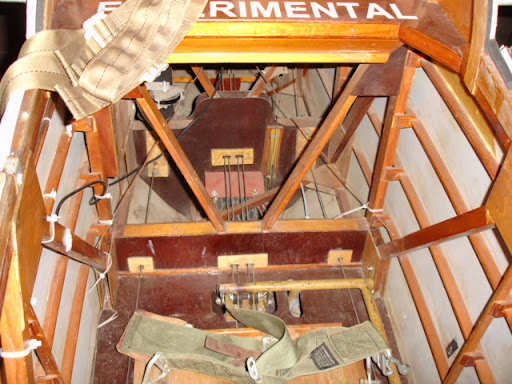
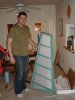
I finished the rest of the benches, but had a math problem while I was at Lowe's and didn't buy enough Lag Screws to attach all the casters. so they will be complete tomorrow. Leah and I also did a ton of sanding on the fuselage, probably 3/4 of the longerons are smooth now.


I hope you're wearing masks!
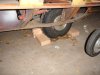
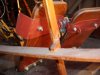
 
Those screws go in easier (and without such a draw on the drill or risk of splitting wood or stripping the heads on the screws) if you first drill a pilot hole with a 7/64 or 1/8 bit. The shaft of those long screws is wide enough to still bite very well into the wood.

Absolutely! Plus, if you use a combination twist drill with a countersink, you get a lot neater finished product.


Trapper John
 
Even by hand, masks are still good..... :yesnod:

FWIW...

I like these masks: http://www.jamestowndistributors.co...805&familyName=3M+9211+Particulate+Respirator

With the valve on the front, they don't fog up my glasses like the plain kind. Seem to seal well, not uncomfortable (as these things go). On the down side, the straps tend to be easy to break - be careful putting them on.

Most likely you could find them locally, buy I tend to mail order them by the box so I have them on hand.
 
I did quite a bit of work in the garage today. Finished putting the Casters on the benches and they turned out good. They didnt even wobble but its hard to tell if thats because the tables are square or the floor is crooked.

attachment.php


I also took some scrap 2x4's and made a chock for my main wheel:

attachment.php


Then I did some work on the glider. First I cut a piece of Balsa for the top of the vertical stabilizer. Then I removed the seat belts and seat bottom, static lines, pitot line, capacity flasks, and some other random hardware kind of stuff.

While doing that work I found some damage. I think I caused this when I removed the rudder. The rudder pedals have massive return springs and when i removed the rudder cable from the rudder the tension in the spring snapped the pedal forward where it hit the frame in front of it. broke it pretty good on the right side and took a chunk out on the left. it can be fixed though.

attachment.php
 

Attachments

  • DSC03637.JPG
    DSC03637.JPG
    149.4 KB · Views: 106
  • DSC03636.JPG
    DSC03636.JPG
    153.7 KB · Views: 106
  • DSC03638.JPG
    DSC03638.JPG
    153.4 KB · Views: 105
Tony,

Ouch!-- on the damage to that nice wood.

Is that a brake system I see over the main wheel? If it is, can you explain how it works and the effectiveness?

Nice project and it mostly looks like fun. I would like to lend a hand if you were closer. Thanks for sharing with us.:thumbsup:
 
yes the brake is just a piece of steel that drags on the tire. It works OK. between the slow touchdown speed, the nose skid, and the brake I can get stopped pretty short. If I brake really hard I get a nice cloud of rubber smoke in the cockpit :) Im going to try to put some sort of mudflap over the tire while I'm working on it this winter to keep dirt and stuff out of the rest of the glider.
 
a few days ago i mixed up some West Epoxy and got some clamps from a friend and glued the balsa to the vertical stabilizer. it has started to get cold and i dont have heat in the garage yet so ive been working on collecting what I need for covering the rudder in my apartment. I was hoping to start that last night but was short a few things and the store that had them was closed. So I went down to the garage and took the clamps off the balsa. It looks great. A little time with a utility knife and sandpaper and it is nice and smooth with rounded corners. No pictures though. Hopefully I can make headway on rudder covering saturday and sunday this weekend.
 
a few days ago i mixed up some West Epoxy and got some clamps from a friend and glued the balsa to the vertical stabilizer.

Don't tell every one you are making Illegal repair...

West System does not meet the requirements of 43,13, page 1-3, para 1.4 A-(2)

T-88 does.

best get your A&P to advise.
 
This is great stuff... looks like a fun project. Too bad about the crack, but sure, it will be OK. It's good, in a way, to make a little boo-boo like this early on... reminds you to slow down and be extra-careful. That will be critical when it's time to do the fabric. :D

Some advice: make absolutely sure that all materials and adhesives used are tried-and-true for that application (which usually means OK'd by the mfr. and the Feds)... and make sure the temperature and humidity are correct when you are doing any of this work. I don't know the whole story, but I heard that such things may have been a factor in my little scare with a C140 a while back... any extra trouble and expense is worth it, trust me. Stuff coming off your bird in flight is even worse than it sounds. :D


That Flintstones-style brake does make for an interesting problem if you hope to enclose the wheel... I guess anything you put there will be better than nothing, and it's worth doing- it is amazing how much stuff gets into the glider that way. Our 2-33 has a nice plastic wheel well, but between the small gaps around the edges and the cutout on one side for the hub-mounted brake mech, quite a lot of dirt, etc. went in there over the years, just from normal ops. And of course, where it settled near the tail, attracting and trapping moisture, is where the worst of the corrosion was on the frame.
 
the plywood and spruce that I ordered came in yesterday. my gallon of cleaner should be here today or tomorrow.

sean - im using Stewart Systems for the covering system with lightweight fabric. I'll probably put some heavier weight fabric down by the skid where it tends to get torn up in off field landings.
 
In a pinch you can use your own saliva to lubricate wood screws. Just be careful with the cadmium plated hardware :D

And don't go slurping a screw that you just backed out because it was too tight to go all the way in. They get hot. Leaves an interesting tattoo on your tongue...

Dan
 
This is great stuff... looks like a fun project. Too bad about the crack, but sure, it will be OK. It's good, in a way, to make a little boo-boo like this early on... reminds you to slow down and be extra-careful. That will be critical when it's time to do the fabric. :D

Measure once, cut twice.

No, wait, cut three times.

No - wait, still to short????

Some advice: make absolutely sure that all materials and adhesives used are tried-and-true for that application (which usually means OK'd by the mfr. and the Feds)... and make sure the temperature and humidity are correct when you are doing any of this work. I don't know the whole story, but I heard that such things may have been a factor in my little scare with a C140 a while back... any extra trouble and expense is worth it, trust me. Stuff coming off your bird in flight is even worse than it sounds. :D
That's definitely what happened to Steve Wittman and his wife :nonod:


That Flintstones-style brake
:rofl: :rofl: :rofl:
 
Don't tell every one you are making Illegal repair...

West System does not meet the requirements of 43,13, page 1-3, para 1.4 A-(2)

T-88 does.

best get your A&P to advise.

do you know of ANY epoxy that is marked with the appropriate TSO, Mil-spec, etc. that is required by that paragraph? If no does that mean that every glue joint in my glider is now illegal? I'm not sure what glue was used when it was built but we are pretty sure it is epoxy. Its definitely not resourcinal (sp) or a urea glue. How does 43.13 apply to my EXPERIMENTAL glider?
 
hey don't be dissin my rubber to smoke converter :)
 
sean - im using Stewart Systems for the covering system with lightweight fabric. I'll probably put some heavier weight fabric down by the skid where it tends to get torn up in off field landings.
I know... I guess my main point was: don't even be tempted to do the fabric (and any wood gluing) in temps that are not correct.
 
Measure once, cut twice.

No, wait, cut three times.

No - wait, still to short????

:rofl:
I have been carpenter-ing for a long time, used to do it for a living... and my variation on that has always been "measure twice, curse once." :D No matter how well a project goes, there will be some cussing before it's over. Measuring twice helps minimize that. You just can't make wood bigger than it was before you cut it... and sometimes it just don't fit even though you know you measured and cut it right... that's when it's time to put the tools away and go have a beer. :D


That's definitely what happened to Steve Wittman and his wife :nonod:

I think that separation was more specifically due improper prepping of a plywood surface prior to fabric being laid on top of it... he skipped a step or something like that. Whatever the case, it's very odd, considering he designed the damn thing and had worked on quite a few of them.
Not sure if he did it consciously or not, but regardless, he did it wrong, and that's all it takes. :nonod:

Much as I am loathe to bad-mouth a truly great designer, builder and airman (and a nice guy from what I've heard), it goes to show you: even the old-timers and experts don't always do what's best.
 
hey don't be dissin my rubber to smoke converter :)

I really didn't mean to diss it- after all, for the Flinstones, that would be pretty hi-tech... saves wear and tear on the feet. :D It is nice and simple... even the cable-actuated brake mech on the 2-33 is more complicated than it needs to be, IMHO. Kind of a PITA to re-assemble, even with the book for reference.
What I don't get is why there isn't a broader surface that makes contact- a wood "spoon" or something that will spread the force and friction over a wider area of the tire. I guess it was a weight thing... but do I see a cable attached to the bar, that lays on top of the tire? Wouldn't that be a good way to cut a tire in half? :D The more I look at that, the wierder it seems. I'd like to see more of that.

But whatever- except in emergencies, or after a long-ish landing when you want to minimize the re-staging time, I wouldn't use any glider brake except to make sure the rope is taut before launching. You usually don't need it to stop in time.
 
sean -

the picture i previously posted in this thread doesnt show the brake very well. The bar you are seeing is part of the airbrake control system. there is a spring inside that bar. The wheel brake operates off the same handle but from two horns off the handle, centered behind the seat. These attach to cables that pull on a piece of steel that fits over the tire. This view gives a little better picture of the how it works.

DSC00901.JPG


The red piece over the tire is the brake. You can't really see the cables as they run forward and under the plywood floor.

I use the brake occasionally if I have a tight landout or any other need to stop short. particularly if landing on a paved runway where coefficients of friction are low and i want to balance wear and tear betweent he steel nose skid and the rubber tire.
 
Tony,,,

My apology I did not realize it was an EXP glider..
 
sean -

the picture i previously posted in this thread doesnt show the brake very well. The bar you are seeing is part of the airbrake control system. there is a spring inside that bar. The wheel brake operates off the same handle but from two horns off the handle, centered behind the seat. These attach to cables that pull on a piece of steel that fits over the tire. This view gives a little better picture of the how it works.

The red piece over the tire is the brake. You can't really see the cables as they run forward and under the plywood floor.

Aha, now I get it. That looks like it would actually work quite well. But still, it would make it hard to enclose the wheel effectively.
I wonder... if you installed a brush-type weatherstrip around the hole where the wheel protrudes, to keep most of the dirt and grass out, would it still drain properly? Since this bird lives in a trailer maybe that wouldn't be a consideration. I think that would work- there's only a small gap between the tire and the frame.It'd probably make the glider a little quieter, too. But I don't think I'd do it on a glider that sits out in the rain.
 
thats an interesting idea and not one I had thought of.
 
do you know of ANY epoxy that is marked with the appropriate TSO, Mil-spec, etc. that is required by that paragraph? If no does that mean that every glue joint in my glider is now illegal? I'm not sure what glue was used when it was built but we are pretty sure it is epoxy. Its definitely not resourcinal (sp) or a urea glue. How does 43.13 apply to my EXPERIMENTAL glider?

I am about 90% sure that my batch of T88 had the appropriate markings on it.

But hell, glue is glue, IMHO. Its not like you're flying a pressurized glider at FL210 or something. :)
 
I started gluing fabric tonight. It went very well, and even looks halfway decent. Full write up on the blog. Will try to get the other side of the rudder done tomorrow then focus on repairs and modifications to the fuselage.

attachment.php
 

Attachments

  • DSC03666.JPG
    DSC03666.JPG
    150.3 KB · Views: 78
Looks good! I am surprised that you apparently glued the fabric to all "face" surfaces of the frame... but then again, I've only worked on a metal-frame glider, so what do I know? The 2-33 is a little more complicated, too... you don't glue to anything except the edges, but on the tail feathers, there are rivets (with reinforcing tape) holding the fabric to key parts of the internal frame. I guess the idea with the glue here is to provide the same sort of "anti-plucking" properties to the fabric surfaces.

I also don't know about the system you're using... what's next? Tape, sealer, UV, then color, or...?

It really is cool watching it shrink up... there were moments in the 2-33 project when I thought "oh crap those wrinkles will never come out" and then it just smoothed out. Definitely like magic. :smile:

Keep up the good work and have fun!
 
Sean I just glued to everything that had glue on it when I removed the old fabric. Figured I couldn't really go wrong there. The process is pretty simple from here. I won't need tape or rib stitching so I will just need to do a good cleaning job on the fabric with the EkoClean degreaser/cleaner then brush on the EkoFill which is the sealer/UV layer. After the EkoFill is paint. I will probably wait to paint until the fuselage is ready in a month or so (hopefully) and then paint it all at once, using a spray gun of some sort. Haven't gotten to planning that far ahead although I do have friends with good options here in town.
 
do you know of ANY epoxy that is marked with the appropriate TSO, Mil-spec, etc. that is required by that paragraph? If no does that mean that every glue joint in my glider is now illegal? I'm not sure what glue was used when it was built but we are pretty sure it is epoxy. Its definitely not resourcinal (sp) or a urea glue. How does 43.13 apply to my EXPERIMENTAL glider?

Sorry I missed this, but I have the mil spec that covers the T88. If you would like it.

West System never did the paper work to be a mil spec approved.

not that is is any different than T-88.

On your EXP any glue is OK if you trust it.
 
Last edited:
Sorry I missed this, but I have the mil spec that covers the T88. If you would like it.

West System never did the paper work to be a mil spec approved.

not that is is any different that T-88.

On your EXP any glue is OK if you trust it.

Yea, what it boils down to for me is that I have every reason to believe that West is at least just as good as T-88 and cheaper. One of the guys down here who knows a lot more about wood working than me swears by West and he worked in the test lab at Beech for many years and ran lab tests on many different epoxies over the years, so I figure he knows what he's talking about.
 
I will probably wait to paint until the fuselage is ready in a month or so (hopefully) and then paint it all at once, using a spray gun of some sort. Haven't gotten to planning that far ahead although I do have friends with good options here in town.

For the final top coat, Take all the parts to a good body shop that has a clean booth to spray in.

You will probably have to teach the body shop how to spray the Stwearts system water born paints or they wil try to put it on like any other paint.
 
For the final top coat, Take all the parts to a good body shop that has a clean booth to spray in.

You will probably have to teach the body shop how to spray the Stwearts system water born paints or they wil try to put it on like any other paint.

but if I make the finish too pretty I'll be afraid to get it dirty :D
 
Looks good Tony, I wish I lived closer to you so I could join in the fun. I guess I will be puting the Jantar in the shop for the winter to spruce up the wing tips. I need something to do now that the snow finally decided to fall.
 
but if I make the finish too pretty I'll be afraid to get it dirty :D
Yeah, that's the tragic irony of shiny new fabric... that first speck or smudge is annoying, and that first bird poop is heartbreaking... :D

FYI: we did all our spraying with a mid-priced HVLP gun, in a homemade booth made of plastic drop cloths, inside a T-hangar, with a simple portable filtration/ventilation system. And forced-air respirators. We were lucky in that we were able to borrow all this stuff, but except for the gun and respirators (and the air compressor, of course) you could make all of it and do the job wherever the glider will fit. Finding a spray booth would be ideal, of course, or maybe it wouldn't cost too much to rent whatever equipment you need.


Another thought: if you're going to wait a while after covering before spraying, if you haven't done the UV coat yet, beware the sun... keep those parts covered up as much as possible. It's not like the fabric is going to dissolve like a vampire, but I've been told that it's a bad idea to expose that raw fabric to much light. UV seems to be the #1 enemy of Dacron (except fire, of course, LOL).
 
Another thought: if you're going to wait a while after covering before spraying, if you haven't done the UV coat yet, beware the sun... keep those parts covered up as much as possible. It's not like the fabric is going to dissolve like a vampire, but I've been told that it's a bad idea to expose that raw fabric to much light. UV seems to be the #1 enemy of Dacron (except fire, of course, LOL).

I've never heard of that before, the factory and distributors keep it on rolls for years with no protection other than a paper cover for dust.

I have left overs from 20-30 years ago seems OK to me. But you do have to keep it clean.
 
after i get the fabric in place and shrunk, the UV/Filler coat goes on. then it waits for paint.
 
after i get the fabric in place and shrunk, the UV/Filler coat goes on. then it waits for paint.

A word of caution

when shrinking the fabric, insure that the perimeter is attached but the interior ribs are not. or you will warp the structure.

apply the glue, allow it to dry. press the fabric into the dry glue, and activate with heated iron. do not activate the cross ribs. wain to do them after the fabric is shrunk, then activate with the iron.
 
Back
Top