You are using an out of date browser. It may not display this or other websites correctly.
You should upgrade or use an alternative browser.
You should upgrade or use an alternative browser.
Ordered Fabric
- Thread starter tonycondon
- Start date
tonycondon
Gastons CRO (Chief Dinner Reservation Officer)
Very Pretty! I do like the look of old wood, will there be an translucent covering on your new ride?
it is pretty. im going to paint the fabric though. Dean Gradwell can not be out done with the clear finish job.
tonycondon
Gastons CRO (Chief Dinner Reservation Officer)
Tom,
this is the kind of finish we are talking about. Regular fabric but with a transparent finish. not truly clear but it lets a lot of sunlight through and looks gorgeous.

this is the kind of finish we are talking about. Regular fabric but with a transparent finish. not truly clear but it lets a lot of sunlight through and looks gorgeous.
Tom-D
Taxi to Parking
- Joined
- Feb 23, 2005
- Messages
- 34,740
- Display Name
Display name:
Tom-D
Tom,
this is the kind of finish we are talking about. Regular fabric but with a transparent finish. not truly clear but it lets a lot of sunlight through and looks gorgeous.
Sun light is UV light, UV light rots wood.
that is why the base coats of all the systems are UV light blockers. Poly fiber uses a silver reflector, as does dope, Airtech uses a UV blocker, Stewarts uses a UV blocker also.
Keep the wood in good condition with a coat of 5 Year clear it has a UV blocker also.
Take the time to strip all the old yellow varnish off and re-sael the wood.
Last edited:
tonycondon
Gastons CRO (Chief Dinner Reservation Officer)
Sun light is UV light, UV light rots wood.
that is why the base coats of all the systems are UV light blockers. Poly fiber uses a silver reflector, as does dope, Airtech uses a UV blocker, Stewarts uses a UV blocker also.
Keep the wood in good condition with a coat of 5 Year clear it has a UV blocker also.
Take the time to strip all the old yello varnish off and re-sael the wood.
I know how UV works. Deans glider (the one pictured) has a very nice finish on the wood. His glider also spends 99.9% of its life in the trailer in the dark.
I'm using UV Blocker per Stewart systems on my glider.
Tom-D
Taxi to Parking
- Joined
- Feb 23, 2005
- Messages
- 34,740
- Display Name
Display name:
Tom-D
I'm using UV Blocker per Stewart systems on my glider.
Goodonya, remember do not touch the new fabric with your bare hands, the oils in your fingerprints effect how well the new top coat will look. wear surgical gloves any tine you are working with any finishing material.
tonycondon
Gastons CRO (Chief Dinner Reservation Officer)
Isnt that the reason for using the EkoClean Heavy Duty Cleaner last thing before you start brushing and spraying the filler?
Took most of the fabric off the fuselage last night. Came off very easy. Most of the wood under the fabric is absolutely gorgeous. A few areas, down low mainly had a bunch of dirt packed in and will need some refinishing. I only found one area where I suspect water damage, that I didn't already know about.
A few pictures at http://cherokeesailplanes.blogspot.com. Ended up being a late night last night so I didnt have time to upload them all.
tonycondon
Gastons CRO (Chief Dinner Reservation Officer)
I cleaned up most of the rudder tonight. Removed the rest of the balsa that was on the top and cut out a new balsa piece to glue on and shape. I also sanded down the old glue on one side of the rudder.
My living room is covered in balsa chips and balsa/glue/fiberglass dust.
My living room is covered in balsa chips and balsa/glue/fiberglass dust.
Ted
The pilot formerly known as Twin Engine Ted
- Joined
- Oct 9, 2007
- Messages
- 29,906
- Display Name
Display name:
iFlyNothing
My living room is covered in balsa chips and balsa/glue/fiberglass dust.
Something tells me that the vacuum cleaner was used shortly after this post.
tonycondon
Gastons CRO (Chief Dinner Reservation Officer)
wrong. i posted that at ~ midnight
tonycondon
Gastons CRO (Chief Dinner Reservation Officer)
i finished sanding on the rudder. tomorrow night im going to a friends house to glue on the balsa cap. my chemicals didnt come today, hopefully tomorrow.
my living room floor still is covered in balsa chips and dust.
my living room floor still is covered in balsa chips and dust.

tonycondon
Gastons CRO (Chief Dinner Reservation Officer)
you want pictures of balsa chips and sawdust on my living room floor?
CJones
Final Approach
you want pictures of balsa chips and sawdust on my living room floor?
No. We want a pic of Leah with smoke coming out of her ears while looking at the balsa chips and sawdust on the living room floor.

tonycondon
Gastons CRO (Chief Dinner Reservation Officer)
leah has not even batted an eye at the balsa chips on the floor although she did threaten me when i suggested i could crack peanut shells into the carpet, since we were making a mess and all...
Clark1961
Touchdown! Greaser!
- Joined
- Jun 7, 2008
- Messages
- 17,737
- Display Name
Display name:
Display name:
leah has not even batted an eye at the balsa chips on the floor although she did threaten me when i suggested i could crack peanut shells into the carpet, since we were making a mess and all...
The longer you don't push it the longer your current state of grace might last...
tonycondon
Gastons CRO (Chief Dinner Reservation Officer)
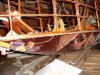
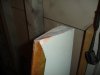
tonight i took the rest of the fabric off the fuselage. To do this I also removed the nose skid and the tailwheel. As far as I can tell the wood is in fine shape. I removed the balsa cap from the vertical stabilizer and got it pretty much completely sanded down. There is a layer of varnish that I need to sand through then I'll glue new balsa on like I did on the Rudder.
Speaking of I went out and picked up the rudder. I used a small hand plane, chisel, and sanding block that Harry had laying around to shape the piece of balsa to match the rudder. It looks very nice. Just need the supplies from Stewart to show up so that I can varnish it! I do need to put some filler in one spot on the balsa, had one side of the trailing edge chip out a little. No biggie.
Pictures:
Structure in the nose, and tow release cable routing

Vertical Stabilizer with Balsa cap removed:

Speaking of I went out and picked up the rudder. I used a small hand plane, chisel, and sanding block that Harry had laying around to shape the piece of balsa to match the rudder. It looks very nice. Just need the supplies from Stewart to show up so that I can varnish it! I do need to put some filler in one spot on the balsa, had one side of the trailing edge chip out a little. No biggie.
Pictures:
Structure in the nose, and tow release cable routing
Vertical Stabilizer with Balsa cap removed:
Attachments
wby0nder
Cleared for Takeoff
Man, I spent HOURS struggling to get mouse nests out of those spaces next to the "keel" with very limited access. That was back when we first rescued it from oblivion. Really sweet to see it all opened up and clean.
There is something magical about that simple elegant wood structure being capable of carrying a person through the sky for hours and hours on sun power and wits. Exquisite engineering.
There is something magical about that simple elegant wood structure being capable of carrying a person through the sky for hours and hours on sun power and wits. Exquisite engineering.
Tom-D
Taxi to Parking
- Joined
- Feb 23, 2005
- Messages
- 34,740
- Display Name
Display name:
Tom-D
tonight i took the rest of the fabric off the fuselage. To do this I also removed the nose skid and the tailwheel. As far as I can tell the wood is in fine shape.
You need to remove every speck of old glue and varnish, best done with Fonsby's Furniture re-finisher.
Yes it is a mess, and a lot of work.
But the new glue needs to be attached to good strong stuff, like new varnish.
and the best varnish on the market today is "5 year clear' by Smith and company.
tonycondon
Gastons CRO (Chief Dinner Reservation Officer)
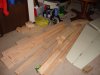
Stuff from Stewarts still hasnt showed up and Andrew Sego on the purple board posted a link to the EAA Chapter 1000 workbench today so I bought the lumber to build a set of them. Leah was rowing after work so I went to Lowe's and bought the lumber and a new blade for my circular saw. Leah hasn't said a thing about the pile of sawdust in our living room...


Attachments
Everskyward
Experimenter
- Joined
- Mar 19, 2005
- Messages
- 33,448
- Display Name
Display name:
Everskyward
Eating your gift bag of peanuts? Had a great time seeing you and Leah last Monday.leah has not even batted an eye at the balsa chips on the floor although she did threaten me when i suggested i could crack peanut shells into the carpet, since we were making a mess and all...
tonycondon
Gastons CRO (Chief Dinner Reservation Officer)
the gift peanuts are gone. it was a great supper. see you next time!
CJones
Final Approach
Stuff from Stewarts still hasnt showed up and Andrew Sego on the purple board posted a link to the EAA Chapter 1000 workbench today so I bought the lumber to build a set of them. Leah was rowing after work so I went to Lowe's and bought the lumber and a new blade for my circular saw. Leah hasn't said a thing about the pile of sawdust in our living room...
I've read several RV'ers doing the EAA Workbench thing, so it must be a useful design.
We always (and still do) use a hollow wood interior door and throw it over a couple of sawhorses. It works well with metal pieces b/c you can drill into the door and actually use clecoes to hold the piece to the work bench. It's very lightweight, doors are relatively cheap (maybe cheaper than a sheet of plywood), and they are straight. The only downside is that they aren't sturdy enough to hammer on very much.
If you keep this up, you're gonna need to rent another apartment for a 'workshop'.
tonycondon
Gastons CRO (Chief Dinner Reservation Officer)
ive got all of the 2x4's cut for the workbench. if i had been smart enough to buy a 4 ft square at lowes yesterday id have the plywood cut too. oh well.
i measured out my one car garage and i think that two benches will fit across the back and allow enough room for the rudder to go between them. or i can put them along the side.
i measured out my one car garage and i think that two benches will fit across the back and allow enough room for the rudder to go between them. or i can put them along the side.
BillTIZ
Final Approach
Leah hasn't said a thing about the pile of sawdust in our living room...
Not even married past the first christmas yet and you are putting her to the test... gotta love that!!
Rob Schaffer
Cleared for Takeoff
ive got all of the 2x4's cut for the workbench. if i had been smart enough to buy a 4 ft square at lowes yesterday id have the plywood cut too. oh well.
i measured out my one car garage and i think that two benches will fit across the back and allow enough room for the rudder to go between them. or i can put them along the side.
Measure from the end, check twice. Use a 2x4 that you have cut already (straightest one you can find) and screw to the plywood for use as a fence guide for the circular saw. I do this quite often when cutting large sheets, cause I have a continuous guide for the long reach.
TangoWhiskey
Touchdown! Greaser!
I've read several RV'ers doing the EAA Workbench thing, so it must be a useful design.
I don't still have my RV-7 kit, but I do have my benches!
http://www.whistman.com/blog/20051231.aspx (Part 1 of 3 on building them)
To Chris' point about using a door or something so you have something to drill into / cleco into, I put cut pieces of MDF free floating over the top of my tables. Easy and cheap to replace, super flat, and I don't mess up the top surface of my actual tables.
P.S.--Gosh, going back and looking at those pics, I can't believe how much my girls have grown in 4 years.
Capt. Geoffrey Thorpe
Touchdown! Greaser!
- Joined
- Jun 7, 2008
- Messages
- 15,639
- Location
- DXO124009
- Display Name
Display name:
Light and Sporty Guy
I don't still have my RV-7 kit, but I do have my benches!
http://www.whistman.com/blog/20051231.aspx (Part 1 of 3 on building them)
To Chris' point about using a door or something so you have something to drill into / cleco into, I put cut pieces of MDF free floating over the top of my tables. Easy and cheap to replace, super flat, and I don't mess up the top surface of my actual tables.
P.S.--Gosh, going back and looking at those pics, I can't believe how much my girls have grown in 4 years.
Wow. Plans to build a workbench?
FWIW, I prefer to let the top hang over about 1 1/2 inches from the frame so you can clamp things to the bench top. I also typically use particle board since it doesn't have as much built in warp as plywood. Adjusters on the legs can be nice if you are trying to build things that need flat and/or level...
Looking at the plans, I assume that you will be connecting a bunch of those tables into one large assembly to use as the landing deck on an aircraft carrier - otherwise I would argue that they are way overbuilt...
TangoWhiskey
Touchdown! Greaser!
Looking at the plans, I assume that you will be connecting a bunch of those tables into one large assembly to use as the landing deck on an aircraft carrier - otherwise I would argue that they are way overbuilt...
They're not overbuilt, they'll just last forever.
You're right about being able to move them around; they are only 2' deep, so you can either put them together short-end to short-end when you want a long level surface for working on spars and such, or long-end to long-end when you want a big square table area.
I put leveling devices on my table's legs, and clamp the tables together when I need them to behave as "one unit".
Reading over that blog had got me thinking about starting to build again....
Last edited:
tonycondon
Gastons CRO (Chief Dinner Reservation Officer)
well i got the tables 3/4 built. one table only needs the 1/2 in plywood shelf screwed down. the other one has 3 of the legs screwed on and needs the doublers and lower shelf structure. my cordless drill lasts a while but those 2 1/2 and 3 inch long screws turn hard and suck the juice. going to recharge overnight and make a final attack on them tomorrow.
tonycondon
Gastons CRO (Chief Dinner Reservation Officer)
jesse
Touchdown! Greaser!
I started a workbench today -- intended to fit both walls of an indoor room. It'll mostly be used for cleaning guns and building rc airplanes. 16 feet worth of workspace.


No real plan for this one. I just went and bough a bunch of wood and the counter tops and started drillign and screwing. It seems pretty strong.
The above is just a test fit -- paint is drying on it now -- and some little detail work to be done before final assembly in the room.
No real plan for this one. I just went and bough a bunch of wood and the counter tops and started drillign and screwing. It seems pretty strong.
The above is just a test fit -- paint is drying on it now -- and some little detail work to be done before final assembly in the room.
Capt. Geoffrey Thorpe
Touchdown! Greaser!
- Joined
- Jun 7, 2008
- Messages
- 15,639
- Location
- DXO124009
- Display Name
Display name:
Light and Sporty Guy
Having more junk than room in my not quite 2 car garage from the 1920's...
Everything is on wheels and I have gone to a set of "modular" work benches. The top is 48X26 which lets met get the top and 2 44X22 shelves out of 3/4 of a sheet of particle board. Add some 1x4 for framing and legs (Legs / shelves are glued / nailed - drywall screws hold the rest). Plenty sturdy.
Everything is on wheels and I have gone to a set of "modular" work benches. The top is 48X26 which lets met get the top and 2 44X22 shelves out of 3/4 of a sheet of particle board. Add some 1x4 for framing and legs (Legs / shelves are glued / nailed - drywall screws hold the rest). Plenty sturdy.
Attachments

TangoWhiskey
Touchdown! Greaser!
well i got the tables 3/4 built. one table only needs the 1/2 in plywood shelf screwed down. the other one has 3 of the legs screwed on and needs the doublers and lower shelf structure. my cordless drill lasts a while but those 2 1/2 and 3 inch long screws turn hard and suck the juice. going to recharge overnight and make a final attack on them tomorrow.
Those screws go in easier (and without such a draw on the drill or risk of splitting wood or stripping the heads on the screws) if you first drill a pilot hole with a 7/64 or 1/8 bit. The shaft of those long screws is wide enough to still bite very well into the wood.
- Joined
- May 18, 2007
- Messages
- 6,730
- Display Name
Display name:
jsstevens
well i got the tables 3/4 built. one table only needs the 1/2 in plywood shelf screwed down. the other one has 3 of the legs screwed on and needs the doublers and lower shelf structure. my cordless drill lasts a while but those 2 1/2 and 3 inch long screws turn hard and suck the juice. going to recharge overnight and make a final attack on them tomorrow.
My grandfather (who was a carpenter before power tools became common) used octagon soap to lube the screw before driving it. I learned that trick and used liquid dish soap. Then I had a brainstorm! I lube the screws with carpenter's wood glue. It makes them drive much easier and then dries strengthening the wood. You can still pull the screws if you want - the glue doesn't stick to the metal, but the wood around the hole is impregnated with the glue and stays strong.
John
tonycondon
Gastons CRO (Chief Dinner Reservation Officer)
I finished the rest of the benches, but had a math problem while I was at Lowe's and didn't buy enough Lag Screws to attach all the casters. so they will be complete tomorrow. Leah and I also did a ton of sanding on the fuselage, probably 3/4 of the longerons are smooth now.