Fun with safety wire

fiveoboy01

Pattern Altitude
Joined
Apr 21, 2013
Messages
2,321
Location
Madison, WI
Display Name

Display name:
Dirty B
Just trying to teach myself.

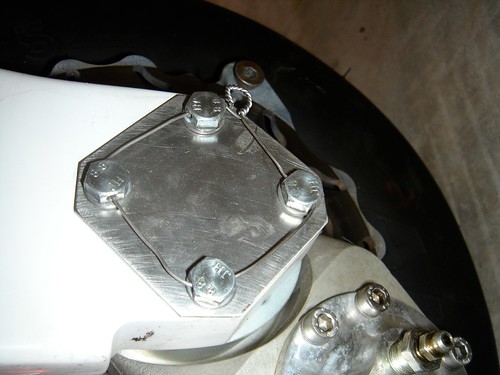
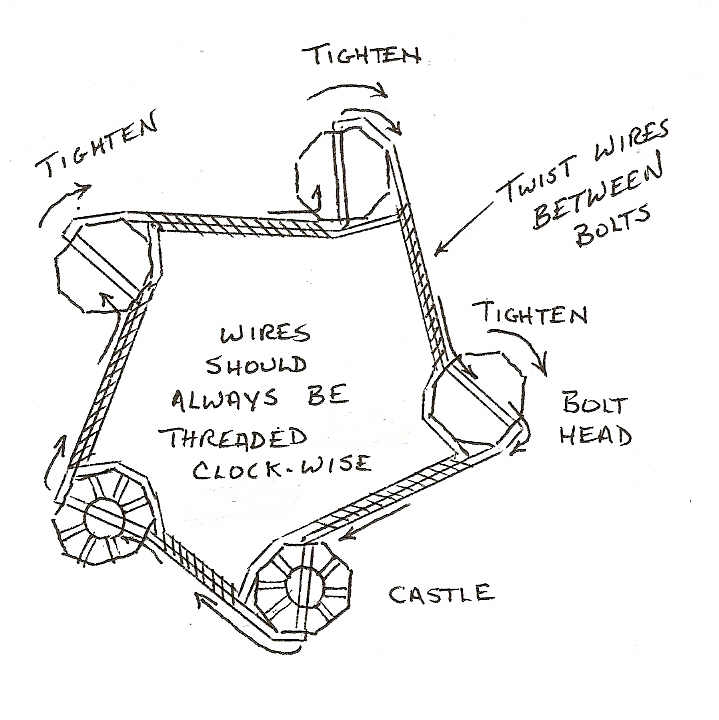
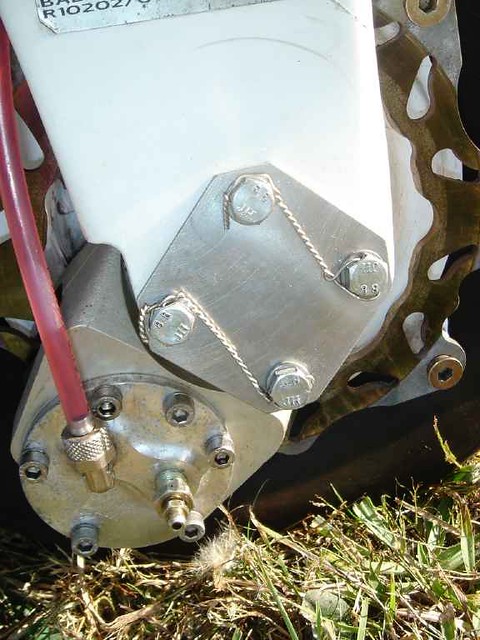
The loop sometimes wants to ride up over the bolt head and I wish I could get it a bit more snug but it seems to always make itself a tad bit of slack by the time I finish. 032 is easier to get tight, 041 is a bear.

I stabbed my fingers many times lol.
 

Attachments

  • image.jpeg
    image.jpeg
    1.5 MB · Views: 305
It gets easier with practice. On the second bolt head, pull it snug then make a left hand twist. That way the wire lies fatter.

So far, looks like you're doing OK.

Almost forgot: expect to donate a few pints. :D
 
Yeah I'm going to leave the prop to the AP. It's bolted up with the old bolts so I could set the belt tension for the alternator... I did some of the other ones myself and there were a few that I ended up doing 3-4 times before I was satisfied with them.

The spinner plate in the pic is concave so that also makes it a bit tougher as far as getting a good straight pull on the wire.
 
How far apart are the bolts? did you use pliars, or hands?

Looks nice and neat.
 
Those might be 3" apart, maybe slightly less.

First couple twists by hand and then pliers. Still learning myself the technique:)
 
A pair of pliers in each hand will give you more grip to start and get it tighter. Sure you have the right amount of twists per inch for that wire size? ;)
 
Nope. On these I'm not counting, because they'll get cut. I have been twisting so it "looks right", and I fully understand that's not the proper way to do it. I should get a steel rule out and measure the twists just to see how close or far off I am.
 
Looks pretty good, just a little loose. The more you do the better you should get. Master safety wiring by hand, first, that'll make a man out of ya!!!
 
A trick I'll attempt to explain verbally. Make the wire long then where it comes out the far side of the first bolt hold down with finger and snap pliers clamped to end of wire to cause it to form around the bolt head faces. Use inertia of the pliers to do this rather than trying to pull it tight by hand. When tightly formed around the back side of the bolt head it will not ride over the top. Prop bolts are ideal for practicing this because you're using forty thou and have lots of room to work in a comfortable position.
 
A trick I'll attempt to explain verbally. Make the wire long then where it comes out the far side of the first bolt hold down with finger and snap pliers clamped to end of wire to cause it to form around the bolt head faces. Use inertia of the pliers to do this rather than trying to pull it tight by hand. When tightly formed around the back side of the bolt head it will not ride over the top. Prop bolts are ideal for practicing this because you're using forty thou and have lots of room to work in a comfortable position.


Agreed.... But.... The dished spinner bulkhead does make the task a bit complicated...IMHO...
 
looks like you stole that directly from AC43.13; plagerizer! :rofl:
good job.
(Try not to scratch the structure so much! I know, those were there before you started.) The AC43 pics show a slack wire for demonstration purposes; mostly you will see these a lot tighter. Included is the twists per inch depiction too. (You need more, me thinks)
 

Attachments

  • AC43.13.jpg
    AC43.13.jpg
    84.7 KB · Views: 72
Q - Why does the wire go around the perimeter of the hex bolt head rather than across the face of the hex. It seems to me that if the bolt loosens, the wire would tighten quicker if it was across the face.
 
A trick I'll attempt to explain verbally. Make the wire long then where it comes out the far side of the first bolt hold down with finger and snap pliers clamped to end of wire to cause it to form around the bolt head faces. Use inertia of the pliers to do this rather than trying to pull it tight by hand. When tightly formed around the back side of the bolt head it will not ride over the top. Prop bolts are ideal for practicing this because you're using forty thou and have lots of room to work in a comfortable position.

Yep I do this and it does seem to work a lot better with 032 than the 041 for obvious reasons. The issue I have is that because the spinner plate is dished, I can't get a straight pull on the wire and it is very easy to bend it coming out of the bolt head so that when I go to route the twisted wire down to the lower bolt, the loop wants to ride up over the bolt head. I have held down the twisted part of the wire and used a finger to push the loop back down.

FYI that pic isn't right, it's sideways... not that it matters. Bolt with the pigtail should be on the bottom.

I like all the tips and comments. Much appreciated. Even if I won't use it a lot, learning a new skill is always fun for me:)

I'll keep on practicing. Might order some drilled bolts from spruce and bolt them to a steel plate for more practice:yes:
 
Q - Why does the wire go around the perimeter of the hex bolt head rather than across the face of the hex. It seems to me that if the bolt loosens, the wire would tighten quicker if it was across the face.

My GUESS is that if you route the wire across the top of the bolt, now you only have one wire holding the fastener from turning instead of two wires together, which doubles the holding ability.

I think I've seen it that way but I think the top of the bolt head was slotted.
 
Q - Why does the wire go around the perimeter of the hex bolt head rather than across the face of the hex...

If you've ever done any safety wiring you'll know that it is much easier to pull both ends of the wire tight for twisting if the back end loops around the perimeter of the bolt head. If it comes straight across it makes it awkward to twist unless you do it 90 degrees from where the second bolt is which then makes it tough to figure out the length and where to clamp your pliers. It would just make it more difficult with no benefit or reason.
 
Q - Why does the wire go around the perimeter of the hex bolt head rather than across the face of the hex. It seems to me that if the bolt loosens, the wire would tighten quicker if it was across the face.

Because that's how it's always been done.

AC 43.13-1B Figure 7-5 Does state:
NOTE: Wire may be wrapped over the unit rather than around it when wiring castellated nuts or on other items when there is a clearance problem.

So, does wrapping it around the perimeter of the bolt head really matter?​
 
Bolts attaching axle to gear legs:

6832919454_25fc5de461.jpg


Comments?
 
OK, show where I made such a comment? :dunno:

He asked for a comment. I simply stated that's not the way I would have done it. How he maintains his aircraft is his business.


Take your childish snipes elsewhere Richard. :rolleyes2:
nice.....:rofl:
 
The safety-wire example I gave was how I got my Sky Arrow back after a factory authorized upgrade of the gear via beveled axle spacers.

The FAA actually gives an example similar, but only for non-critical, non-load bearing applications. Things like inspection covers.

I thought it was totally inappropriate in this application and re-did it:

23954919910_00dd488a59_z.jpg


I try not to let the perfect be the enemy of the good. I do my best safety-wiring, but don't sweat minor imperfections.
 
PBA (Probably Be Alright), they would be a do over where I work.

The one bolt is a flub. Minor imperfections are more like the IA's work in the video posted earlier.

Question, did you document your work?
 
Last edited:
Safety wiring is an art that just takes time to get better at. After several years of doing it every week in the Navy, I can say that I'm almost adequate at producing something really bad.

If you've poked your fingers many times then you're well on your way. Once you quit feeling the pokes because of the scars, you'll be close.
 
The safety-wire example I gave was how I got my Sky Arrow back after a factory authorized upgrade of the gear via beveled axle spacers.

The FAA actually gives an example similar, but only for non-critical, non-load bearing applications. Things like inspection covers.

I thought it was totally inappropriate in this application and re-did it:

23954919910_00dd488a59_z.jpg


I try not to let the perfect be the enemy of the good. I do my best safety-wiring, but don't sweat minor imperfections.

I do. That second from the top bolt gives me the heebie geebies. It is neutral and was wired better when it was single strand. Just sayin. ;)
 
That's nice of you, Dave. For those that don't know, we worked together at ATA back in the 80's and 90's. American Trans Air was lovingly referred to as the Airline Training Academy due to the turnover rate. However, ATA managed to retain a core group of maintenance personal (which Dave was very much a part of) that keep the fleet in such condition that contributed to ATA's safety record, which was second to none.
 
Because that's how it's always been done.

AC 43.13-1B Figure 7-5 Does state:
NOTE: Wire may be wrapped over the unit rather than around it when wiring castellated nuts or on other items when there is a clearance problem.

So, does wrapping it around the perimeter of the bolt head really matter?​

Not really but like I said it's a lot easier doing it that way. Now, as far as "that's the way it's always been done" - note this image from the Model T forum:

48629.jpg
 
Hmmm.....the endless safety wire continuum.....or conundrum. :D
Not really but like I said it's a lot easier doing it that way. Now, as far as "that's the way it's always been done" - note this image from the Model T forum:

48629.jpg
 
Back
Top