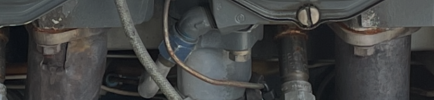
Cylinder Exhaust Ports Leaking

Chrisgoesflying

Pattern Altitude
PoA Supporter
Joined
Dec 7, 2018
Messages
1,902
Location
The Lone Star State
Display Name
Chrisgoesflying
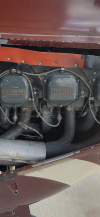
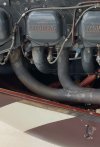
Two of my cylinders on the O-540 strapped to my Comanche appear to leak exhaust gas out of the exhaust ports. My IA during the last annual flagged this to me to monitor it since the two cylinders had some moderate erosion in the exhaust ports. I can tell it's leaking as there is white deposits on the pipe next to it. Not a lot, but noticeable. All cylinders have good compressions in the 70s. During annual (in August) the IA put new gaskets and some high temperature silicone. The silicone is pretty much gone by now. The photo show the amount/extend of white deposits. My questions are:

1. Can this be fixed without removing the cylinders e.g. reface the exhaust ports with the cylinders installed?
2. If not and the cylinders have to come off, would I overhaul them or just reface the exhaust ports? Or do I just install new cylinders at that point?
3. If this is a bigger job that requires taking off the two cylinders, do y'all think it's okay to keep flying as is until the next annual this summer (probably around 40-50 hours)? If not, is there a temporary fix (someone suggested dropping the cylinders and applying Neal Seal) that would get me through to this summer's annual?

My IA said to keep monitoring the situation for now. I just don't know what exactly I'm monitoring for e.g. at what point do I say "this is too much white deposits!"? I don't notice any reduction in power just as an FYI.
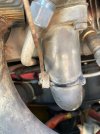
IMG_3002.JPG

Resized_20250805_153929.JPEG

IMG_3161.PNG

IMG_3162.PNG

IMG_3163.jpg
 
Last edited:
Two of my cylinders on the O-540 strapped to my Comanche appear to leak exhaust gas out of the exhaust ports. My IA during the last annual flagged this to me to monitor it since the two cylinders had some moderate erosion in the exhaust ports. I can tell it's leaking as there is white deposits on the piper next to it. Not a lot, but noticeable. All cylinders have good compressions in the 70s. During annual (in August) the IA put new gaskets and some high temperature silicone. The silicone is pretty much gone by now. The photo show the amount/extend of white deposits. My questions are:

1. Can this be fixed without removing the cylinders e.g. reface the exhaust ports with the cylinders installed?
2. If not and the cylinders have to come off, would I overhaul them or just reface the exhaust ports? Or do I just install new cylinders at that point?
3. If this is a bigger job that requires taking off the two cylinders, do y'all think it's okay to keep flying as is until the next annual this summer (probably around 40-50 hours)? If not, is there a temporary fix (someone suggested dropping the cylinders and applying Neal Seal) that would get me through to this summer's annual?

My IA said to keep monitoring the situation for now. I just don't know what exactly I'm monitoring for e.g. at what point do I say "this is too much white deposits!"? I don't notice any reduction in power just as an FYI.
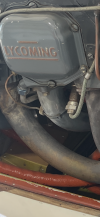
View attachment 149205

View attachment 149206

View attachment 149207

View attachment 149208

View attachment 149209
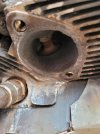
The leakage is cooking that sparkplug. Continued leakage means continued erosion until the cylinder cannot be saved. It needs to come off and have the port face milled.

Someone might have re-used the gaskets when that riser was off. False economy there.
 
I have used a tool that can reface that in situ. Worth a shot, ask your mechanic if he has one or access to one.
 
My belief is the old copper- asbestos gaskets can conform and seal a

little better. Note they do blow out easier so monitoring is needed.

Leak check with clean leaf blower or vacuum cleaner. There are limits so

putting off repairs can cost more long term.
 
I agree with Tools, that surface is rough enough that it must be machined to get a reliable seal.

Continued flight will permanently ruin the cylinder. Pay now, or pay later, but the size of the bill does change.
 
Is that a weld that has been redone in pic?

Often welders can do a good job on welding but lack tooling to verify

alignment. Aircraft such as Cherokee 140’s have slip joints that become

non-functional and leads to exhaust port leakage. I think if you pull

cylinders it would be prudent to have an Exhaust Specialist true up the

pipes. Should be cheaper than cylinder repairs.


Another factor can be installation. Drawing all nuts down evenly before

final torque may help. Tightening one while others are still loose is

not a good idea.
 
That pic shows what appears to be a thread insert that isn’t fully seated… could be part of the problem.

If you’re dressing two, do the third to keep things as coplaner as possible.

That video and the tool to which I’m referring is not machining them, but might work. It’s really dressing them. Wont take much work to determine if it’ll dress out, so start with the worst one.

Monitoring an exhaust leak ain’t a great idea, these things are aluminum. A tiny leak on a hobby car, iron block, iron head… meh. The cost of a whole motor is what a single cylinder is here. Not getting super judgy about the safety of the whole deal, but there’s a fair amount of expense that might be avoided. If it was caused by that thread insert, would be tragic, look at the old gasket for witness marks.

That thread insert is a lot harder than the rest, nibble it off with a dremel and a cutoff wheel. Then surface.
 
That lower helicoil doesn't appear to be installed all the way. Exhaust gasket will never be able to seal.... Unless that helicoil is backing out.
 
Just wanted to clarify if this isn't clear. My IA doesn’t recommend to monitor until next annual. He recommends to monitor and get it fixed if it gets worse. I just don’t know what i’m looking at and when it’s bad enough to pull the plug. @Bell206 sent me some pointers on what to look out for, which I appreciate! My IA lives 2 hours away flying (5 driving) so it would be impractical to work on anything major before annual. Having said that, if this issue is a safety concern, I will have to figure something out. I don’t know if it is a safety of flight concern at this point. My cabin CO monitor shows 0 CO in cabin even with the heat on. My local A&P, who I trusted blindly, moved away so I don’t have anyone I trust locally right now. Long story short, I am trying to figure out if this is a “fix now before any more flights” issue or a “monitor carefully” issue and what exactly i’m monitoring for. If it’s a fix now issue, what can be done without removing the cylinders affected? If I end up waiting until annual, I’ll probably get two new or overhauled cylinders anyways. I trust my IA in San Antonio to change them and do major work. I don’t trust anyone locally for things like that at the moment unfortunately.

Questions:

1. Is this a safety of flight concern at this point e.g. can this reduce engine power or even fail the engine or is it fine to fly for another 40ish hours? So far, I noticed no reduction in power.
2. If this is a safety of flight concern, what can be done to nurse it through to this summer's annual without removing the cylinders?
3. Does anyone of you know anyone in the DFW area who is trustworthy and can help with this?
 
Can't answer the safety question, but the implications of waiting are replacing a cylinder vs refacing the affected area soon. Hot exhaust gases erode the metal over time. If it's leaking it's eroding. I had that happen to me, my A&P (at the time) tried to double gasket and a few other bandaids that didn't work. I ended up replacing the cylinder.
 
If it were me... I'd pull that helicoil and index a new one to the proper depth. Clean up the face as best I could and see if reinstalling with a new gasket stops the leakage maybe the face needs rework. But maybe you get lucky and installing that helicoil correctly is all it takes. I would also recommend an oversize stud just in case the aluminum threads are a bit chowdered up and that's why the helicoil was able to pull out.

I've wondered if a keensert would have been a better use rather than a helicoil. But there's not a ton of meat on the cylinder to get a keensert in there.

The longer you wait and the more you fly just is just going to make it cost more.
 
Putting things off till Annual seems rarely a good move. In 2026 shops offer limited choices and things can really go downhill waiting for back ordered parts. I would suggest addressing the repair AND the Annual now. Better to give up a few months than endanger you and your pax.

My intent in #7 was not to “ monitor a leak” but rather monitor to see
if there is a leak. When the port or gasket deteriorates the squeeze at the connection may be lost. This results in the nuts loosening or even falling off. I have found exhaust manifolds just laying in the bottom of the cowl.
 
  • Like
Reactions: WDD
By the way, a leak puts co inside your cowling, which is from where you draw air for cabin heat…
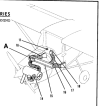
Not quite. The air source is normally taken from the high-pressure side of the cooling system, which discourages CO from getting into the cabin heat air. High pressure above the engine, while leaking exhaust is below. Typical 172 system:

1769284194951.png

The air comes off the front baffle, taking high-pressure air to the muffler shroud (14), where the muffler heats it. Then it goes to control valve (A) and is distributed via hoses to the floor and defroster ducts.

That control valve not only shuts off the flow, but it dumps the heated air into the lower cowl so that cooling air is constantly flowing over the muffler. Some Pipers did not have this feature and they had exhaust manifold burnouts.

The big threat is CO from a leaking muffler or pipe, where ever the heat is taken from. That takes CO directly into the cabin. In Canada, where we use the heater a lot, we have an AD that forces thorough inspection of that muffler or pipe every 12 months or 150 hours, whichever comes first. Here it is:

CF-90-03R2 EXHAUST TYPE CABIN AND COCKPIT HEATERS​

Applies to exhaust type heat exchangers (muff heaters) used as a source of cabin and cockpit heat.

Compliance is required:

  1. Before next flight, unless previously accomplished in accordance with Airworthiness Directive CF-90-03R1; and
  2. Subsequently, at intervals not to exceed one year or 150 flight hours, whichever occurs first.
NOTE: A non-cumulative 10-flight-hour tolerance is authorized for the repetitive 150-flight-hour inspection requirement.

Incidents involving exhaust gases entering the heating system continue to occur and in some instances result in fatal accidents due to carbon monoxide poisoning of the aircraft occupants.

To detect the deterioration of exhaust type heat exchangers, accomplish Part I or Part II as applicable:

Part I: For heat exchangers wherein the fresh air supply encloses the engine exhaust pipe.​

  1. Remove the heater jacket (when removable) and inspect the outer surface of the inner core (exhaust pipe) for signs of combustion products.
  2. Thoroughly clean the exhaust pipe of all dirt and corrosion.
  3. Carefully inspect the exhaust pipe, using a hand-held magnifying glass and light/mirror, for signs of cracks and pinholes. Pay particular attention to welds, seams, and their adjacent areas.
  4. Any suspect areas are to be further evaluated by a pressure test or other means recommended by the aircraft manufacturer.
  5. Repair or replace, before further flight, exhaust type heat exchangers containing cracks or holes in the exhaust pipe.

Part II: For heat exchangers wherein the fresh air intensifier tube is enclosed by the engine exhaust pipe.​

  1. Remove the intensifier tube (if removable) from the exhaust pipe.
  2. Ensure that there are no obstructions in the intensifier tube which may restrict the flow of air through the exchanger, and clean thoroughly the exterior of the tube.
  3. Perform a close visual inspection of the intensifier tube for signs of cracks and pinholes.
  4. Any suspect areas are to be further evaluated by a pressure test.
  5. Repair or replace, before further flight, intensifier tubes containing cracks or holes.
Alternative means of compliance with the requirements of this directive may be used only if approved by the Director, Airworthiness Branch, Transport Canada, Ottawa. Any application should be made to the appropriate regional office.

When I did it, I removed the shroud and went straight to the pressure test. Put a tiny bit of pressure into the exhaust, and use soapy water on the muffler and risers and everything. This will reveal tiny leaks that can't be seen. It's also hard to use the magnifier in really tight places.

Too much pressure blows the soap away and you don't get bubbles. They used to recommend using a vacuum cleaner with the hose attached to the vacuum's outlet, but you risk blowing dirt and dust into a cylinder. I had an old vacuum thoroughly cleaned out and used exclusively for that. Eventually I used a low-pressure air regulator and put maybe 2 or 3 PSI in the system. CO leaks were not uncommon.
 
Are Helicoil inserts factory-original for this engine in this area, or were they installed as a post-production repair for stripped threads? I don't see them listed in the 0-360 parts catalog? For the OP, there is an A&P/IA in West Tennessee who produced a video demonstrating this in-situ resurfacing process.
 
Are Helicoil inserts factory-original for this engine in this area, or were they installed as a post-production repair for stripped threads?
I believe both. The Helicoil repair is the recommended repair for both Lycoming and TCM. But I seem to recall Lycoming started using Helicoils in certain locations at the factory to facilitate future repairs.
 
This happened on the Archer a couple of years ago. Why is your mechanic recommending to keep watching it? It needs to be fixed now.

There’s a honing tool that will allow him to resurface that exhaust to allow the gasket to properly fit. If you let it go too long, it’ll wear beyond repair and you’ll eventually need a new cylinder.
 
On these two risers it appears that someone has used bolts instead of the special studs and nuts. That results in thread damage when the bolts are removed, since the heat and carbon can seize those bolts in the aluminum threads, making helicoiling necessary. Lycoming uses a special stud that has an oversize thread on the head end so it stays put when the nut is removed. The nuts themselves are silver-plated to prevent seizure on the stud. The intake risers use bolts and it's ok because they don't get anywhere near as hot.

1769305118657.png
 
I believe both. The Helicoil repair is the recommended repair for both Lycoming and TCM. But I seem to recall Lycoming started using Helicoils in certain locations at the factory to facilitate future repairs.
Lycoming sl162b
 

Attachments

M2C - Pull the cylinders and do the proper fix today. It's not going to stabilize, it's going to get worse. It sure isn't going to get better.

How old are they BTW? I'd be tempted to just do a rebuild - resurface the ports, re hone the cylinders, new pistons and rings, new valve guides, lap valve seats, etc. If you don't have a machine shop you trust, get new cylinders. Hopefully someone on the POA in the Dallas area can recommend one.

Planes need maintenance and repair, and they break down when you don't do that. Cost of making things right get's higher the more you put it off. You don't want to keep flying wondering when something is going to let go enough to dump CO into the cabin, burn spark plug / other wiring, etc.
 
Last edited:
I concur with everyone saying do it NOW.
Have the Heli-Coil dealt with, and resurface in situ.
You may want to grind down another 1/8 of the cylinder fins around the port. The flange may be impinging. Look at the second photo between the port and spark plug.
 
  • Like
Reactions: WDD
You should get a CO monitor that alarms. Best $125 investment. The single Comanche can leak into the cabin through the steering rod boots and leaky firewall pass-throughs. The muffler shroud can leak.

My O-540 had a crack in the exhaust port that let exhaust into the cowl, making me have to opeb the side vents to bring in fresh air pressure. Get a repaired cyl and swap it.
 
You should get a CO monitor that alarms. Best $125 investment. The single Comanche can leak into the cabin through the steering rod boots and leaky firewall pass-throughs. The muffler shroud can leak.
Other airplanes have those steering boots, too. All the Cessna singles, for instance. Crawl under any older 150 or 172 and you might see those boots all torn and frayed and ratty. 182s and up use a silicone bellows that lasts much longer, but can still wear out.

A leaking shroud won't leak CO. It's a leaking muffler or pipe that does that.
 
Make sure when you do the cylinders to get the face of the exhaust stack (that meets with the cylinder) flat. Over the years of erosion and over torquing will make the ears bend and it won't sit flush. A simple fix is to build a support for a wide belt sander and sand the face flat. If it's too far gone, you'll need to send it in for repair. I've seen it a lot where people have leaking and it's actually the flange on the riser, not the cylinder.
 
Those gaskets also don't look very new. Did he replace them or were the photos taken before? always replace gaskets, even if its just been run for a flight. Cheap insurance.
 
I did several on a Bonanza O470 myself by making my own abrasive disk and a clamp for the angle die grinder. Using 220grit and very light pressure got them nice and flush. Finished with 400grit. I also did the exhaust flange the same way. For thd Conti, there is a newer style composite sandwich gasket for the 470. I think Lyc usds flat metal with a crush ring? If so, i would make my own composite sandwich material custom cut. Cyl removal would have been ideal but i have a lathe to make the die grinder support gripper to maintain flatness.
 
Curious if in the long run it would make more sense to just replace the cylinders in question? How much time is involved in repairing the surface?
 
Curious if in the long run it would make more sense to just replace the cylinders in question? How much time is involved in repairing the surface?
I will respectfully disagree with this. Mike Busch and others in this industry, as well as outside the aviation world have come to realize the issue of introduced faults in a system. We're currently here dealing with a minor leak in one flange. Replacing the jug introduces another set of potential issues having nothing to do with this current repair. By replacing the assembly, that assembly must now pass through the area of infant mortality in many other parts, not related to the scruffy looking flange.

I've seen jugs come off a plane at Sals cyl that he and I consider capable of going right back on the case with zero machining needed. We also introduce the actual repair involvement that could result(rarely) in a spun bearing, crankcase leak, through bolt/nut failure, etc. If the flange can't be properly repaired, then remove that jug, and either repair the jug by welding and machining back the port, or in the last resolution replace it, and only then deal with the potential alternate failure modes.
 
Back
Top