Design your dream home workshop to build a kit

Brad W

Pattern Altitude
Joined
Nov 19, 2019
Messages
2,081
Location
NE Florida
Display Name

Display name:
BLW2
this is just sort of pipe dream / day dream stuff
Just interested to see thoughts.. not just previous builders, but especially from those of you that have built experimental before

What would you like to have in a shop (realistic level stuff, not lottery winners)
and my thought is not on an airpark neighborhood with a hangar attached
but a regular house...perhaps in a developed neighborhood...perhaps a standard attached garage or a purpose built out structure
so it would force it to be either a trailer-able design (those don't interest me as much) or take it to an airport somewhere once the major sub-assemblies are done.

and I'm thinking kit type, probably metal or maybe composite.... but I'm daydreaming about something like a Van's RV-9 or RV-14, for example
not wood or fabric (because it might end up living outside if I can't get a hangar)

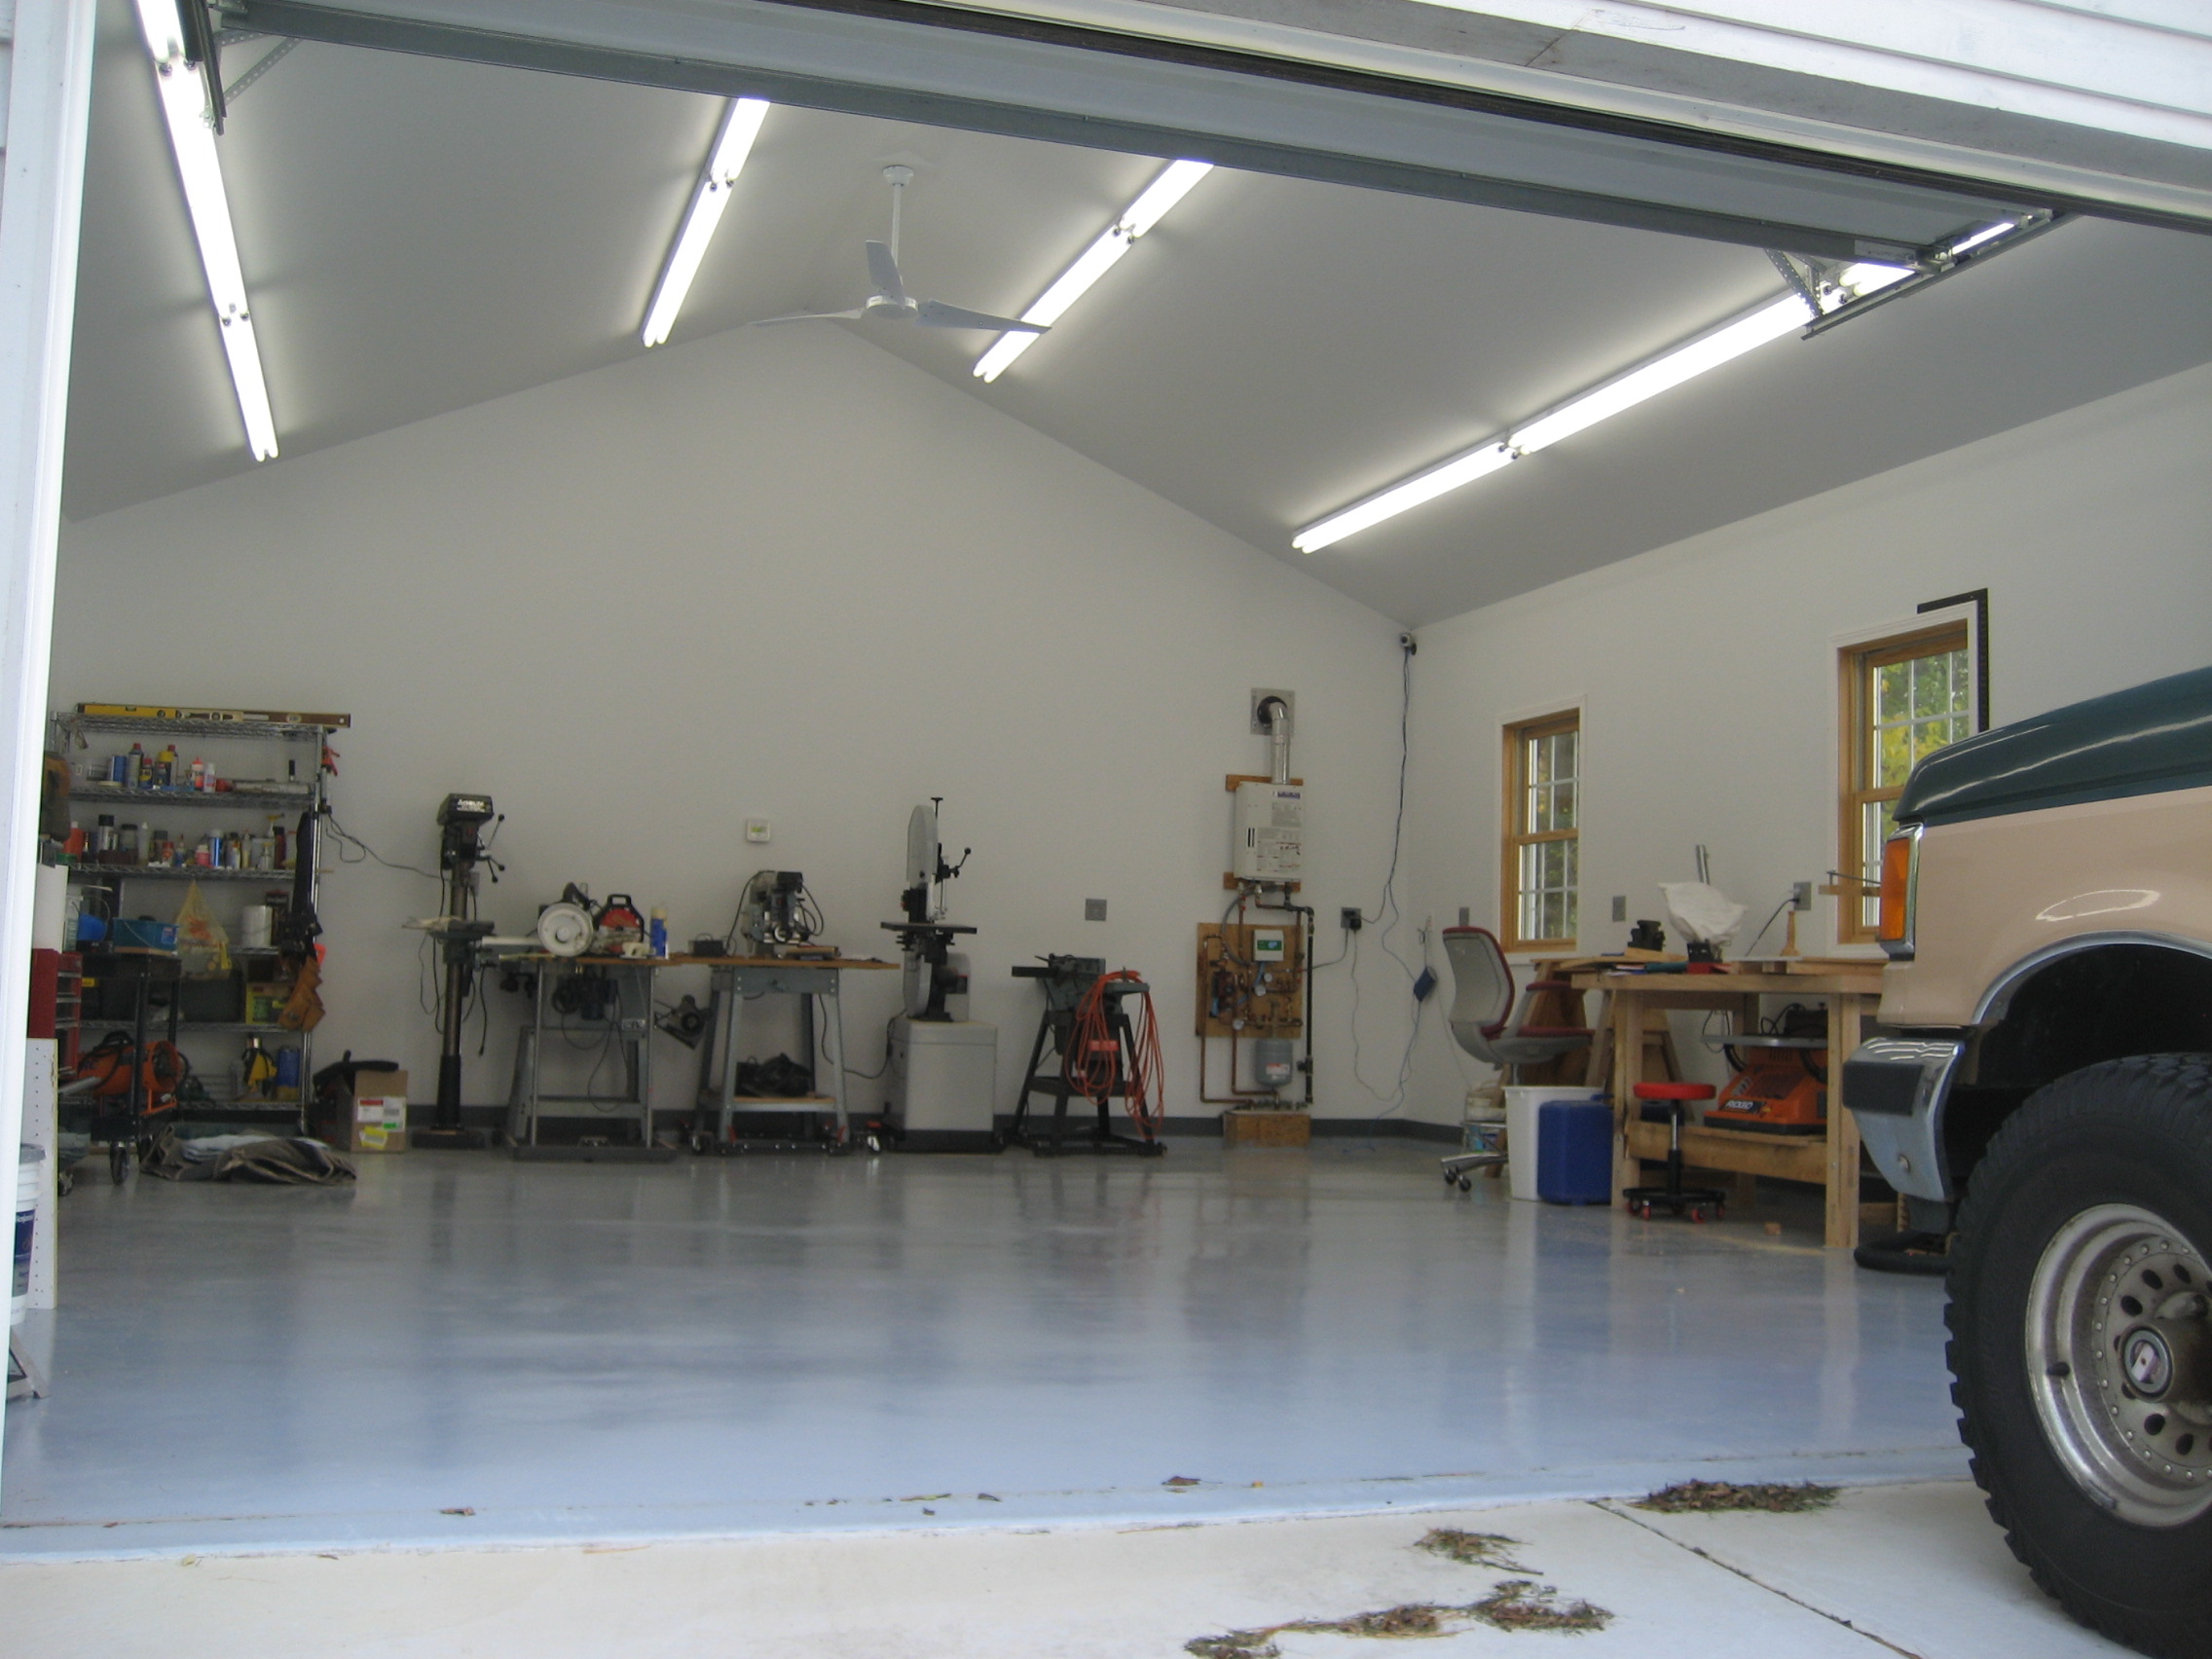
What sort of size? space/area layout? features?

my reason for the thought.....
My daydreams lately have settled on what it would be like to dive into a kit plane project when I retire in a few years.

This morning on my way to work I was thinking about my wife's desire to downsize our home at that point as the kids depart, and what it might look like with a workshop.

Now I know a lot of folks have built in their basement, garages, and I heard of one being built in a living room, removing windows to get it out once it was ready to move the parts to the airport...

but I was wondering more about not just the set-up to "make do".... but a realistic but much nicer situation
 
So I started building my RV-10 in a finished basement, moved up to our 2-car garage once I outgrew the available basement space, and finally out to a standard t-hangar. This was in Northern Virginia just outside DC so I froze in the winter and fried in the summer. Here’s what I would have like to have had with an eye on using it post build as a multi-use workshop/garage:
— size of 2 car garage with single large garage door
— multiple 20amp 120v outlets with at least a couple on each of the 3 non-garage door walls
— one 50amp 220v outlet for a welder (not necessary for a kit build but a nice to have for a well equipped workshop)
— insulated and climate controlled
— beer fridge
— utility sink with hot and cold water
— excellent lighting
 
Last edited:
You don’t say where you are, but locking in a hanger lease early is an increasingly good idea in nearly every market. You might as well get double-duty out of it by jumping on an opportunity when you can get into an airport you like. Also, don’t overlook the benefits of community while you build. An open hanger & fridge full of drinks buys a lot of expert advice & encouragement.

An amazing amount of work is easier with the wings on the plane and with sufficient space between the top of the plane & the ceiling to jack it up or suspend it.
 
I built an oversize 2-car detached garage. That way when we sold the house it could be a shop or additional garage space. Radiant floor heat because it's cold in northern Illinois and I didn't want force air blowing dust all over the place. Scissor trusses which gave me an 11' ceiling in the center. 2x6 walls for better insulation. Probably had about R-60 in it the ceiling. Lots of lighting. Separate electrical service panel. 110v quad outlets every 6' at 48" high. Lots of 220v at 16" off the floor. Shiny gray epoxy floor to make cleanup easy.

It was perfect for building a Velocity... Except it wasn't big enough to hold the plane with both wings on. But there were only a few times that was necessary.

http://www.velocity-xl.com/blog/2006/12/31/9/
http://www.velocity-xl.com/blog/2007/05/30/building-the-shop-part-ii/
 
People make all sorts of spaces work, obviously.

I built mine in a 25x25 shop. That worked ok, but I could have used a little more room. Couldn't put the wings on until it was moved to the hangar.

Wing storage is something to plan for, depending on your build order. I was able to suspend a couple of platforms to set the wings on while I worked on the fuse and systems.

Spending some time organizing hardware, tools, etc. will save you time in the long run.

I had to add extra lighting. My shop was fine for working on my jeep, but it really helps to have some very bright lighting. New LED fixtures are cheap.

Buy a quiet air compressor. Repeat, but a quiet air compressor. There's a lot that will aggravate you during a build. Having that screaming air compressor going off, when you're already annoyed, can put you over the edge. Also, if you live in an urban area and want to work nights or early mornings, the noise from these things can create a problem with your neighbors.

I think it was mentioned, having a finished floor is nice because you will be laying on it more than you think.

Heat is really important as well. Also a large capacity fan for the summer, if ac is not an option.
 
As has been mentioned:

Heat in winter, AC in summer

LOTS of light. Way more than you think you’ll need.

A quiet compressor, with plumbing to several places around the shop. Install a dryer or means to add one, and drains. See below.

Plenty of outlets, and 220 for the compressor.

Set it up for spraying paint. Even if you don’t plan to paint the plane yourself, lots of pieces will need to be primed.

And yeah, paint the floor.
 
16x18 is doable for most two seaters. Been there, done that. You will have to store some finished assemblies elsewhere. HVAC and good lighting are critical. It is no fun when it is 50 degrees in the shop (you lose dexterity), nor is it fun when it is 90+ degrees. There is never enough lighting.

Personally, I'd love a 25x25 or 30x30 detached shop with a half bath, mini fridge, and microwave. Also, a desk with a PC and enough space to lay out plans. It would be very helpful to have at least one good sized garage door. Windows are helpful because they allow you to get airflow through the shop if you're painting. You can guild the lilly from there, but it all comes down to how much money you wanna spend.
 
Last edited:
wow, some great points here.... thanks
Mostly kinda the same as a workshop anything else really I suppose...the good lighting, lots of outlets, etc....

I know what ya'll mean about the painted floor. The house we're in now has an epoxy coated floor in the garage and it's so much nicer. After 12 years though it's starting to need a re-do..

Anyway, I was thinking about the stuff such as a beer fridge, a desk and computer set up, sink, and HVAC...but never dawned on me that a half bath would be nice....especially if it's detached from the house! As I read through and look at these pictures, I would think an attached garage would in some ways be better because it's easier to get out there on a whim....early in the morning or to go check something.

I was also thinking it might be nice to have a comfy chair or even a sofa. Maybe a TV.....

Great point about the quiet compressor. I think I might go one better and consider putting the compressor "out back" like some pro level shops do. A separate utility shed for stuff like that...

anyway, so far the only thing that hasn't made sense to me is this
....... Lots of 220v at 16" off the floor. ......
Why 16 inches off the floor?

I've seen a few mentions of garage for better future use and re-sale.... I have some experience with motorhomes, and that might actually be a thing to design in....high enough and long enough for either an RV or a boat. That would probably appeal to many....

Another question comes to mind that I hadn't considered before..... How important would having enough room to completely assemble...put the wings and empennage on the fuselage...like for dry fitting, alignment, rigging, or whatever...even though it would have to be disassembled for transport...?

Oh and the heated floor...I think that could be nice even here in Florida...even though it's not as cold, it's still cold to stand on a cold slab all day..or to lay on it.
 
Second a separate outbuilding for the air compressor. Large enough and with baffled ventilation so it doesn't annoy your neighbors, and with a remote start, and a remote controlled or auto valve to release the pressure when you're done for the day.

Enough clean heat and AC in the shop so it's comfortable to work in. Lots of light, both fixed and portable. Rolling tool chests and carts. Retractable reels for electric and air. Anti-fatigue mats for the floor. Maybe some acoustic treatment up top and on the sides to keep the echos and noise down. Lightweight and quiet power tools, for the ones you use a lot of. Some of the Makitas can be good in that respect. A little fridge. Ideally running water and a fiberglass cleanup sink. Basically, make the place as comfortable as possible to work in.
 
I was also thinking it might be nice to have a comfy chair or even a sofa. Maybe a TV.....

Another question comes to mind that I hadn't considered before..... How important would having enough room to completely assemble...put the wings and empennage on the fuselage...like for dry fitting, alignment, rigging, or whatever...even though it would have to be disassembled for transport...?

Personally, I wouldn't put a sofa out there. Too easy to fall into the trap. The half bath, mini fridge, and microwave are to keep you from having to run back into the house every time you need to pee or get something to eat/drink. The time adds up. You go back in the house to pee, then you sit in your easy chair for a few minutes, and before you know it, an hour is gone. So stay in the shop if possible.

As far as assembly goes, you can fit most everything in the shop other than (maybe) wings. On my RV-6, I fit the wings in the driveway, pulled them off, and pushed the fuse back in the shop and took the wings to storage (in my master bedroom... I was single at the time and I'm sure the chicks dug the wings.).

On the RV-10, I did mostly the same thing, except took the wings to the airport after fitting them. SWMBO ain't about having wings in our bedroom, despite my best sales effort.
 
I did build in an oversized air park hangar and it was good.

But with that said, I built an RV10 and never even thought about putting the wings on. Since I was on a grass strip, I decided to do final assembly at a hard surface runway so putting the tail feathers on in my shop was enough. The final assembly was done in a corner of the ‘main’ hangar of a mechanic’s/FBOs shop/hangar in exchange for extra hands moving **** around. I was lucky.

The RV kits are built as separate units. You can do final assembly at the airport with a month or two of hangar time.


Sent from my iPad using Tapatalk Pro
 
anyway, so far the only thing that hasn't made sense to me is this
Why 16 inches off the floor?

Oh and the heated floor...I think that could be nice even here in Florida...even though it's not as cold, it's still cold to stand on a cold slab all day..or to lay on it.
110v tools are typically hand tools. Used on benches. Moved around a lot. So having those outlets up high is convenient. 220v tools on the other hand are usually fixed. They don't move around much. No reason for them to be where it's easy to plug and unplug. And they usually feed into the tool down low. So putting those outlets down low keeps the cords short and out of the way.

I built that shop in northern Illinois. I'm in north Florida now. No way I'd put in a heated floor here. For the same reason I didn't put in A/C in Illinois. For that one month of the year that it would be useful, it wasn't worth the additional cost.
 
Personally, I wouldn't put a sofa out there. Too easy to fall into the trap. The half bath, mini fridge, and microwave are to keep you from having to run back into the house every time you need to pee or get something to eat/drink. The time adds up. You go back in the house to pee, then you sit in your easy chair for a few minutes, and before you know it, an hour is gone. So stay in the shop if possible........
I guess that's where my head is at in thinking about a comfy chair/sofa area.....I'm picturing sort of a little living room set up like some folks do in a hangar..... so you can take a break, or relax while you read something, while you eat, etc.... all while staying in the shop. I'm not sure but I think I have this in the back of my head based on something I heard at some lecture on home building I saw at oshkosh many years ago, the point being "stay in the shop".

110v tools are typically hand tools. Used on benches. Moved around a lot. So having those outlets up high is convenient. 220v tools on the other hand are usually fixed. They don't move around much. No reason for them to be where it's easy to plug and unplug. And they usually feed into the tool down low. So putting those outlets down low keeps the cords short and out of the way.

I built that shop in northern Illinois. I'm in north Florida now. No way I'd put in a heated floor here. For the same reason I didn't put in A/C in Illinois. For that one month of the year that it would be useful, it wasn't worth the additional cost.
brilliant about the logic for outlet heights! I recently put a 220V outlet in my garage. it was part of a project to install a hardwired electirc car charger. The charger wants to hang more or less chest height on the wall by design, so I just put the 50A outlet right next to it. Purpose for the outlet was to plug in my RV when I have it in the driveway or future cars or a welder or whatever in the future. Already with the RV I have wished it was down lower on the wall, it would make better sense!

re. the heated floor in florida...my perspective is Northern FL, but certainly your right, not necessary or really worth it probably.....it's just based on doing work on cars and other things, laying on the garage floor or the driveway in anything but the hottest parts of the summer is fine for short jobs but gets cold and uncomfortable quick, it just pulls the heat out of you.
 
I was just watching a flightchops build video (wheel pants before the end of the world). Building an RV-14

They had built custom jigs.... legs really made from 2x4 lumber, attached to the fuselage to stand it up into flight attitude so the attached landing gear would hang....these legs were just right to fit on top of a workbench like stand.....they drew a centerline on the floor, and layout lines, fueselage perfectly level and square....

And I was thinking, I can imagine doing this by myself, often with less than the ideal carpentry tools for the job, maybe jury rigging it to fit something that I happened to have on hand that's close but not ideal.... on a floor that's not level.... finding help to lift it, etc.....
that it could be many days of work cobbling something together.
When it might be an hour to get it set up if I had a level and flat floor, a purpose built hang point, or whatever.....
but how would you know what you even would need until you get into it?
 
re. the heated floor in florida...my perspective is Northern FL, but certainly your right, not necessary or really worth it probably.....it's just based on doing work on cars and other things, laying on the garage floor or the driveway in anything but the hottest parts of the summer is fine for short jobs but gets cold and uncomfortable quick, it just pulls the heat out of you.

Where you at?

I did a lot of work on the hangar floor after finishing the airplane. There were only a couple times I thought it was uncomfortable. Rarely are you laying on your back when working on an airplane. On those occasions that I was, an old piece of carpet or mechanics creeper did the trick.
 
just south of Jacksonville...and yeah sure, good point, any sort of mat or creeper would certainly work. No doubt there's wiser uses of the money. I was just saying that a heated floor could be nice if building a ground up dream shop....certainly didn't mean to imply I thought a heated floor was any sort of primary need or anything. Just seems like a nicer way to accomplish a full climate control, or HVAC system for a workshop...that would even carry over as useful for resale to someone that's restoring a car, or that sets up a wood shop, or a craft shop, etc.... Because even with forced air heat on, a slab will be colder and a builder would be standing on it for lots of hours.

and talk about timing... sucked into the youtube vortex today, with the crummy weather. Just watched this flightchops episode that went into some detail about the benches and racks and tools they put together for his project. It was almost exactly their answer to my question.... or was it the other way around since they made the video long before I asked the question...ha? Some interesting points in the video, to me anyway.
I wonder how things might look if they didn't have to make it mobile. A fixed jig in the center of the shop with enough space to hold the thing permanently inline and level through the whole process maybe?
Watching the video I had some side thoughts that there's probably some sort of need to organize paperwork stuff....it's not something they touched on but for logging time and the build for certification purposes, keeping track of shopping lists, to do lists, etc....
 
At my old house when I was building I bought a prefab garage to build in. It was 24x24 with a gembrel roof which gave a me a full second floor. I used the second floor as my workshop and the first floor as my assembly area for the plane. All the small parts got made upstairs and when bigger things like wings and the engine were finished they got moved downstairs to assemble on tothe plane. It worked out great as I could make a mess in the workshop and not disrupt anybody needing to use the actual garage for something and my mess of metal or wood shavings never got near the finished plane.

Regardless of the size of the shop I recommend putting all tools and benches on wheels so you can move and reconfigure the space based on what you are working on. Drops from the ceiling for electricity and air are also extremely helpful. You can never have too much lighting or too many electrical plugs. I would also insulate the walls and make sure you have a heating and cooling source.
 
Good point. Unless you've got a huge building, put everything on wheels.

G14.jpg
 
Good point. Unless you've got a huge building, put everything on wheels.

Even if you’ve got all the space in the world, put everything on wheels. Doesn’t make sense not to.
 
I would love to have a 2 car garage where I can have a two-post lift for my car. I love wrenching on German cars, especially my Audi which I am a big fan of (though the VW group has their downsides especially recently). Enough space for a huge toolbox with ALL tools organized in foam pads. A separate toolbox for all detailing products and shelves to organize my microfiber pads (Dirty and clean sections; each divided into interior, exterior, engine, etc.) Have the floors epoxyed so oil doesn't stain the concrete. Also have the garage somewhat insulated and resistant from debris from the outside so I can also wash/detail the car inside the garage (If I wanted to apply ceramic coating they usually require 24hrs to cure and about 48 to 72hrs before it can come in contact with rain.) When of legal age everyone loves to rant and rave about beer and working on cars so maybe a fridge (too much of a risk right now to lose my medical cert because I wanted to have a crazy night with my friends in college). My grandfather actually has some of this (though its not insulated, no epoxyed floors and no two-post lift) and also has steps to an attic of sorts ABOVE the garage. That'd be really nice as well to store extra stuff.

Problem is that newer houses are pretty shoddy quality unless you have unbelievable money to shell out (and central air sucks imo; window AC and a thermostat to control heaters allow for individualized temps in each room). I like older stone houses with cast-iron sinks, solid walls (wood or good plaster) and nice flooring. Those houses usually weren't designed with a garage in mind. Then again the cost for flight training just to be an airline pilot may set me back decades until I even have the money to get a house with a garage:p
 
Even if you’ve got all the space in the world, put everything on wheels. Doesn’t make sense not to.
Have to disagree with you there. I have yet to see a mobile base that's a solid as sitting on the floor. Especially something taller like a drill press. I had my main workbench on wheels. But it simply wasn't stabile enough. So I pulled the wheeled base off of it. But everything else was on wheels. Even the wing cradle was on wheels. Although, for a wooden workbench, these will allow you to roll it around but have it sit on it's own legs when you don't need to move it.

https://www.amazon.com/dp/B08HHVMXT4?psc=1&ref=ppx_yo2_dt_b_product_details

But few people have a building that big. So those of us that don't, put everything on wheels.
 
So that's pretty cool, above. I don't think I've ever seen a radial arm saw or a jointer on wheels. Kinda looks like those above. It makes sense if that casters lock really well, or if there are solid feet that go down. Sounds good for woodworking. I don't think I'd do it for stationary metalworking tools.
 
When I moved up north (before I built the shop), I was operating out of 1 bay of our three car garage. So I got an HTC mobile base for every piece of equipment I had. When the wheels are retracted, they are pretty stable. Not like being on the ground, but good enough.

I've seen some metal lathes and mills on wheels. But those where benchtop machines. More like mini-lathes and mini-mills. I can't imagine something like a Bridgeport Mill or Monarch Lathe on wheels.
 
I've seen some metal lathes and mills on wheels. But those where benchtop machines. More like mini-lathes and mini-mills. I can't imagine something like a Bridgeport Mill or Monarch Lathe on wheels.
Given the time and effort needed to level them for best accuracy....
 
I don't think I've ever seen a radial arm saw or a jointer on wheels.
I have enough weight on the one table that it doesn't move in use. And, I normally have it stuck in a corner with the drill press, band saw, and jointer up against the walls which saves a bunch of space.
 
So that's pretty cool, above. I don't think I've ever seen a radial arm saw or a jointer on wheels. Kinda looks like those above. It makes sense if that casters lock really well, or if there are solid feet that go down. Sounds good for woodworking. I don't think I'd do it for stationary metalworking tools.

I have a Craftsman radial arm saw on a factory wheeled base. The basic design is adaptable to the DIY design.

The essence is to only have one pair retractable wheels. To move the table/base you just deploy the pair and lift the other end up by hand and roll.

The radial arm base has well designed retractable wheel assembly with a spring and a detent. If I remember next time in the shop I’ll clear the cobwebs and take a pic.


Sent from my iPad using Tapatalk Pro
 
You will want these for your toolbox. Organization with your tools will save you tons of time in the long run.

www.foamfittools.com

The guy will sell you ones for complete tool kits or you can just buy the two color foam and make your own while you are waiting for your kit to arrive.
 
You will want these for your toolbox. Organization with your tools will save you tons of time in the long run.

www.foamfittools.com

The guy will sell you ones for complete tool kits or you can just buy the two color foam and make your own while you are waitingor your kit to arrive.

True statement but this only works if you put your tools back--ask me how I know. :rolleyes: I can't tell you how many times I spent an inordinate amount of time looking for something that I actually had in my hand only a few minutes before. And don't get me started on time spent hunting for dropped rivets, nuts, and washers....
 
Last edited:
The nice thing about tool organizers is that it makes it easy to spot a missing tool. One of the things I did is to put every tool back at the end of each task or at the end of the day. That way you know if you've left a wrench somewhere that it isn't supposed to be.

Anal retentive? Maybe. But it's better than flying around with a screwdriver rattling around in engine compartment waiting to fly into the prop creating a revenue increasing event for MT.
 

Attachments

  • 2017-03-19 IMG_20170319_094012.jpg
    2017-03-19 IMG_20170319_094012.jpg
    377.7 KB · Views: 15
  • 2017-03-19 IMG_20170319_094042.jpg
    2017-03-19 IMG_20170319_094042.jpg
    399.1 KB · Views: 14
  • 2017-03-19 IMG_20170319_094051.jpg
    2017-03-19 IMG_20170319_094051.jpg
    314.3 KB · Views: 14
The nice thing about tool organizers is that it makes it easy to spot a missing tool. One of the things I did is to put every tool back at the end of each task or at the end of the day. That way you know if you've left a wrench somewhere that it isn't supposed to be.

Anal retentive? Maybe. But it's better than flying around with a screwdriver rattling around in engine compartment waiting to fly into the prop creating a revenue increasing event for MT.
That won't stop you from losing your 10mm socket. Can't count the number of times I've misplaced it, especially when I had my Toyota. Surprisingly I haven't lost it recently. Could also be because Audi uses 10mm, 13m, 15mm, 18mm, 23mm, ... you get the point. Combine that with the fact that they use mostly Torx, triple square and hex that I rarely use my 10mm socket now that I type this. Mostly T25, T27 (The 10mm of German cars) and my M10 and M13 triple square.
 
That won't stop you from losing your 10mm socket. Can't count the number of times I've misplaced it, especially when I had my Toyota. Surprisingly I haven't lost it recently. Could also be because Audi uses 10mm, 13m, 15mm, 18mm, 23mm, ... you get the point. Combine that with the fact that they use mostly Torx, triple square and hex that I rarely use my 10mm socket now that I type this. Mostly T25, T27 (The 10mm of German cars) and my M10 and M13 triple square.
No, I don't get the point.

I never said that organizing your tools would prevent you from losing a particular tool. Only that it will help you see that a particular tool is missing.

The shop that used to do the work on my Cessna had a box with all the tools that were found in aircraft. Some in places where they could have caused problems. So knowing that something is missing and possibly still inside an airplane is pretty important.

But that's just my opinion, I acknowledge that I could be wrong.

In the end it boils down to individual discipline. Foam cutouts are just a tool, but they don't work if you don't use them. Over 9 years of building, my work discipline was outright pathetic -- it just became too easy to leave things where they were than to walk 20 feet and put them away. Having a tool crib operation or similar construct that forces you to check tools in and out externally enforces tool discipline, but at the home builder level, it boils back down to how diligent each builder is. I wasn't although I'm waaayyyyyy more disciplined doing my condition inspections than I was when I was building for the reasons you mentioned.
 
Last edited:
I'm not superstitious, but there are magical forces that steal 10mm and 5/16 and 7/16" wrenches, and #2 Phillips screwdrivers.
 
Was watching an Eliot Seguin test flight video on youtube this AM. He's testing a guys modified Lance air. Anyway....there was a brief B roll shot of back when the owner was working on the plane. Looked to be in a home garage. Anyway, looked like he had the front suspended form one of those manual engine lifts that they use for car engines...like attached to the spinner. The tail was outside of view, but the plane was inverted so he could get to the bottom.
Anyway, I'm surprised nobody has suggested some sort of unique things like a more elegant solution for that sort of thing...a "lazy susan" or some odd sort of rotating jig
or some other specialty mod.... kinda like a car guy might like to have a pit or a lift.


True statement but this only works if you put your tools back--ask me how I know. :rolleyes: I can't tell you how many times I spent an inordinate amount of time looking for something that I actually had in my hand only a few minutes before. And don't get me started on time spent hunting for dropped rivets, nuts, and washers....
That sparks an idea that certain colors of floor might be better for finding dropped screws and rivets.

That stuff is great, but I'd go from 3 rolling tool chests to about 8 if I spread my tools out like that.
I was thinking the same thing....
and my other thought about that sort of tool foam organizers. Kind of like the old fashioned idea of a pegboard with outlines of each tool, it's kinda great....but what do you do when you get that one additional wrench or tool that needs to go between two others but there's no room...or you run out of space in the pliers drawer but you don't have enough to fill two drawers.... It would just drive me nuts in some ways and I'd NEVER get it organized correctly.... but that's just me. Otherwise I truly admire that nice and neat organization...wonderful!
 
Anyway....there was a brief B roll shot of back when the owner was working on the plane. Looked to be in a home garage. Anyway, looked like he had the front suspended form one of those manual engine lifts that they use for car engines...like attached to the spinner. The tail was outside of view, but the plane was inverted so he could get to the bottom.
Anyway, I'm surprised nobody has suggested some sort of unique things like a more elegant solution for that sort of thing...a "lazy susan" or some odd sort of rotating jig or some other specialty mod.... kinda like a car guy might like to have a pit or a lift.

That's done fairly often with tube and rag aircraft during the covering process. People build fixtures to connect the firewall and the tail post to engine stands, or just bolt on a longitudinal pipe they can rest on sawhorses so the fuselage can be rotated. The key is to get the axis of rotation near the CG so the thing doesn't try to go all Poseidon Adventure on you at an inopportune time.
 
Back
Top