You are using an out of date browser. It may not display this or other websites correctly.
You should upgrade or use an alternative browser.
You should upgrade or use an alternative browser.
Wire Terminals & Crimping Tool
- Thread starter Rob58
- Start date
bnt83
Final Approach
Tyco brand MS25036 series terminals otherwise known as PIDG terminals, are all I use. New Tyco tools range from $150 to eye wateringly expensive, homebuilders generally use anything that does a decent job.
https://www.mouser.com/pdfdocs/ENG_DS_82042_StdTermsSplices_0708.pdf
I would terminate the shields using M83519/1-3 solder sleeves, more wire and ring terminals rather than what the OEM did when it was new.
Also, given that the red MS25036 terminals cover wire gauges from 22 to 16, I'd use 16 gauge wire. It doesn't need wire that big since there is barely any current in it ever but 16 gauge is beefier and more resistant to breaking.
Last edited:
catmandu
Pattern Altitude
I got this nice kit for the hangar when I had my first small wiring project to do, have used it many times since:
http://www.bandc.aero/insulatedterminalkitwithstoragecase.aspx
Got the $45 tool at the bottom of the page as well, takes a bit of care when placing the terminals in the die, but does the job nicely.
http://www.bandc.aero/insulatedterminalkitwithstoragecase.aspx
Got the $45 tool at the bottom of the page as well, takes a bit of care when placing the terminals in the die, but does the job nicely.
flyer770
Pre-takeoff checklist
- Joined
- Nov 23, 2017
- Messages
- 265
- Display Name
Display name:
Flyer770
Digikey has the Tyco connector a little less than Mouser. Either sells the terminals for less than Spruce. Aircraft Tool also sells a good tool, if you're not looking to crimp all day in a shop environment.
Raymo
Pre-takeoff checklist
Aircraft Spruce has all the terminal sizes.
https://www.aircraftspruce.com/catalog/elpages/insulterms.php?recfer=21960
I purchased crimpers on Amazon and am quite happy with them.
https://www.amazon.com/Titan-Tools-...d=1540220974&sr=8-3&keywords=terminal+crimper
https://www.aircraftspruce.com/catalog/elpages/insulterms.php?recfer=21960
I purchased crimpers on Amazon and am quite happy with them.
https://www.amazon.com/Titan-Tools-...d=1540220974&sr=8-3&keywords=terminal+crimper
Rob58
Pre-takeoff checklist
- Joined
- Feb 20, 2016
- Messages
- 360
- Display Name
Display name:
Rob
Very helpful advice from everyone - exactly the info I was hoping for! I will use the PIDG terminals and the TE 58433-3 crimper (from Digi-key!). The documentation from TE is first rate. Need a little clarity on the technique you are suggesting for terminating the shield - are you suggesting soldering the shield wire to a ring terminal? Or is the idea here to splice the shield to a short piece of solid wire and then crimp the wire to the ring terminal? Really appreciate the help!Tyco brand MS25036 series terminals otherwise known as PIDG terminals, are all I use. New Tyco tools range from $150 to eye wateringly expensive, homebuilders generally use anything that does a decent job.
https://www.mouser.com/pdfdocs/ENG_DS_82042_StdTermsSplices_0708.pdf
I would terminate the shields using M83519/1-3 solder sleeves, more wire and ring terminals rather than what the OEM did when it was new.
Also, given that the red MS25036 terminals cover wire gauges from 22 to 16, I'd use 16 gauge wire. It doesn't need wire that big since there is barely any current in it ever but 16 gauge is beefier and more resistant to breaking.
flyer770
Pre-takeoff checklist
- Joined
- Nov 23, 2017
- Messages
- 265
- Display Name
Display name:
Flyer770
Splice the shield to a short 4" section of wire and solder using solder sleeves. Crimp the other end into an appropriate PDIG ring terminal.
Lndwarrior
Cleared for Takeoff
- Joined
- Jan 15, 2009
- Messages
- 1,122
- Display Name
Display name:
Gary
Aircraft Spruce has all the terminal sizes.
https://www.aircraftspruce.com/catalog/elpages/insulterms.php?recfer=21960
Did all of the wiring in my plane (hundreds of connectors) with a single pair of these. Pull tested everyone of them and never had a single one come apart. I have almost 300 hours on my plane now without any electrical problems (ok, except for the ones i created...).
I purchased crimpers on Amazon and am quite happy with them.
https://www.amazon.com/Titan-Tools-...d=1540220974&sr=8-3&keywords=terminal+crimper
bnt83
Final Approach
Very helpful advice from everyone - exactly the info I was hoping for! I will use the PIDG terminals and the TE 58433-3 crimper (from Digi-key!). The documentation from TE is first rate. Need a little clarity on the technique you are suggesting for terminating the shield - are you suggesting soldering the shield wire to a ring terminal? Or is the idea here to splice the shield to a short piece of solid wire and then crimp the wire to the ring terminal? Really appreciate the help!
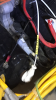
Never used a solder sleeve? This is just what you need to watch. If the solder sleeve you buy has a preinserted drain wire, I'd replace it with something heaver (on the magneto end) and use the smaller 20/22 gauge drain wire on the ignition switch end of the p-lead.
https://www.mouser.com/datasheet/2/418/NG_CD_S01-0X-R_E1-105296.pdf
The yellow shrink is just a label but it also supports the drain wire where it exists the solder sleeve.
Attachments
Last edited:
Rob58
Pre-takeoff checklist
- Joined
- Feb 20, 2016
- Messages
- 360
- Display Name
Display name:
Rob
I learned a lot in the replies to my post - thank you everyone! The solder sleeve is a very neat solution to the p-lead project and light years improved over the sloppy job that is controlling my mags now. I continue to be amazed at some of the horrible workmanship that has been signed-off over the years, and not just on my plane.
Attachments
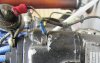
If more solder sleeves are in your future, you can go top shelf and get a reflector (or build your own) for your heat gun.The solder sleeve is a very neat solution to the p-lead project
bnt83
Final Approach
I already have what appears to be a high quality heat gun - with all the accessories - in my Amazon cart. What's the correct temperature for the solder sleeves?
Page 6 of 10 https://www.te.com/commerce/DocumentDelivery/DDEController?Action=showdoc&DocId=Specification+Or+StandardRCPS-100-70J1pdfEnglishENG_SS_RCPS-100-70_J1.pdf216787-000
Raymo
Pre-takeoff checklist
I already have what appears to be a high quality heat gun - with all the accessories - in my Amazon cart. What's the correct temperature for the solder sleeves?
You'll need at least 1000 degrees to shrink the solder sleeves. I have a relatively expensive Dewalt heat gun that has a digital readout and can be adjusted from a few hundred up to 1100. I use 1100 for solder sleeves and 500 or so for heat shrink.
weirdjim
Ejection Handle Pulled
- Joined
- Jul 8, 2008
- Messages
- 4,171
- Location
- Grass Valley, CA (KGOO)
- Display Name
Display name:
weirdjim
I did an Oshkosh workshop once where one of the $100+ tools was used by the other guy and I used a $30 Klein 1002, the same one I've been using since they taught me how to use one 50 years ago. Somebody poked fun at me for using a "toy tool". I loaded up a ring terminal with about 6' of #16 wire and hung it from a nail in the overhead. I started doing a chin-up slowly so as not to put jerk force on it. The wire broke when I was about 6" off the ground; the crimp held just fine. It isn't the cost of the tool that makes a good crimp, but the experience and skill of the crimper.
Jim
Jim
bnt83
Final Approach
Several
I'm pretty sure most of these >$1k crimpers for regular old terminals, like R/B/Y ring terminals, are designed and sold to Uncle Sam at astronomical prices. Since they designed their brand tools to work with their products they couldn't possibly work using something else.
I did an Oshkosh workshop once where one of the $100+ tools was used by the other guy and I used a $30 Klein 1002, the same one I've been using since they taught me how to use one 50 years ago. Somebody poked fun at me for using a "toy tool". I loaded up a ring terminal with about 6' of #16 wire and hung it from a nail in the overhead. I started doing a chin-up slowly so as not to put jerk force on it. The wire broke when I was about 6" off the ground; the crimp held just fine. It isn't the cost of the tool that makes a good crimp, but the experience and skill of the crimper.
Jim
I'm pretty sure most of these >$1k crimpers for regular old terminals, like R/B/Y ring terminals, are designed and sold to Uncle Sam at astronomical prices. Since they designed their brand tools to work with their products they couldn't possibly work using something else.
hamer
Pre-takeoff checklist
Rob58
Pre-takeoff checklist
- Joined
- Feb 20, 2016
- Messages
- 360
- Display Name
Display name:
Rob
Most certainly an analogue to many aspects of our world today. Thanks Jim.It isn't the cost of the tool that makes a good crimp, but the experience and skill of the crimper.
Jim
weirdjim
Ejection Handle Pulled
- Joined
- Jul 8, 2008
- Messages
- 4,171
- Location
- Grass Valley, CA (KGOO)
- Display Name
Display name:
weirdjim
Secret .... SSSSSHHHHH now. I use a LOT of #24 wire where we are switching microamps to a few milliamps. The red terminals won't squish down that far. Strip the wire as long as the red plastic on the crimp terminal, bend the stripped bare wire back around the wire insulation and wrap it in a helix around the insulation. Put insulation and wire back into the terminal and NOW crimp down on both insulation AND wire wrap. Never had one come apart or lose conductivity.
Jim
Jim
Last edited:
Chip Sylverne
Final Approach
- Joined
- Jun 17, 2006
- Messages
- 5,891
- Display Name
Display name:
Quit with the negative waves, man.
I already have what appears to be a high quality heat gun - with all the accessories - in my Amazon cart. What's the correct temperature for the solder sleeves?
My heat gun has two settings. I use low for smaller guage sleeves, or it melts the hell out of the insulation. It's not really rocket science, you can see the solder ring melt and flow inside the sleeve. Careful where you aim the gun!
NASA has a downloadable splicing and connector manual. Good reading for Newbs.