You are using an out of date browser. It may not display this or other websites correctly.
You should upgrade or use an alternative browser.
You should upgrade or use an alternative browser.
PoA Jet Ski Project
- Thread starter asechrest
- Start date
jesse
Touchdown! Greaser!
If you don't intend on giving it a chance to run, and just want to do a short crank, do as doc suggested above and you'll be fine.Let me clarify a bit: I'm only working a single step ahead so that I have a plan and some answers when I go back to work on the ski. I'm going to hook up the relay and then briefly test the crank. I just wondered if I could leave the oil tank off for that brief crank test in case I've got the relay hooked up wrong and need to get back in the e-box. If by some miracle the engine were to actually fire, I'd kill it right away because I'm not ready for that.
I'll probably convert to pre-mix after all is said and done (block off kits are cheap), but I'm focused on these two steps right now. If leaving the oil tank off for the crank test is "risky" in some way, I'll just hook it back up. No sweat.
You're more patient than I. I go from getting it to trying to get it to run in an evening. If it doesn't run make a list of all the parts I need, order, and be rebuilding in a few days
")
Last edited:
jesse
Touchdown! Greaser!
Thanks Jesse. Ordering it up now.
Also: zoom into that first photo of my e-box and look at the back of the igniter (large black rectangular box). See those salt-like crystalline deposit things on the vertical face of it? Is that normal?
I wouldn't worry about it.
asechrest
En-Route
No prob. All you do is push the green button, look for spark. Spray some WD-40 to protect things. And don't take this the wrong way, but I'm tired of repeating things.
Hah! Point taken. My comment was mainly so the other folks didn't think I was about to blast across the intracoastal without the oil tank on (and, granted, my experience level doesn't necessarily warrant thinking otherwise
 ). Just a brief crank test.
I'll update once the relay comes in. TY all.
PaulS
Touchdown! Greaser!
Lets be careful here. Oil in the cylinders could hydrolock it and destroy things quickly. I wouldn't pour anything in the cylinders. I'd spray some WD-40 in there to protect the engine piston and cyl linings, but don't go pouring stuff in your engine.
Leave the plugs out until you are sure you have spark with the new relay inserted and connected. You need to sort out where the start pick yellow/red wire attaches so the start button will work, and also the red and red/white wires which provide 12V to the igniter box to get spark. Once you have the wiring right, have the safety lanyard under the stop button, can crank the engine with the green button and have tested the ignition switch we'll move to the fuel system.
For now, just fog the cylinders with WD-40 to prevent rust and provide a small layer of lube.
Good point Doc, I should have said about a teaspoon full of oil and no spark plugs until it's been cranked, not a big fan of wd 40 in the cylinder but it should be fine.
docmirror
Touchdown! Greaser!
- Joined
- Jan 5, 2007
- Messages
- 12,008
- Display Name
Display name:
Cowboy - yeehah!
WD-40 is the ideal thing to spray in the jugs. It was developed as a rust inhibitor with lube properties. It has good cling, displaces moisture, lubricates and is combustible. I've fogged boat engines for decades with WD-40 because that's what it's designed for.
http://wd40.com/
WD-40® Multi-Use Product protects metal from rust and corrosion, penetrates stuck parts, displaces moisture and lubricates almost anything. It even removes grease, grime and more from most surfaces.
http://wd40.com/
WD-40® Multi-Use Product protects metal from rust and corrosion, penetrates stuck parts, displaces moisture and lubricates almost anything. It even removes grease, grime and more from most surfaces.
asechrest
En-Route
[snip]...
You need to sort out where the start pick yellow/red wire attaches so the start button will work, and also the red and red/white wires which provide 12V to the igniter box to get spark. Once you have the wiring right, have the safety lanyard under the stop button, can crank the engine with the green button and have tested the ignition switch we'll move to the fuel system.
...[snip]
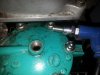
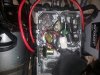
Tonight I took the igniter off to make some room in the e-box so I could look at the wiring and prepare for relay installation (delivery date is tomorrow). I found the old relay wiring still in the box. See attached photos for reference.
I think now I understand what the seller rigged up to crank the engine using the start button. You can see he's taken the red, red/black, and yellow/red wires (top half of e-box (or left half if POA rotates my photo)) and spliced (?) them together. I think this is where he connected the battery when showing me that the ski cranked using the start/stop switch. It looks like he just snipped the old relay right off the wires. Even the ground wire is still connected to the e-box. (This actually concerns me slightly; if we had power directly to those wires, why didn't we have spark?)
Relay installation looks fairly straightforward. White connector with red/black and red wires just plugs into the female white plug in the e-box. Ground goes to e-box post. Yellow/red wire appears to push into the red plug in the e-box after I yank the existing yellow/red wire out of there. Not sure I've connected one of those to an existing plug. Does it just push in?
Looking forward to tomorrow for the first test.
Attachments
Last edited:
jesse
Touchdown! Greaser!
There is nothing in the e-box you could do to make it crank. The only way to make it crank is to connect the red heavy gauge wire from the battery to the red heavy gauge wire that runs to starter which is on the left front-ish side of the motor. That is exactly what the relay does. It also provides the power to everything in the ebox...which is what those other wires are for.
So, to sort out this mess, do the following:
1) Cut off that yellow end they crimped on.
2) Unplug the plug that has the two red wires and plug the new plug in from your starter relay into the same plug.
3.) The yellow wire you'll ahve to remove from the plug it's currently in. You'll need to look inside where it goes into the connnector and push the tab that's holding it in there with something small. Then slip the new yellow wire from the starter relay into that plug and it'll snap in place.
4.) Put starter relay in it's place. Connect the two heavy gauge red wires to it. One goes to your battery. The other to your starter.
Best of luck! You should be able to have the relay in and it cranking in 10 or 15 minutes of work. If something I said isn't clear, let me know and I can try to explain better.
Last edited:
docmirror
Touchdown! Greaser!
- Joined
- Jan 5, 2007
- Messages
- 12,008
- Display Name
Display name:
Cowboy - yeehah!
Yup, Jesse got it all perfect. The yellow wire is going to be a challenge to get out of the red connector. It has a one-way snap retention tab on the end. That's the little tab thing that sticks out on the new relay yellow wire. When you push it firmly into the red connector, it's like a barb that won't allow the wire plug to back out of the connector bail. Getting the old one out is always a hassle, and once out, make sure you fit the new one in fully so it snaps and won't come back out later.
He was trying to rig it so that you had 12V going to the igniter box inside there to give spark. Not sure where he hooked it up to, but just put it all back the right way, and we'll see what you have when you crank it. We may have to re-visit the ignition switch on the center console I discussed prev.
He was trying to rig it so that you had 12V going to the igniter box inside there to give spark. Not sure where he hooked it up to, but just put it all back the right way, and we'll see what you have when you crank it. We may have to re-visit the ignition switch on the center console I discussed prev.
PaulS
Touchdown! Greaser!
There's a tool for removing that pin, just have to figure out which one.. sometimes you can luck out at the hardware store.
http://www.ebay.com/bhp/connector-pin-tool
http://www.ebay.com/bhp/connector-pin-tool
asechrest
En-Route
I felt like crap tonight, so I didn't do as much as I would have liked.
The new relay was in the mailbox. I was able to get the existing yellow/red wire out of the molex connector using a paperclip. Then I inserted the new yellow/red wire, plugged the white connector in, and screwed in the ground wire to the e-box post.
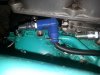
It then became apparent that I wasn't entirely sure which terminal of the relay was the batt(+) and which was the starter(+). Since the old relay wasn't there for me to copy from, I looked at the wiring diagram in the service manual and it sure looked to me like the red/black and red (red/white on my new starter) should be branching off of the batt(+) terminal of the relay. So that's how I hooked it up. So in the following picture, I have the batt(+) cable hooked up to the relay terminal that has the red wires branching from it (the right terminal).

The good news: I didn't set my face on fire. Also, I was able to turn the ignition switch to on, at which point the oil and temp dash lights illuminated, the analog trim gauge came alive, and I was able to trim the jet up and down and confirm that the trim system appears to work (and reflects correctly on the gauge). I am actually pretty pleased about the trim working. From what I've read, the older Kawasakis are known to have the trim systems fail due to water in the trim box.
The bad news: the engine didn't crank when inserting the lanyard key under the stop switch and pressing the start button. Nothing happened. Relay also didn't click. I do wonder if I have the relay terminals backward, but then I assume I'd not have power to the dash. Also, the manual mentions and shows a bunch of insulating washers and grommets that should go on the relay, and I don't appear to have those, though I don't think that's part of my problem. (Note also that I personally pressed the start button and cranked the engine when at the seller's house considering the purchase.)
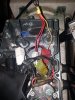
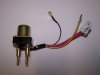
Anyway, that's as far as I got because I felt like I was going to die. I had a number of other ways I was going to troubleshoot but it'll have to wait until I feel better. Final attached pics are of the relay hooked up in the e-box and the service manual page for the relay installation.
Thanks.
The new relay was in the mailbox. I was able to get the existing yellow/red wire out of the molex connector using a paperclip. Then I inserted the new yellow/red wire, plugged the white connector in, and screwed in the ground wire to the e-box post.
It then became apparent that I wasn't entirely sure which terminal of the relay was the batt(+) and which was the starter(+). Since the old relay wasn't there for me to copy from, I looked at the wiring diagram in the service manual and it sure looked to me like the red/black and red (red/white on my new starter) should be branching off of the batt(+) terminal of the relay. So that's how I hooked it up. So in the following picture, I have the batt(+) cable hooked up to the relay terminal that has the red wires branching from it (the right terminal).
The good news: I didn't set my face on fire. Also, I was able to turn the ignition switch to on, at which point the oil and temp dash lights illuminated, the analog trim gauge came alive, and I was able to trim the jet up and down and confirm that the trim system appears to work (and reflects correctly on the gauge). I am actually pretty pleased about the trim working. From what I've read, the older Kawasakis are known to have the trim systems fail due to water in the trim box.
The bad news: the engine didn't crank when inserting the lanyard key under the stop switch and pressing the start button. Nothing happened. Relay also didn't click. I do wonder if I have the relay terminals backward, but then I assume I'd not have power to the dash. Also, the manual mentions and shows a bunch of insulating washers and grommets that should go on the relay, and I don't appear to have those, though I don't think that's part of my problem. (Note also that I personally pressed the start button and cranked the engine when at the seller's house considering the purchase.)
Anyway, that's as far as I got because I felt like I was going to die. I had a number of other ways I was going to troubleshoot but it'll have to wait until I feel better. Final attached pics are of the relay hooked up in the e-box and the service manual page for the relay installation.
Thanks.
Attachments
I bought this one instead. Impatience got the best of me; it ships from a few cities to my south. Hoping it arrives tomorrow.
Question: can I test crank without the oil tank hooked up, and with the oil line hanging free, if I pour some 2 cycle oil down the cylinders? The reason I ask is because the oil tank and mounting plate sits on top of the e-box and it's a bit of a pain to hook it all up, test, and then have to take it all off to open the e-box again.
Do NOT pour oil into the cylinders, that's not why it's in the fuel, it's there because the fuel air charge goes through the crankcase and lubricates the crank. If the engine is free to spin, no good can come of pouring oil in the cylinders, and has a slight potential of breaking major components of the engine.
Can you test it without the oil tank? Sure, if it fires hit the kill switch, no damage done. You can also just premix the fuel in the tank for now, mix at 100:1 which will be fine for no load test runs and won't really cause any problems in between the time you hook up the oil tank and when the premix runs out. The just refill with fresh gas and enjoy.
Last edited:
jesse
Touchdown! Greaser!
Question: should it really matter which terminal of the starter relay I hook to batt(+) vs. starter(+)? It's just a simple switch, right?
I'm going to monkey with it later tonight.
I'm 90% certain it matters as if it were backwards I do not think the ebox would receive power.
It depends. If all that the relay does is runs electricity to the starter, then no, it won't matter. If there are other circuits tied to a big post, then those circuits will probably hook to the terminal that has the battery cable lead on it. If there are multiple small pin leads as well (an I and S are typical) then those leads are critical, S will be the lead to the switch, and the I will be charged when the starter is engaged. In the old days this routed around the ballast resistor to the coil to provide a hotter spark to start with and then would go open when you released the key to keep from frying the points. Now a days I occasionally see other things hooked to it like a cold start enrichment circuit, though I can't say I've seen it as a factory solution.Question: should it really matter which terminal of the starter relay I hook to batt(+) vs. starter(+)? It's just a simple switch, right?
I'm going to monkey with it later tonight.
Last edited:
docmirror
Touchdown! Greaser!
- Joined
- Jan 5, 2007
- Messages
- 12,008
- Display Name
Display name:
Cowboy - yeehah!
Look at post 29 pics. On the top of the e-box cover there is a legend: "(+)Batt (+)Start." I'm having trouble with the orientation in the pics because it's different. Use the legend to connect the wires. I think they might be backwards, meaning that the hot lead from the batt is on the starter lug which won't work. But - since you were able to get power to the display and tilt, maybe you do have it right, in which case we're back to an ignition switch problem, or a start button problem:
Hold the cover with legend over the e-box and check that the (+)Batt lug goes to the + of the batt, and the (+)Start lug cable goes to the starter.
If you have it right, then go back to the post I made about bypassing the ignition switch by jumpering the red terminals on there and insure the white wire is not grounded. once you have that done, the display should come alive again.
If the display is live and the tilt will work, then try the green button. If it cranks, you found a bad ignition switch.
If it still won't crank, you need to get 12V to the yellow/red trace wire which is the pick for the starter solenoid. We will cover that depending on the results of the tests above.
<edit to correct wire colors>
Last edited:
asechrest
En-Route
Thank you sirs!
I have it matching the legend on the ebox cover. The problem is that the relay fits two different ways into the ebox, rotated 180 degrees apart.
Right now I've got the batt(+) lead hooked to the relay post that has some other circuits leading from it. This is intuitive to me, because we'd want some powered components even if the starter solenoid isn't active. As far as I know I can't hurt anything swapping the leads on the relay terminal, so I'll probably try that after work.
If no luck, I'll double check all my ebox connections and then it's on to your ignition switch and start button tests.
Look at post 29 pics. On the top of the e-box cover there is a legend: "(+)Batt (+)Start." I'm having trouble with the orientation in the pics because it's different. Use the legend to connect the wires. I think they might be backwards, meaning that the hot lead from the batt is on the starter lug which won't work. But - since you were able to get power to the display and tilt, maybe you do have it right, in which case we're back to an ignition switch problem, or a start button problem:
Hold the cover with legend over the e-box and check that the (+)Batt lug goes to the + of the batt, and the (+)Start lug cable goes to the starter.
If you have it right, then go back to the post I made about bypassing the ignition switch by jumpering the red terminals on there and insure the white wire is not grounded. once you have that done, the display should come alive again.
If the display is live and the tilt will work, then try the green button. If it cranks, you found a bad ignition switch.
If it still won't crank, you need to get 12V to the yellow/red trace wire which is the pick for the starter solenoid. We will cover that depending on the results of the tests above.
<edit to correct wire colors>
docmirror
Touchdown! Greaser!
- Joined
- Jan 5, 2007
- Messages
- 12,008
- Display Name
Display name:
Cowboy - yeehah!
Thank you sirs!
I have it matching the legend on the ebox cover. The problem is that the relay fits two different ways into the ebox, rotated 180 degrees apart.
Right now I've got the batt(+) lead hooked to the relay post that has some other circuits leading from it. This is intuitive to me, because we'd want some powered components even if the starter solenoid isn't active. As far as I know I can't hurt anything swapping the leads on the relay terminal, so I'll probably try that after work.
If no luck, I'll double check all my ebox connections and then it's on to your ignition switch and start button tests.
Cooleo. Since you are getting indication on the dash and the tilt works, I think you have it right. If not, like you said the power to the aux circuits wouldn't be there.
Don't forget the safety lanyard has to be under the red button pulling it back so that the green button gets power. If the lanyard isn't under the red button, it'll never crank/start. If you get to this point, try pulling back and holding a bit harder on the red button with your fingers, and then try the green button. The contacts in the red button may not be making good connection.
PaulS
Touchdown! Greaser!
According to the wiring diagram and the looking at the picture of the relay, there are indeed wires on the Batt side of the relay that power stuff, while on the starter side there is only the starter relay. That said, the picture you posted looks like it is connect correctly if the thicker wire is the batt wire. Make sure neither of the posts is making contact with the box, it concerns me that some to of the insulating washers are missing.
I'm thinking the lanyard switch might be a problem, This is where a volt meter would be very helpful to trace the circuits and figure out where the juice isn't getting thru....
I'm thinking the lanyard switch might be a problem, This is where a volt meter would be very helpful to trace the circuits and figure out where the juice isn't getting thru....
asechrest
En-Route
According to the wiring diagram and the looking at the picture of the relay, there are indeed wires on the Batt side of the relay that power stuff, while on the starter side there is only the starter relay. That said, the picture you posted looks like it is connect correctly if the thicker wire is the batt wire. Make sure neither of the posts is making contact with the box, it concerns me that some to of the insulating washers are missing.
I'm thinking the lanyard switch might be a problem, This is where a volt meter would be very helpful to trace the circuits and figure out where the juice isn't getting thru....
I bought a new multi-meter for this project. But I don't have a lot of experience using one other than rudimentary household stuff like checking to see if plug or switch power is off before changing a lightswitch. To be embarrassingly honest, I don't quite "get" how to use one to test specific components, though I haven't done much reading yet. I mean, I understand it conceptually, but not when I'm standing there holding a red and black lead and looking at a component with a bunch of wires going to and from it.
asechrest
En-Route
Don't get sidetracked. We can all cover that stuff later if needed.
No worries. Going out there now, even with a low-grade fever.
PaulS
Touchdown! Greaser!
I bought a new multi-meter for this project. But I don't have a lot of experience using one other than rudimentary household stuff like checking to see if plug or switch power is off before changing a lightswitch. To be embarrassingly honest, I don't quite "get" how to use one to test specific components, though I haven't done much reading yet. I mean, I understand it conceptually, but not when I'm standing there holding a red and black lead and looking at a component with a bunch of wires going to and from it.
Doc gave you a pretty good list of items to try so give that a go.
The multi meter is easy to use and relatively safe with 12 volt dc. Just set the meter to read voltage dc and the proper range if not auto ranging. You can try it out by testing the battery. Make sure the probes are plugged into the right ports if they are not permanently attached to the meter. Place the red probe on the positive terminal and the black probe on the negative terminal. The meter should read around 12.7 volts for a fully charged battery.
To test the circuits you simply attach the black probe to the negative post on the battery, then follow the wiring diagram to locate the points where juice should be. Touch the probe to those points and you should get 12 volts when switches are in the proper position. No juice, then something is wrong.
I'll leave it to doc to get more specific if you need to do this.
The resistance test function is also very useful and can be used to test switches and fuses. You need to be sure the components are disconnected from the battery and usually other components when you do these tests however.
Good luck.
asechrest
En-Route
Gentlemen, we've had some success.
Here are the only things I did differently than last night:
Then I tried everything again. Here's what we got.
Nice, strong crank. I could see all the pistons moving. I could feel air coming out of the spark plug holes. Unlike last night, the oil light on the dash continued to flash, which is good because I've got the oil tank completely removed. The trim was tested again and still works.
This is good news! But what we don't appear to have is spark. Which I guess suggests it might be more than just the relay that's the issue. So, I'm going to have to work on diagnosing the no spark condition. I guess at this point I could also do a compression test if I wanted? What would ya'll say are some next steps?
Here are the only things I did differently than last night:
- Pulled the relay out of it's mounting position and stood it terminal side up for easier access
- For giggles, swapped the cables on the relay terminals and tried to start; nothing, not even power to the dash
- Swapped the cables back the way I had them (batt(+) to the terminal that has the other circuits coming off of it)
- Glanced at the red molex plug that joins the yellow/red wire from the relay to some others, noting that one of the posts on the female side looked kind of corroded. I took some sandpaper and cleaned it best I could, then sprayed a touch of WD-40 on a toothbrush and cleaned all the posts in the plug.
Then I tried everything again. Here's what we got.
Nice, strong crank. I could see all the pistons moving. I could feel air coming out of the spark plug holes. Unlike last night, the oil light on the dash continued to flash, which is good because I've got the oil tank completely removed. The trim was tested again and still works.
This is good news! But what we don't appear to have is spark. Which I guess suggests it might be more than just the relay that's the issue. So, I'm going to have to work on diagnosing the no spark condition. I guess at this point I could also do a compression test if I wanted? What would ya'll say are some next steps?
docmirror
Touchdown! Greaser!
- Joined
- Jan 5, 2007
- Messages
- 12,008
- Display Name
Display name:
Cowboy - yeehah!
Gook job. That corrosion was contributing. Common on jet skis, so you found what we didn't.
Get in behind that ign switch. Remove ONLY the white wire from the terminal and leave it not touching anything then try again.
Let me add some theory to this method. When looking at the igniter, there are a lot of wires that go in and out. The kill wire is the white one labeled "W" of course. It comes out of the igniter, through a waterproof sealed bushing out of the e-box, and splits into two white wires. One of the wires goes to the back of the red stop button. The other one goes to a normally closed wiper on the back of the ignition switch. These are the two ways to kill the engine. Apply a ground signal from the black/wht trace to the white wire to the igniter. Either of these two methods will shut off the spark, and cause the engine to stop.
First order is to eliminate the ignition switch on the panel because it is the easier one to tackle. If that one isn't grounding the igniter, we will move on to the red switch on the handlebar. There's a multi-pin connector up on the bar that serves both the red and green buttons. Once that connector is pulled, we will need to find the colors on the wires so that we can cause the red/wht to close with the yellow/red(goes to our new start relay) to cause the engine to crank.
Since the engine now cranks, it appears that the lanyard is holding the red switch open so that the power is applied to the ski, and start is avail. Another reason I want to eliminate the ignition switch first. It has a higher probability of failure.
Once we get that white wire isolated so it is not grounded if we still don't have spark, we'll need to move over to the wires from the magneto, which are not labelled as to timing pulse, and that's going to get sticky.
Last edited:
asechrest
En-Route
Ok. Let's see what I can do. Will report back.
PS - I see what you're talking about in the wiring diagram. Also going to open up the other molex plugs and clean those as well. Might as well eliminate that as a factor.
PS - I see what you're talking about in the wiring diagram. Also going to open up the other molex plugs and clean those as well. Might as well eliminate that as a factor.
docmirror
Touchdown! Greaser!
- Joined
- Jan 5, 2007
- Messages
- 12,008
- Display Name
Display name:
Cowboy - yeehah!
After further review(watching Thur night football), I"m noticing there are some safety circuits at work in there. All of which may kill the engine. You mentioned the oil light is flashing, where before it was just on solid and when I trace back one of those kill wires, I notice it comes from the oil/temp indicator control unit. Maybe - the smart little folks at Kaw put a kill in the engine if you run the ski entirely out of oil. hmmmmmmm? I sez to myself.
So, after due consideration, I would like you to locate that oil level sensor, and hang it upside down so the level sensor does not indicate a no oil condition, the float must go to the top of the sensor shaft. Turn on the ignition switch, check the oil light is completely out, and not flashing or lit, and then try a crank again. The signal line from the control unit to the igniter is red/yellow trace.
So, after due consideration, I would like you to locate that oil level sensor, and hang it upside down so the level sensor does not indicate a no oil condition, the float must go to the top of the sensor shaft. Turn on the ignition switch, check the oil light is completely out, and not flashing or lit, and then try a crank again. The signal line from the control unit to the igniter is red/yellow trace.
Last edited:
asechrest
En-Route
Manning is on my fantasy bench right now. 
To be clear, last night when I tried this, the oil light flashed once, then went out completely. Tonight, I get a steady flash. I'm skeptical that a no oil indication kills the spark, only because I've read of so many people blowing these engines by running it out of oil. But it's possible, so I agree let's try it.
Also note my gas tank is dry, so if a similar safety exists for the gas tank, that could also be an issue.
docmirror
Touchdown! Greaser!
- Joined
- Jan 5, 2007
- Messages
- 12,008
- Display Name
Display name:
Cowboy - yeehah!
They blow up because oil is injected to each carb, which serves each cylinder. One of three oil lines comes off the carb, or gets clogged and that specific cyl is not lubed and gets hot and melts. There is no circuit from the fuel sensor to the ignitor.

asechrest
En-Route
Jesse: Man, nice photo. Thanks for the vote of confidence.
Doc: I'm packing it in for the night. I found the white molex with those wires and cleaned it. Cleaned a couple others as well. Turned the oil stick upside down, confirmed oil light off. Cranked with no spark.
I decided I want to clean every connection I can find in the e-box since I know that to have caused one problem already. Got most of them cleaned, but there's one large molex that I can't get apart. I can't even actually figure out the latch mechanism on it. Before packing it in, I also finally got apart the molex plug at the back of the regulator. It's pretty corroded so I'll clean that.
Will pick this up Monday evening. Good progress tonight. Thanks to all of you.
Doc: I'm packing it in for the night. I found the white molex with those wires and cleaned it. Cleaned a couple others as well. Turned the oil stick upside down, confirmed oil light off. Cranked with no spark.
I decided I want to clean every connection I can find in the e-box since I know that to have caused one problem already. Got most of them cleaned, but there's one large molex that I can't get apart. I can't even actually figure out the latch mechanism on it.
Before packing it in, I also finally got apart the molex plug at the back of the regulator. It's pretty corroded so I'll clean that.Will pick this up Monday evening. Good progress tonight. Thanks to all of you.
asechrest
En-Route
OK, was the oil light off when you tried it?
If so, we'll move on to that white wire on the ign sw, and then the white wire on the handlebar.
Oil light was definitely off. It went like this: oil stick hanging down, ignition switch on, confirm oil light blinking, turn oil stick upside down, confirm oil light off, crank engine, no spark.
Night all. Updates on Monday.
asechrest
En-Route
Just finished a few glasses of wine and cleaning every connection in the e-box. I was able to get every molex connector apart. I even sanded and cleaned the ground post and wires. Put them all back together and tested. Cranked fine again but no spark on any plug. I have a video that I'll post later. I'm moving on to pulling the white kill wire from the terminal behind the ignition switch to see if that's malfunctioning and killing spark.
Some additional reading over the weekend revealed a couple of expensive components that, if dead, could prevent spark: stator and related stuff, and CDI igniter (new OEM $400+). I intend to follow Doc's lead and eliminate the "easy" stuff as the issue instead of "throwing parts at it".
and cleaning every connection in the e-box. I was able to get every molex connector apart. I even sanded and cleaned the ground post and wires. Put them all back together and tested. Cranked fine again but no spark on any plug. I have a video that I'll post later. I'm moving on to pulling the white kill wire from the terminal behind the ignition switch to see if that's malfunctioning and killing spark.Some additional reading over the weekend revealed a couple of expensive components that, if dead, could prevent spark: stator and related stuff, and CDI igniter (new OEM $400+). I intend to follow Doc's lead and eliminate the "easy" stuff as the issue instead of "throwing parts at it".
PaulS
Touchdown! Greaser!
Just finished a few glasses of wine
Some additional reading over the weekend revealed a couple of expensive components that, if dead, could prevent spark: stator and related stuff, and CDI igniter (new OEM $400+). I intend to follow Doc's lead and eliminate the "easy" stuff as the issue instead of "throwing parts at it".
You know, basic question but I have to ask, are you grounding the spark plugs and do you know they are good? Ok, that was two questions.
asechrest
En-Route
You know, basic question but I have to ask, are you grounding the spark plugs and do you know they are good? Ok, that was two questions.
Fair question(s) since I've never done this before. I'm laying the spark plugs, connected to their leads, on the head, with the spark plug...ends(?)...laying right next to an engine bolt. My understanding is that this is how I should do it. Let me know if I'm mistaken!
The spark plugs are brand new, right out of the box.
Thanks.
jesse
Touchdown! Greaser!
Fair question(s) since I've never done this before. I'm laying the spark plugs, connected to their leads, on the head, with the spark plug...ends(?)...laying right next to an engine bolt. My understanding is that this is how I should do it. Let me know if I'm mistaken!
The spark plugs are brand new, right out of the box.
Thanks.
Make sure the plug is making contact with the bolt.