overengineered repairs

GeorgeC

Administrator
Management Council Member
Joined
Dec 5, 2010
Messages
6,581
Display Name
GeorgeC
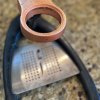
We've had a $20 rice cooker for a long time. Some years ago, the original handle on the lid crumbled, so I bodged something together with some washers and a nylon standoff and a nyloc. Those eventually rusted, so it was time do a better job. I sharpened some copper tubing and punched some gaskets out of leftover baffle seal. A few bucks in stainless hardware and a plastic drawer pull, et voilà:
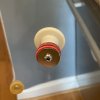
lid.jpg
Between the 3/4" gaskets, there is a stack of two 5/16" gaskets to support the hole in the glass. I wonder if the laser cutter at the kids' school can cut gaskets.


I do worry that thermal cycling will eventually crack the plastic...
 
We've had a $20 rice cooker for a long time. Some years ago, the original handle on the lid crumbled, so I bodged something together with some washers and a nylon standoff and a nyloc. Those eventually rusted, so it was time do a better job. I sharpened some copper tubing and punched some gaskets out of leftover baffle seal. A few bucks in stainless hardware and a plastic drawer pull, et voilà:
View attachment 141569
Between the 3/4" gaskets, there is a stack of two 5/16" gaskets to support the hole in the glass. I wonder if the laser cutter at the kids' school can cut gaskets.


I do worry that thermal cycling will eventually crack the plastic...
Not sure what I'm looking at. Can you zoom out a bit?
 
rice cooker
you had me at that for overengineered....

My wife has one of those, but it's easy enough to get consistent rice in any old regular saucepan with a tight lid. No measuring of anything required.

Otherwise, yes. Nice looking repair. And Yes, I too think the plastic knob may not hold up...but it'll probably last a while, so....so what, easy enough and cheap enough to replace.
 
I thought this thread was going to be about something like the infamous longeron splices in some of the old Bell 212 tail-booms.
 
That doesn’t look overengineered to me. You just made what the manufacturer should have used in the first place.
 
problem: Car sun shade does not stay in place.

solution: Need to suspend it from the visors. First, we'll need grommets. The shade is basically mylar bubble wrap, so not very strong; on its own, a grommet will probably just tear out. So, put a square of duct tape on the top left and top right corners of the sun shade. Punch holes in duct tape. Put grommets in holes. Put key rings in grommets. Clip s-biners on key rings.

Now, need an adjustable length rope to string between the two s-biners. Find old sash cord. Find heat shrink. Use butane torch to put heat shrink on cord ends. Tie an adjustable hitch [1] on each end.

Deploy sun shield, flip up visors. Lengthen the cord, clip each loop onto an s-biner, then take all the slack out of the cord. That's amore.

[1] https://en.wikipedia.org/wiki/Adjustable_grip_hitch
 
Rice cookers are magic. We bought one in Hawaii back in 1989. Still use it almost daily.
 
Have a Zojirushi rice cooker, worth every prnny!
 
Have a Zojirushi rice cooker, worth every prnny!
Any society willing to develop, market, and eventually spend >$200 per unit on a fuzzy logic rice cooker takes their rice VERY seriously.

I wonder if there's merit to the Instant Pot electric pressure cookers that do it all: Pressure cook; slow cook; air fry; rice; yogurt; etc.
 
Any society willing to develop, market, and eventually spend >$200 per unit on a fuzzy logic rice cooker takes their rice VERY seriously.

I bicycle, and love that I can set the cooker up the night before, and wake up to perfect rice as part of my pre ride breakfast.

And really any other time, it makes perfect sticky rice. Simple pleasures I suppose.
 
The gaskets/washers are not concentric. My OCD is triggered....
 
Front loading clothes washer. Made light to save on shipping cost. It has a stationary water tank to weigh down the whole machine and a hollow - water filled - drum probably to act as a flywheel in operation.

Rural house, well water, low pressure pump, laundry room on the main floor 2x10 joists 24" o.c. and two sheets of 11/16 inch ply floor.

"Is your washer running?" Yeah, it's trying to escape. Only the hoses are holding it back.

Store that sold it, manufacturer, and independent appliance repair couldn't get it to work right.

Long story short . . . adding two extra 2x10 joists so they were now 12" o.c under the washer helped a little. Finally, the water supply was raised so that it was 18" higher than the washer inlets (cutting copper pipe and soldering it back together). Now both water tanks are full and the damned thing is in balance.
 
That sounds more like "under-engineered product" than an over-engineered fix.
 
The portafilter on my espresso machine had a silicone sleeve with a flange molded into it. It sits in this recessed land on the frame of the machine:
thingy.jpg
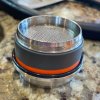
Unfortunately, after you pull enough shots, it chewed through the silicone. My handy digital micrometer said the OD was about 2.9 inches (metric inches, I suppose). After obtaining a plethora of o-rings from the espresso machine and sink repair aisle of $local_hardware_store, I was able to glue in a spacer (orange), trim the mashed parts off the sleeve (gray), and put in a proper o-ring:
portafilter.jpg
Better than new!
 
When I was building my deck, I used 5, 6x6 posts and 2x12 joists, half on 16" centers and half on 12". The two beams are 6x12s.
With most of the framing in place, my next-door neighbor wanders over while I'm working and asks in his British accent, "What's ya building, mate, a carpark?"
 
"What's ya building, mate, a carpark?"
You could've told him "it's built like a brick $#!thouse". Or have a momentary lapse of reason, like I did, and say "it's built like a $#!t brickhouse" instead.
 
The portafilter on my espresso machine had a silicone sleeve with a flange molded into it. It sits in this recessed land on the frame of the machine:
View attachment 146436
Unfortunately, after you pull enough shots, it chewed through the silicone. My handy digital micrometer said the OD was about 2.9 inches (metric inches, I suppose). After obtaining a plethora of o-rings from the espresso machine and sink repair aisle of $local_hardware_store, I was able to glue in a spacer (orange), trim the mashed parts off the sleeve (gray), and put in a proper o-ring:
View attachment 146435
Better than new!

Nice! I've rebuilt the wife's BDB machine twice now. Second time I abandoned buna rubber and went with Aflas (reddish orange) o-rings which are apparently more steam resilient and have lasted a lot longer. Amazon has a bunch from a dude named Mister O-ring. I'm not sure I'd adapt that appellation myself, but no judgement. :D

So far so good. I haven't had to do that central ring yet and I somewhat dread it.
 
Mongo makes tools...

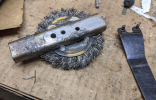
deathwheel got over tightened on my angle grinder. Have a welder and scrap metal...
I must never own a welder. You can take the kid out of the trailer park...
 
I kinda think everyone should own a welder. But overengineered repairs? I'm thinking they're usually better called under-designed products.

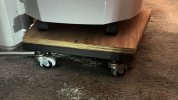
Case in point, before the mini-splits I had a portable air conditioner. Miserable for many reasons, one of which is that it was supposed to exhaust out all the moisture, so it didn't have a drain pan. Here in upstate NY, the humidity is always high when it's warm, so the AC would pee on the floor. Solution - weld up a simple trapezoid shaped frame out of 1" square tube, bolt some casters on the bottom, 3/4" plywood on top, and it's high enough I can put a drip pan under the rear center where the water leaks out. No closeups of the flux core welds, but they're just fine to hold up the 40 lb AC unit. Worked fine for several years.repair-1a.jpg
 
Yeah, I would’ve looked at just plumbing a drain line.
:) I would've, but this was in a bedroom, and 2" off the floor before that stand. The right fix was to put in a real AC unit...only took me about 3 years to do that.

edit - part of that is that I'm lazy. but the other part is that the 3 head mini-splits were about 8k total, while that little stand cost maybe $20 for the wheels. I may not be handy but I *am* cheap sometimes. Maybe that's the point of the thread? Things that some people will repair, that others would just toss, for various reasons.
 
Back
Top