MickYoumans
Cleared for Takeoff
- Joined
- Jan 26, 2012
- Messages
- 1,334
- Location
- 2J5 / KBXG - Georgia
- Display Name
Display name:
MickYoumans
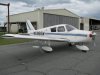
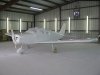
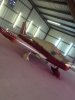
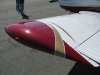
Hopefully this thread will be an encouragement to those of you that are currently refurbishing an old airplane or contemplating doing so. I just got my airplane back out of the paint shop and I now consider my refurbishment complete. This is so exciting for me because this has been a four and a half year journey to get to this point.
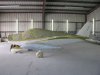
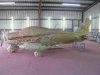
I purchased my humble little Cherokee on April 2, 2011. It had a total of 2000 hours on both the engine and airframe. I thought that since the airframe had so little time on it, it would be a good candidate for refurbishment. Some people like to rebuild old 60’s muscle cars, but for me, I wanted to refurbish an old airplane. Even though the engine was at TBO, it was running good and allowed me to purchase the airplane for a very low price. During the first two annual inspections, I went through everything on the plane to put it into first class shape mechanically, including sending the fuel tanks to Woodstock Aviation to be refurbished. The throttle cable, mixture cable, starter, alternator, vacuum pump and brakes were replaced or rebuilt. For the first two and a half years there was nothing done where you could visibly see any improvement, but the airplane was now in great shape mechanically.
Radio Stack:
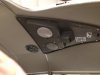
In October of 2013 the first visible upgrade I made to the airplane was the radio stack. This plane had one of the saddest radio stacks around. I was starting to have problems with the mechanical selector buttons on the transponder. I didn’t feel like that old transponder was worth wasting money on to repair, plus I wanted to upgrade the panel anyway. I installed a PS Engineering PMA-8000BT audio panel, Garmin GTR-225 radio and a Garmin GTX-327 transponder. I retained the old TKM comm radio for a backup, which I now regret. I wish I had gone ahead and put two of the Garmin GTR-225’s in. I will have to put an ADS-B Out transmitter in the plane before 2020 and will pull the TKM and replace it with either another GTR-225 or maybe even a Garmin GTN-650 GPS/Comm radio at that time.
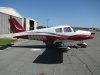
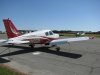
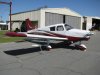
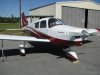
Before and After Pictures
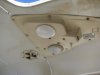
I purchased my humble little Cherokee on April 2, 2011. It had a total of 2000 hours on both the engine and airframe. I thought that since the airframe had so little time on it, it would be a good candidate for refurbishment. Some people like to rebuild old 60’s muscle cars, but for me, I wanted to refurbish an old airplane. Even though the engine was at TBO, it was running good and allowed me to purchase the airplane for a very low price. During the first two annual inspections, I went through everything on the plane to put it into first class shape mechanically, including sending the fuel tanks to Woodstock Aviation to be refurbished. The throttle cable, mixture cable, starter, alternator, vacuum pump and brakes were replaced or rebuilt. For the first two and a half years there was nothing done where you could visibly see any improvement, but the airplane was now in great shape mechanically.
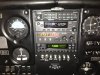
Radio Stack:
In October of 2013 the first visible upgrade I made to the airplane was the radio stack. This plane had one of the saddest radio stacks around. I was starting to have problems with the mechanical selector buttons on the transponder. I didn’t feel like that old transponder was worth wasting money on to repair, plus I wanted to upgrade the panel anyway. I installed a PS Engineering PMA-8000BT audio panel, Garmin GTR-225 radio and a Garmin GTX-327 transponder. I retained the old TKM comm radio for a backup, which I now regret. I wish I had gone ahead and put two of the Garmin GTR-225’s in. I will have to put an ADS-B Out transmitter in the plane before 2020 and will pull the TKM and replace it with either another GTR-225 or maybe even a Garmin GTN-650 GPS/Comm radio at that time.
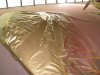
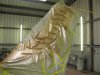
Before and After Pictures