Keeping track of parts when priming

4RNB

Cleared for Takeoff
PoA Supporter
Joined
May 24, 2016
Messages
1,392
Display Name
4RNB
I did my first batch of cleaning and priming yesterday. I'd been told to expect blue sharpies to persist through this process but they are mostly absent.

When building a plane, what are the practical methods to keep track of parts through the priming process? How do I make sure it Cleco and rivet things back where they fit after painting? Attaching part numbers on tags seems tedious.
 
What's your priming process?

I've just been using rattle can zinc chromate, and only on the faying surfaces and edges where the alclad is broken (although it gets everywhere of course). I do scuff and solvent wipe before priming. Sharpie doesn't survive that process, so I try to mark parts in a place where I won't be wiping it. I have found that although regular black sharpie (regular size, not fine tip) is wiped off by solvent, it leaves a "shadow" that is still readable, usually even through the primer. I'll generally take the time to re-mark the parts after I wipe them, and the sharpie shows through the primer.
 
I didn't do anything extraordinary to mark parts. Generally, it's not something to worry about. Typically, a Sharpie (black more than blue) will show through the primer so you can remark them after the metal prep steps but prior to shooting primer. For something like ribs, probably the easiest thing to do is just put a little piece of blue masking tape with a number on it on the part so it goes back where you want it,or simply mark the part itself -- you won't see it after it's installed.
 
What's your priming process?

I've just been using rattle can zinc chromate, and only on the faying surfaces and edges where the alclad is broken (although it gets everywhere of course). I do scuff and solvent wipe before priming. Sharpie doesn't survive that process, so I try to mark parts in a place where I won't be wiping it. I have found that although regular black sharpie (regular size, not fine tip) is wiped off by solvent, it leaves a "shadow" that is still readable, usually even through the primer. I'll generally take the time to re-mark the parts after I wipe them, and the sharpie shows through the primer.

Right now I am playing around on the Vans control surface practice kit. I'd watched some videos of a guy that reviewed products. My process was scuff lightly with scotchbrite pad, clean with Super Clean, then use a no residue window cleaner. The Super Clean removed most of the red manufacturing ink and blue sharpie ink. The primer I used was a 2K epoxy rattle can from an auto parts store. If I paint I'll likely prime with 2k epoxy that I mix and spray with air.

I might need to remark.
 
I did my first batch of cleaning and priming yesterday. I'd been told to expect blue sharpies to persist through this process but they are mostly absent.

When building a plane, what are the practical methods to keep track of parts through the priming process? How do I make sure it Cleco and rivet things back where they fit after painting? Attaching part numbers on tags seems tedious.
For similarly shaped parts, I put wires through different rivet holes and then take a picture I can refer to again when it's ready to assemble. Wire through the first hole is part one, second hole is part 2, etc.
 
Make sure that window cleaner has no ammonia in it. %90 isopropyl alcohol may be better.
 
Make sure that window cleaner has no ammonia in it. %90 isopropyl alcohol may be better.
Why?

I know about issues on windshields and plastic.
 
Ammonia eats copper. 2024 aluminum alloy is around 4.5% copper.
 
My process, when I primed (which I stopped after the tailcone except for faying surfaces or non-ALCLAD parts that required priming) was old school RV build:
1. Etch / clean with Alumiprep and maroon scotchbrite, rinse with fresh water
2. Alodine
3. Prior to priming, wipe thoroughly with Acetone (suitable subs are lacquer thinner, PPG's DX330 degreaser, etc) and then remark with sharpie (if required)
4. Shoot primer (I used Stewart Systems water based EkoPrime)

I stopped priming everything because unscratched ALCLAD has significant corrosion resistance by itself so for me all the time and effort wasn't worth it. I live in a coastal saltwater environment and don't regret my decision in the least.

No matter what, proper PPE and ventilation are a must.
I swear I read the exact same response somewhere else, I best listen!
 
I swear I read the exact same response somewhere else, I best listen!
Could have been from me since I cross posted the same post on VAF. In any event, this is a classic VAF "primer wars" discussion dating back to when VAF was an ebulletin board/list server so this process as I described it has been immortalized overtime and used by countless RV builders with various modifications.
 
In any event, this is a classic VAF "primer wars" discussion dating back
Same "war" on the TC side. While priming does add to the process, in reality, where you see the difference is with aircraft that are not maintained, eg., cleaned on a regular basis, etc., and aircraft that actually operate in saltwater environment like float planes and offshore helicopters.
 
I stopped priming everything because unscratched ALCLAD has significant corrosion resistance by itself so for me all the time and effort wasn't worth it.

While on paper ALCLAD sounds wonderful the real world is very different.

With todays epoxy primers the level of protection is way above a couple of hundreds of thousandths of easily damaged Al.
 
While on paper ALCLAD sounds wonderful the real world is very different.

With today’s epoxy primers the level of protection is way above a couple of hundreds of thousandths of easily damaged Al.
Don’t dispute proper metal prep and primer application as “a” way but do disagree that it’s “the” way, in my experience. I just completed my 11th condition inspection on my RV-10. As an example, my unprimed interior wing skins look brand new, if a bit dusty in places. And for the past 7 years my plane has been hangared next to a saltwater bypass canal in Tampa FL. Of course there are no absolutes, but I stand by my assertion on ALCLAD. YMMV….
 
Last edited:
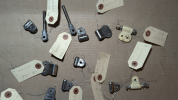
When repainting small parts for my Parrakeet I used tags with metal wires and hung the parts by the wires to prime and paint them

1746274224362.png

The tags stayed on in the parts until they were bolted to the plane.
 
When repainting small parts for my Parrakeet I used tags with metal wires and hung the parts by the wires to prime and paint them

The tags stayed on in the parts until they were bolted to the plane.
Good practice. On my RV's there were very few indistinguishable parts. Wing ribs, aileron ribs, and flap ribs are the only ones that come to mind. Had to clean, then remark them before priming (sharpie marks tend to telegraph through primer). The other stuff was pretty easy to figure out.
 
Back
Top