DKirkpatrick
Pre-takeoff checklist
- Joined
- May 18, 2011
- Messages
- 317
- Display Name
Display name:
DKirkpatrick
Anyone have a thumb in the breeze of the number of hours to expect to install all new windows on a 1968 Cessna 182? Thanks

All the windows? the doors too?Anyone have a thumb in the breeze of the number of hours to expect to install all new windows on a 1968 Cessna 182? Thanks
I have never heard of anyone installing a new windshield on a Cessna with rivets. Ever. Can't even remember the last time I've seen anything other than screws and nuts.And getting at the rivets under the glareshield to buck them is no fun, either
Now, drilling out rivets means that the shop heads fall where they may and can drop into avionics .
I have never heard of anyone installing a new windshield on a Cessna with rivets. Ever. Can't even remember the last time I've seen anything other than screws and nuts.
What? the rivet heads are on the outside of the aircraft. How do they get into the radios?
And by pulling a couple instruments you can clean the mess up and re-install all the rivets.
Takes two people.
Those of us that do know how to replace windows, do remove the lower strip first then take the window out whole.If an A&P say "remove the valance" or "use the old window as a template" RUN like heck and find some one who knows what they are doing.
Those of us that do know how to replace windows, do remove the lower strip first then take the window out whole.
Then clean all the old sealant, rivet holes, and any other repairs we need to do then set the new window properly on a clean surface. Great Lakes do make good products.
cause.....some folk need the money.Why turn a $1000 job into a $4000 job.
It's usually 2 hours at 50 per.cause.....some folk need the money.
ok....I understand why it takes twice as long.It's usually 2 hours at 50 per.
What? the rivet heads are on the outside of the aircraft. How do they get into the radios?
Drilling out and replacing the lower valance is a 30+ hour job.
You should read the Cessna structural repair manual. Cherry Max are not allowed to fill a whole row anywhere on the aircraft.The job can be shortened a few hours if Cherry Max pop rivets are used instead of bucking new standard rivets.
For the love of all that holy, DO NOT removed the lower valance for install the front windscreen. Follow the Cessna service manual<snip>
If an A&P say "remove the valance" or "use the old window as a template" RUN like heck and find some one who knows what they are doing.
The paint shop on my field never removes the lower valance, and follows the Cessna 182 Service manual procedure. They put new windows in Cessnas every month. It's a fraction of the hours required to replace. My A&P also uses the Service manual approach. And showed me while replacing my windows. I was surprised how much easier it was, and did not need to repaint.
There is a logical impulse to remove the lower valance, but it's not what Cessna recommends. I'd read the Cessna Service manual for the recommended procedure and talk with a few paint shops who do windows as a routine repair.
drilling out rivets means that the shop heads fall where they may and can drop into avionics and bus bars and the like
What? the rivet heads are on the outside of the aircraft. How do they get into the radios?
You didn't know the head of the rivet is on the outside of the aircraft, and we remove it, rather than the buck tail?

You didn't know the head of the rivet is on the outside of the aircraft, and we remove it, rather than the buck tail?
Only an uneducated sloppy mechanic would not protect the area prior to working.
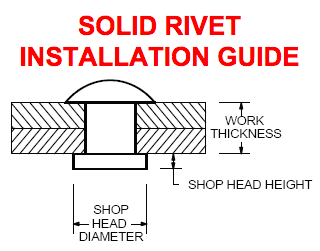
The "shop head" is the formal name for the bucktail. Look at the picture.
One can apply duct tape over the row of shop heads and use a drill stop set up pretty short so that the drill removes only enough to get the manufactured head off and release the shop head. The tape will come off with all the shop heads stuck to it. Of course, getting tape to stick to an old surface contaminated with the remnants of glue and fiberglass insulation might be a challenge.
Or simply use the proper tool.. a rivet removal tool. And If driven correctly the bucktail will not simply fall out, or be pulled out by tape.The "shop head" is the formal name for the bucktail. Look at the picture.
One can apply duct tape over the row of shop heads and use a drill stop set up pretty short so that the drill removes only enough to get the manufactured head off and release the shop head. The tape will come off with all the shop heads stuck to it. Of course, getting tape to stick to an old surface contaminated with the remnants of glue and fiberglass insulation might be a challenge.