UPDATE:
I updated our life insurance policies last night just in case. This morning I took off the bottom cowl and cleaned it all up. The wife hopped in a did a few laps around the pattern. Said it flew weird without any cowlings on??? Whatever, she's kinda weird that way. When the windshield had too much oil to see out the front she pulled the power, cut the mixture and side slipped it all the way down and straight into to the hangar. We cleaned the engine bay again. Put the cowls back on, closed the cowl flaps, inserted the nose plugs and then squirted 163 tubes of RTV inside until it finally started coming out the top oil fill door. Solved. BOO YAH!!!
Kidding of course. That was for
@Tantalum because he loves Skylanes and
@Rgbeard because he loves my husband/wife flying stories LOL.
Seriously....I did take off the bottom cowl and clean it all really good. For the push rod tube theory, the best I could see was some older oil around the pilot side front cylinder push rod tubes. But that really looked like it was from long ago spilled oil since its pretty much below the oil fill cap. Same thing around the dipstick tube. What little oil there looked old. It was clamped down really good too. Not a drop around the quick drain nor the other fitting going into the pan (oil temp or pressure?). So it really seemed like this leak was in the back by the firewall.
The thing that kept bothering me was the amount of oil that had collected on top of the strut. Like a mini reservoir. So we decided to start with one quick run up with all cowls off. No more than 60 seconds. Before startup we swept up really good to make sure nothing would get sucked into the carb since there was no filter. I had our purple K extinguisher nearby even though we just used dried shop rags (no solvents or cleaners yet). Both tires chocked and the parking brake on.
She fired it up and nothing. I came up from the back and peeked around. About then I saw oil really gushing out and by the time I raised my hand for her to cut the engine the firewall was drenched again and the windshield was completely covered in oil. Lets hope that was her first and last time she (or I) see that again!!! Unfortunately I didn't spot the exact the location on that run. So we toweled it off again. Once again, not a new drop anywhere forward.
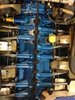
Second run, after about 30sec and oil pressure up nice and good I had her bump the rpm maybe 1,300 instead of 1,000. I spotted it coming out what looked like the bottom of the alternator drive pulley shaft. Its started gushing pretty good and we stopped the engine again. After it was shut down and safe I started wiping in this area and notice what appears to be a sleeve (or ???) that is loose around the pulley shaft. I can move it with my fingers. See the attached image. Has a red paint stripe/band towards the firewall side.
Definitely not going to fly it anywhere!!! No AP shops open today. That space seems pretty tight to be able to remove that plate and assembly. My eye thinks I can see how it might be removed...if there is space. So that's what we know right now. It is definitely not a slow leak or safe to fly. Typical, was the nicest flying morning in the last 2 weeks.
We did a short 3rd run and although it had plenty of oil and the same typical oil pressure (indicated) it didn't leak. So maybe the oil is low enough now to not spill out of there. It should be around 8qts. I cleaned it all up, parked it and tipped the tail to the same angle as when we first checked oil. Will check oil tomorrow to see how much we actually lost. I am guessing about 1/4...1/3qt.
View attachment 97456
")