RV6 gear leg

Notatestpilot

Pre-takeoff checklist
Joined
Aug 31, 2020
Messages
160
Display Name
Notatestpilot
Home Airfield
KTOA
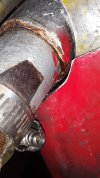
I’ve noticed a bit of corrosion/rust between the gear leg and where it inserts into the engine mount.
Shall I consider gear leg removal to treat this corrosion?
 
Nope!
I'm not going there.
Anyone on this forum that has an opinion about RV6 rusty gear leg, please respond.
Please do not turn my question to a side topic about using VAF. I have a maintenance question and wish to discuss and seek discussion here on Pilots of America.
Thanks!
 
Can you provide a pic? Pulling one gear leg on a -6 isn't a crazy amount of work, so if it was enough to bother me, I'd either treat it in place or pull it and treat it.

If you wanna pull the gear leg, put a carriage bolt in that side's wing tiedown recess, jack the airplane on that side, rest the wing on blocks using that tiedown point/bolt, pull the wheel, remove the bolt securing the gear leg, and you'll have room to drop the gear leg.
 
Last edited:
A lot of that looks like old grease to me that they coated the upper portion of gear leg where it inserts into the weldment vs actual corrosion. However, if in doubt Kyle, an RV-6/RV-10 builder, has pointed you in the right direction.

PS- I don't know why you are reluctant to utilize VAF and it's none of my business as to why, but just be advised there are on a handful of RV builders active here on POA. Even if you disagree with the site for whatever reason, I wouldn't be too quick to dismiss it as VAF still has more RV institutional knowledge than what you are ever gonna get here on POA. Just saying......
 
Last edited:
nah, there's a good clip of surface corrosion in there. The question is what lies beneath....

My cylinder nuts has similar rust on them, I'm not saying addressing them would have saved me the indignity of finding out/allowing fatigue failure inflight to kick me off the hobby, but given my username checks and all....

I'd have that investigated fo sho'
 
It's very interesting that there is no posting from any where on the internet about removing these RV gear legs and inspect to treat for corrosion.
There's how to install various leg dampeners though.
 
It's very interesting that there is no posting from any where on the internet about removing these RV gear legs and inspect to treat for corrosion.
There's how to install various leg dampeners though.
Kinda tells you where most of the problems lie, then, doesn't it?

Having done both, I can say that removing a single gear leg is straightforward as long as you can get everything out of the way. Stiffeners are much more involved and a PITA to install/remove. I worked hard to make sure I could remove the legs without removing the stiffeners just in case I have to get a leg off again.

Nauga,
who is not pulling your leg.
 
I'd appreciate a photo of the leg removed and what the associated engine mount socket looks like.
 
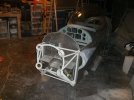
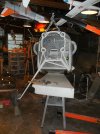
Excuse the mess and see if this helps. Each leg is a friction-fit and held with a single AN6 bolt. They're easier to get out than to get back in, at least with no corrosion.
Gear Up.jpgPegLeg.jpg

Nauga,
who has moved to better digs
 
Wow, amazing. The wings were removed just to pulled the gear leg to mitigate corrosion.
Thanks for sharing.
 
Wow, amazing. The wings were removed just to pulled the gear leg to mitigate corrosion.
No, the wings were removed for transport to the location in the photos. Had the wings been mounted I would have just jacked the airplane at the tiedown points and pulled the gear.

The gear legs were pulled for spot refinishing (no corrosion noted) before the wings were remounted because the airplane would not fit in the shop with the wings on.

Nauga,
and confirmation bias
 
Last edited:
I pulled both main gear legs on the RV-6 a couple of years ago to subsequently remove the engine mount so I could have gussets added. The original style mounts had a service history of cracking so the factory added gussets on new mounts and provided "free" gussets to anyone with an old mount who wanted to go to the trouble of doing the upgrade.

Anyway, 22 year old airplane, always hangared, no rust in the sockets or on the gear legs. Stripped the mount, had a friend TIG the gussets in place, then spent a ridiculous amount of time dealing with the <now> oblong gear mount sockets (heat warpage from welding). Reamers, bullet shaped tools persuaded with a slide hammer, quite a bit of cussing, and they finally refit properly. In total, probably 50 hours or more of labor and almost that much time thinking about how to fix things to correct a potential (not actual) problem. Yay, me.

The key to avoiding rust in the engine mount/gear leg interface is probably to grease the gear legs when installing 'em.

 
Thanks for sharing. Very informative and helpful. Really appreciate the responses.
 
I pulled both main gear legs on the RV-6 a couple of years ago to subsequently remove the engine mount so I could have gussets added. The original style mounts had a service history of cracking so the factory added gussets on new mounts and provided "free" gussets to anyone with an old mount who wanted to go to the trouble of doing the upgrade.

Anyway, 22 year old airplane, always hangared, no rust in the sockets or on the gear legs. Stripped the mount, had a friend TIG the gussets in place, then spent a ridiculous amount of time dealing with the <now> oblong gear mount sockets (heat warpage from welding). Reamers, bullet shaped tools persuaded with a slide hammer, quite a bit of cussing, and they finally refit properly. In total, probably 50 hours or more of labor and almost that much time thinking about how to fix things to correct a potential (not actual) problem. Yay, me.

The key to avoiding rust in the engine mount/gear leg interface is probably to grease the gear legs when installing 'em.
Kyle,
I am faced with a similar issue following repair of my engine mount. The gear sockets seem to have distorted slightly and the legs no longer fit.
I am aware of the need for a tight fit, and options for honing or reaming. I believe reaming is the better choice in my case. Can you tell me more
about how you went about getting your gear leg sockets corrected ? Specific methods or tooling used would be most helpful. How did you ensure
alignment of the bottom and top of the gear sockets while reaming ?
Thanks,
Peter
First, you only really need to worry about the bottom of the socket, which is adjacent to where welding is done. The top probably won't distort. What I did was have a buddy turn a bullet plug of the right diameter on a lathe, then use a slide hammer to pull that through the distorted end of the socket to re-round the socket. Then I used a reamer (and a light touch) to enlarge the socket back to a tight fit over the gear leg.

Reach out if I can help. I could send you the reamer and bullet plug if that would be helpful.
 
Thanks for the quick response. I’d take this to pm, but I don’t think I have permission (yet).

I had welding done top and bottom, so my situation may be more complicated. The (first) interference is at the top of the socket, stopping the gear leg about 0.5” short of its assembled position. The bottom bushing may bind also if I get the leg inserted further, but the top of the gear leg passes the bottom bushing easily.

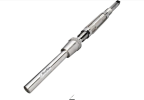
Pulling a plug through with a slide hammer seems more energetic than I hope to need. I’m trying to do this fix with the mount back on the firewall. What sort of reamer did you use? I’m afraid that if I only engage the top bushing with the reamer I might get the top and bottom bushings out of alignment. I’m looking at “Long Pilot” adjustable hand reamers such as pictured, with the idea that the pilot cone riding on the long shaft could engage the opposite end bushing and help maintain concentricity.

Did you use something simpler ? Did you have any trouble restoring a tight fit?

1788460883721.png
 
To answer your question, I didn't have any alignment problems. You're removing .000's of inches with the reamer and you'd have to be pretty careless to get a real misalignment issue with that small of an adjustment. But, if you want, make a wooden bushing (dowel or plywood) for the bottom socket, drill a centering hole in it, and use it as an alignment tool for the reamer extension.

I'll tell you one more thing I did. I had a steel rod turned to the exact diameter of the gear leg. I attempted to insert it into the deformed/undersized socket. If it didn't fit, I expanded the reamer a wee bit and removed a little more material. Lather, rinse, repeat until the rod would slide in. That way I didn't need to fool with the gear leg every time I wanted to check fit.
Excellent, thanks.
 
Just to close the loop on this, the Piloted Adjustable Reamer - size H14 worked perfectly to true up my gear leg sockets. Highly recommended. If you try this, work carefully and take your time, the difference between a good fit and too large is small. Take small bites with the reamer.

The reamer I used is widely available on Amazon and eBay.
 
Back
Top