DesertNomad
Pattern Altitude
My plane is in annual and I had them remove an INOP Stormscope WX10A to make room on the panel for other things. I may eventually replace it with a model 500 remote unit. They took out the instrument, processor and antenna.
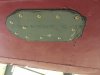
When they (not my shop) originally installed the Stormscope antenna on the rear belly many years ago, they screwed up and ended up drilling twice as many holes as they should have, and the large center one for the main connection had to be ovaled. Note that I have not seen this but am relating what my shop told me it looked like.
This past week, my shop removed the antenna (thus discovering all the holes) and screwed an external plate to the original antenna backing plate with the "swiss cheese" skin sandwiched in between. This is meant to be permanent but maybe it would be best if I took it to a good sheet metal place. I was hoping it could be riveted with an internal doubler plate and made smooth but my shop said this external plate was a good solution. Perhaps they are just reluctant to do much sheet metal work.
They still need to clean up the sealant around the edges and paint it. He said it was primed... Does that look primed since you can still see writing on the metal?
Does it seem like there is a better way to do this?
Attachments
Last edited:

