You are using an out of date browser. It may not display this or other websites correctly.
You should upgrade or use an alternative browser.
You should upgrade or use an alternative browser.
Recover take 2
- Thread starter tonycondon
- Start date
Arbiter419
Cleared for Takeoff
Tune in for the next episode of "GLIDERS GONE WILD!"
Have fun doing the recover - I'm sure it'll be a blast.

Keep us posted!
tonycondon
Gastons CRO (Chief Dinner Reservation Officer)
ha chris. leahs glider has original fabric on it from 1964. the paint is in good shape but is thick. it has at least two coats on it. a few of the longerons and the trailing edge of the wings are starting to show some warpage from years of shrinkage. so it is time for new fabric.
I thought this was going to be a thread about Lindsay Lohan.
Seriously though, good luck with the project. I enjoyed following the progress on the last one.
Seriously though, good luck with the project. I enjoyed following the progress on the last one.
BiffJ
Pre-takeoff checklist
What are you going to recover with???? Was the original covering cotton or ceconite?
Frank
(a former builder or Zuni 15m sailplanes)
Frank
(a former builder or Zuni 15m sailplanes)
tonycondon
Gastons CRO (Chief Dinner Reservation Officer)
frank the original was, im told, polyester fabric from sears roebuck. finished originally with silver and dope and at least another coat of paint with polyfiber on top of that.
we`ll recover with stewart systems like we did my glider last winter.
we have 2 or 3 zunis down here in kansas. neat glider!
we`ll recover with stewart systems like we did my glider last winter.
we have 2 or 3 zunis down here in kansas. neat glider!
Baron2PG
Pre-takeoff checklist
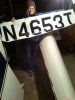
Leah cut out the N numbers from her glider last night. All the wood that I could see looks like it is in good shape. We'll get more wild after Thanksgiving with the knife.
Make sure you take a look at the Biplane Forum. There are plenty of good posts regarding various fabric systems, paints, primers, techniques.
BiffJ
Pre-takeoff checklist
I know the designer of the Zuni-George Applebay, built a couple Cherokee's while he was working for Cessna in Wichita. He had some good soaring stories flying those. He still had one when I worked for him back in the 80's.....He may have it still in the soaring museum in Moriarty NM. Do you know who originally built your gliders???
I've not worked with the Stewart system. Its been a while since I did any fabric work. Back then it was a choice of poly peel or dope. I've heard good things about Stewart though. Hope your project goes well. Sounds like you know what you're getting into.
Frank
I've not worked with the Stewart system. Its been a while since I did any fabric work. Back then it was a choice of poly peel or dope. I've heard good things about Stewart though. Hope your project goes well. Sounds like you know what you're getting into.
Frank
tonycondon
Gastons CRO (Chief Dinner Reservation Officer)
one of george`s cherokees is at the sw soaring museum. i think the other one is in illinois somewhere i think. ive gathered histories of a lot of cherokees at http://cherokeesailplanes.blogspot.com
tonycondon
Gastons CRO (Chief Dinner Reservation Officer)
tonight we got the fabric off the fuselage. looks mainly good under there. write up and pictures at http://cherokeesailplanes.blogspot.com
tonycondon
Gastons CRO (Chief Dinner Reservation Officer)
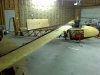
wings are uncovered. http://cherokeesailplanes.blogspot.com/2010/12/wings-open.html
tonycondon
Gastons CRO (Chief Dinner Reservation Officer)
last night we cut out the top stringer on the fuselage and identified work that will need to be done when it is warm enough to epoxy. Also did some more sanding on the fuselage.
tonycondon
Gastons CRO (Chief Dinner Reservation Officer)
well by next thursday it is supposed to be 70 degrees here in wichita so i'm hoping to get a lot of work done on the garage next week. once the garage is insulated we'll move the glider over and get back to work.
tonycondon
Gastons CRO (Chief Dinner Reservation Officer)
Finally got the glider moved to the garage. Spent most of today working on it. Update here:
http://cherokeesailplanes.blogspot.com/2011/03/one-step-forward-two-steps-back.html
http://cherokeesailplanes.blogspot.com/2011/03/one-step-forward-two-steps-back.html
rottydaddy
En-Route
Mouse damage... ugh. And the spar, no less. They could have nibbled on the seat, but nooooo... had to go for the spar. 
But it looks, to me, like it can be rectified without doing anything too radical, and whatever the case, it will be worth it for the peace of mind.
I know that feeling: "Gee, I kinda wish I hadn't looked in there... but I'm also kinda glad I did..."
But it looks, to me, like it can be rectified without doing anything too radical, and whatever the case, it will be worth it for the peace of mind.
I know that feeling: "Gee, I kinda wish I hadn't looked in there... but I'm also kinda glad I did..."
tonycondon
Gastons CRO (Chief Dinner Reservation Officer)
last night i did some more cleanup/removal of water damaged wood at the base of the vertical stabilizer. sort of mapped out what i will need to do for the scarf joints there. tonight hoping to finish removing wood and start cutting the scarfs. ordered new wood and a bunch of fabric from Spruce last night.
tonycondon
Gastons CRO (Chief Dinner Reservation Officer)
made more progress this week and the gilder side scarfs on the vertical spars and the lower longerons are done. need to scarf the new wood and start re-assembling everything this week.
CJones
Final Approach
So are you going to have anything flyable this season?
You're starting to sound like the redneck of gliders with a bunch of cars (gliders) in your front yard... "Well, the Pinto needs a starter... The Topaz needs a transmission..."
You're starting to sound like the redneck of gliders with a bunch of cars (gliders) in your front yard... "Well, the Pinto needs a starter... The Topaz needs a transmission..."
tonycondon
Gastons CRO (Chief Dinner Reservation Officer)
So are you going to have anything flyable this season?
You're starting to sound like the redneck of gliders with a bunch of cars (gliders) in your front yard... "Well, the Pinto needs a starter... The Topaz needs a transmission..."
i should get a picture of my driveway and post. huge pile of tree debris, two glider trailers, 3 (driveable) cars.
Leah's glider and my NG-1 glider are in the garage. I need to do a little cleanup and touch up paint on the NG-1 and it should be ready for its condition inspection and then will go back in the trailer and back to the gliderport. My glider is in the other trailer. It is perfectly flyable the way it is but there are a few things I want to do to it this spring before the season gets going. Like fill in the bubbles on the leading edge and replace the wiring.
Capt. Geoffrey Thorpe
Touchdown! Greaser!
- Joined
- Jun 7, 2008
- Messages
- 15,667
- Location
- DXO124009
- Display Name
Display name:
Light and Sporty Guy
So are you going to have anything flyable this season?
You're starting to sound like the redneck of gliders with a bunch of cars (gliders) in your front yard... "Well, the Pinto needs a starter... The Topaz needs a transmission..."
It's easier to get at the parts if you roll them up on one side.
CJones
Final Approach
i should get a picture of my driveway and post. huge pile of tree debris, two glider trailers, 3 (driveable) cars.
Leah's glider and my NG-1 glider are in the garage. I need to do a little cleanup and touch up paint on the NG-1 and it should be ready for its condition inspection and then will go back in the trailer and back to the gliderport. My glider is in the other trailer. It is perfectly flyable the way it is but there are a few things I want to do to it this spring before the season gets going. Like fill in the bubbles on the leading edge and replace the wiring.
You should do a before-and-after setup with the tree debris, and you working on your wooden gliders or Leah's wooden canoes.
Ted
The pilot formerly known as Twin Engine Ted
- Joined
- Oct 9, 2007
- Messages
- 29,930
- Display Name
Display name:
iFlyNothing
So are you going to have anything flyable this season?
You're starting to sound like the redneck of gliders with a bunch of cars (gliders) in your front yard... "Well, the Pinto needs a starter... The Topaz needs a transmission..."
Sounds like the fleet in my garage...
- The high beam doesn't work on the RC51, and it needs one of the headlight brackets adjusted
- The KZ1000P needs the high driving lights connected, and the front brake switch doesnt' work
- The Triumph needs a mirror, some touch-up paint, and for me to finish painting the new nose fairing to put on
- The 3000GT needs... everything
- The Excursion has a sticking left rear brake
But the Sportster, Seca, and Avalanche work great! Oh wait, none of those are mine...
tonycondon
Gastons CRO (Chief Dinner Reservation Officer)
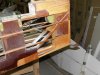
the wood that arrived earlier this week was just the birch plywood. today the spruce arrived. mahogany plywood is still on backorder. So anyway i started slicing and dicing the spruce today. First made the scarfs for the vertical stabilizer spars. Leah also worked on removing the aileron from the left wing. Lot of back and forth to the bench and fine chiseling on the glider side of things and i got everything more or less lined up I think. Then I took a break from the glider and sanded on my latest rowing shell repair project. Then it was back to work on the glider. Next up I made the longeron scarfs which didn't really take anytime at all. By the way I really love the new fence on my table saw. Perfectly square and straight. Even with the crummy stock blade it is making great cuts. At least a whole lot better than with the old fence! So once I got the longeron scarfs made I thought I was done but then I remembered that the longerons also tapered from 3/4" wide to about 5/16" wide at the aft end. I also had to make sure to leave 1/8" clearance between the spars and the longeron for the plywood shear web. So a lot of marking, measuring, and planing and I had them trimmed up to the proper shape. By then it was 1 AM so I decided to call it a night.
Tomorrow I'll epoxy the spars in place in the morning so that later in the day I can work on scarfing in the new plywood webs. Hopefully I don't have to tear out too much stringer material to do that. Then with the plywood in place I can epoxy the longerons in and then rebuild whatever stringer stuff I have to tear out. I'll also have to scarf in a piece of plywood that covers the back of the aft vertical spar and replace a plywood gusset that was in the way of removing the front spar. might have some more work to do on a large gusset that i had to trim away to make the longeron scarf.
Letsee then I'll have to come up with my tailwheel attach bracket scheme and get that in place at the bottom of the vertical stab. This was the piece that originally busted out and caused all of this work. I've got some ideas on how to make it less flexible lighter than the old one. Then once that is in place I can finish the work on the tail by replacing the plywood on the bottom of the truss and finishing the lower stringer.
tonycondon
Gastons CRO (Chief Dinner Reservation Officer)
got the spars in this morning and this evening epoxied in the plywood webs. update on the blog, and pictures. http://cherokeesailplanes.blogspot.com
Richard
Final Approach
- Joined
- Feb 27, 2005
- Messages
- 9,076
- Location
- West Coast Resistance
- Display Name
Display name:
Ack...city life
Tony, what method did you use to make the scarfs? And it appears you are making only one half of the joint...is that correct?
I just started to read this thread and your blog. I'm liking what I see so far. Cool projects.
I just started to read this thread and your blog. I'm liking what I see so far. Cool projects.
tonycondon
Gastons CRO (Chief Dinner Reservation Officer)
Tony, what method did you use to make the scarfs? And it appears you are making only one half of the joint...is that correct?
I just started to read this thread and your blog. I'm liking what I see so far. Cool projects.
i used a plane on the longerons and spars. both the glider side and the new piece of wood have 15:1 scarfs on them so they match up nicely. On they plywood I just used my little handheld sander to get the 15:1. Easier when the scarf is only 1 7/8" long instead of 7 or 11 1/4" like the spars and longerons.
glad you're enjoying it. The longerons are curing now.
tonycondon
Gastons CRO (Chief Dinner Reservation Officer)
longerons turned out great, did a little trimming and started working on the stringers today. http://cherokeesailplanes.blogspot.com
tonycondon
Gastons CRO (Chief Dinner Reservation Officer)
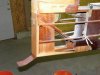
stringers are glued in. the tailwheel support with steel backup and nutplates is primed and ready to be epoxied in place. Also have a few more plywood scarfs to make on a the gussets that I had to butcher for the longeron scarf. Once those are ready the gussets will get replaced, then the tailwheel support and the plywood on the back of the vertical stab. The final part of the tail repair will be replacing the plywood that was on the bottom of the entire area and fixing up the 3/4" thick stringer that defines the bottom of the glider.
tonycondon
Gastons CRO (Chief Dinner Reservation Officer)
Tom-D
Taxi to Parking
- Joined
- Feb 23, 2005
- Messages
- 34,740
- Display Name
Display name:
Tom-D
You gotta get busy and get that dry wall up.
Capt. Geoffrey Thorpe
Touchdown! Greaser!
- Joined
- Jun 7, 2008
- Messages
- 15,667
- Location
- DXO124009
- Display Name
Display name:
Light and Sporty Guy
Get some large diameter PVC pipe, cut it into short lengths and slit it so you end up with dozens of C shaped spring clamps.
tonycondon
Gastons CRO (Chief Dinner Reservation Officer)
You gotta get busy and get that dry wall up.
will finish insulating walls and drywall ceiling and insulate attic later this summer after glider projects are done and before it starts to get cold again. even with walls and ceiling 3/4 insulated it heats up fast and stays pretty warm out there when the temps are in the high 30s and 40s like last night.
tonycondon
Gastons CRO (Chief Dinner Reservation Officer)
got back to work on leahs glider last night. plywood gusset on the bottom of the fuselage in tail area is cured in place, Leah did some sanding on the left wing and worked on some of the filler work around the wing roots on the fuselage. I spent some time with my calculator and the mouse damage to the wing spar is OK with plenty of margin at an 8G ultimate load, so we're happy about that.
tonycondon
Gastons CRO (Chief Dinner Reservation Officer)
Last night I epoxied in the last part of the tail repair, the lower stringer. Tonight everything got a couple coats of epoxy varnish. Looking good! I guess the only thing left in this area is to finish priming the tailwheel bracket and drill a hole in the bracket for a castering wheel which is still TBD. I also varnished up the chewing damage in the left wing tonight. Next step is to figure out the new wheel/brake install and work on replacing the control cables. Leah is still working on sanding and filling in a few spots.
Attachments

rottydaddy
En-Route
Lookin' good! Prime the bracket after you drill the hole... just sayin'.Last night I epoxied in the last part of the tail repair, the lower stringer. Tonight everything got a couple coats of epoxy varnish. Looking good! I guess the only thing left in this area is to finish priming the tailwheel bracket and drill a hole in the bracket for a castering wheel which is still TBD. I also varnished up the chewing damage in the left wing tonight. Next step is to figure out the new wheel/brake install and work on replacing the control cables. Leah is still working on sanding and filling in a few spots.

tonycondon
Gastons CRO (Chief Dinner Reservation Officer)
wow been a while since i updated here. I've started to replace the control cables in the fuselage and the elevator and fuselage side aileron cables are done. Rudder cables just needs connected to the turnbuckle and rudder itself. In anticipation of running the aileron and airbrake cables, Leah and I did some cleaning and reorganizing in the garage tonight to make enough room to allow the glider to be assembled inside.
We also fired up the heater for the first time this fall. I think it ran a total of 10 minutes to keep us in t-shirts for at least 3 hours. Love that insulation and I still have to finish that job!

We also fired up the heater for the first time this fall. I think it ran a total of 10 minutes to keep us in t-shirts for at least 3 hours. Love that insulation and I still have to finish that job!