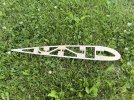
Got a booboo, need a wood working guy

Barrett50

Line Up and Wait
Joined
Oct 3, 2024
Messages
701
Display Name
Barrett50
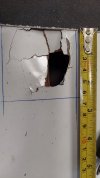
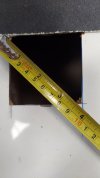
My plane has a bash in the top of the wing about 1.5x2". It's right through the surface, and I'm no good at woodwork. I can maybe mess with it and do a marginal job, but I'm looking for someone, anyone with an A&P ticket and some experience in wood repair. It's right next to the entry step, but just beyond it and right at the top of the arch of the wing planform.

Know a wood wing person? PM me.
 
Last edited:
You may need 2 people. A cabinetmaker to do the task and an A & P to

outline requirements and sign off completion.
 
You may need 2 people. A cabinetmaker to do the task and an A & P to

outline requirements and sign off completion.
Correct. The bigger issue is this damage structural or not?

I’m assuming this is a fabric covered wood wing. This will require removing either all or part the fabric, conduct the repair and repair or replace the fabric.

Where is the aircraft located?
 
A Starduster 2. Did that very recently. Suffered a spar failure during a loss of control on roll out.

Was easier to double splice a piece in the middle. Wing tip hitting broke the spar at a aileron hinge fitting.
 
I've spoken to a 40 year wood expert and have some instructions. I'm going to give it a shot as I can follow written instructions well. I'll take a pic of the damage and upload it here, and see if there's a consensus(unlikely) about repair process.
 
ANY task is easy for folks that possess the needed SKILLS..

Suggest you check out AC 43.13-1B to determine the type of repair required.

Then practice , practice, practice.

That still leaves you with needed a A & P to sign off.

Bring them on board at the beginning.


At one time wood work of Return to Service quality was a requirement

for the A& P. I thought my model building experience would help.

It did; but not as much as I thought it would.
 
I’ve found a/c repairs utilize my machining and pattern maker skills the most.
 
Here's what I've got.
hole pre cut.jpeg
My A&P with extensive wood experience has advised thusly: Cut a piece of 3/32" Mahogany 3.5x5". Trim the corners round. Put a small hole right in the center, and put a piece of fishing line through the hole with a large knot on one side. This is the inside plate. Build a temp A frame or some type of trellise that goes over the cutout to tie the fishing line off.

Spread a modest amount of T-88 system three on the inside around the hole with my finger. Spread a modest amount on the face-up side of the inside plate. Don't need any on the opening area 2.5 square, leave blank. Place the inside plate through the hole vertically, and then orient it so the line is in the center of the square. Orient it so the longer end(5") runs fore and aft to the plane. Lift up the inside plate so it mates to the inside of the wing. Tie it off on the trellise over the cutout, and then raise the trellise just enough to put the curve in the inside plate, matching the radius curve of the top of the wing. It will have a mild arc lengthwise. Once oriented and curved to match the wing curve, let set at +70F for 18 hours min.

Once set, remove the trellis and cut the fishing line. Push the small piece of line down into the int of he wing. Now make the surface patch from the exact opening of the inside piece. Once it is fitted well, glue the inside piece and the patch piece modestly with T88. Set the patch on the inside piece. Use two pencils oriented down the wing at front and aft edge. Set a brick on the two pencils to force the front and back down matching the radius of the wing and inside piece. let dry 18 hours.

Taper up the fabric around the patch with a dremel and small drum sander. Cut out two fabric patches, one slightly smaller than the first. Apply some dope to the fabric and fit the small one then the slightly larger one on the patch. Let cure 18 hours. Sand smooth and match paint.

Pretty sure I can do this with A&P oversight even if he's not a wood pro. Ready for the critique.
hole in wing.jpeg
Edit: My A&P is two hangars down and he knows my work. He'll sign just about anything I put in front of him. Might make a cursory inspection and look but he knows I have high standards. He hired me to put bladders in a Bo, he'd never done it and I had plenty of experience.
 
Last edited:
Since this is repairing the skin, it might be a major repair needing a 337. Don't forget to ask your A&P about it.

(b) Major repairs—(1) Airframe major repairs. Repairs to the following parts of an airframe and repairs of the following types, involving the strengthening, reinforcing, splicing, and manufacturing of primary structural members or their replacement, when replacement is by fabrication such as riveting or welding, are airframe major repairs.
,,,,,,
(xxiii) The repair of portions of skin sheets by making additional seams.

(xxiv) The splicing of skin sheets.
 
Booboo work in progress. I bought the right wood(got a lot extra wood), and T88 system 3. Used my jig saw for the first time and realized I am not an expert with the jig saw. Oh well, I did some filing, and sanding to take the waves out of the cut edge. I decided to use two string holes as I was worried if I used one it would bow laterally as well as longitudinally and I may get poor adhesion on the sides. I wanted it to bow the radius of the top wing.

After cutting the inside fill piece, I made a few measurements and cut the patch piece about 1/8" oversize. I'll do the finish fit with a belt sander to trim so I get a tight fit in the remaining hole. Because I'm a noob at wood work and don't want to make a single cut precision fit piece.

I test fit the fill base a few times, and make my Tower of Tension to pull up on the lines from the wood. I have to be careful not to pull too hard and break the wood or the lines, but not too little and don't get the right bend profile of the upper wing curve. I think I have it just right and test fit a few more times.

It's glue time! Outside temps are in the high 80s, I have a 45 min to 1 hour working time once the resin is mixed. Pull it all together, and mix up my glue. I purposefully mixed more than I would need at the expense of tossing out maybe half of my glue. I used a little cut of a standard paint mixing stick and smooshed the glue up around the inside of the wing. I smooshed it all around, and got a few small drips down on the inside of the bottom of the wing. Oh well. Only a few drops. Stuck my finger in there and made sure it was evenly spread on the upper surface. Cleaned my hand with some acetone. Sanded the inside piece with some 100 grit to rough it up. Basted the inside piece with glue, and spread around evenly. I maybe used a bit too much, but the drippings, if any were going inside the wing.

Fitted the inside piece, and got it oriented perfectly. wrapped my lines around a file as my cross brace on the Tower of Tension, and used some shim material on each side to get the wood to take a mild curve matching the upper wing profile. It was a deft touch to get the tension right. Letting it set over night before fitting the patch, and the fabric and dope, then some paint.
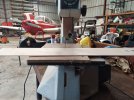
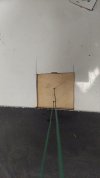
wing patch2.jpegwing patch1.jpeg
Now, we're having fun.
 
Honestly, the biggest difference between an amateur and a pro is the pro needs to be fast and efficient enough to make a living at it.

Take your time, don’t get rushed, you can get the same quality. Bravo!

THAT is a cool looking plane. Keep the progress pics coming.
 
The Bo in the background is my take a trip plane. Of course, that's not the wood plane I'm working on. I'll have a lot of leftover wood I'll send you Tools, and the T88 left too once I'm done. I will hopefully never need any wood again. If I do, I'll reach out to you.
 
For the next piece, get some nitrile gloves.

You don't want skin contact with the glue.
 
Back
Top