chronically low vacuum indication

GeorgeC

Administrator
Management Council Member
Joined
Dec 5, 2010
Messages
5,151
Display Name

Display name:
GeorgeC
My plane has two venturis, one on each side. I've been hunting a low vacuum indication, on and off, since 2021.

My first questions were about basic stuff: filter, regulator, are the hoses ancient and cracked... I think they adjusted some things and it got better for a little while, but the issue eventually recurred.

I had a different shop look at it again this year. The vac gauge itself tested good. They replaced a cracked fitting on the back of the AI, but I still got a low vac indication on the flight back.

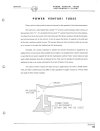
When I got home, I noticed that the (plastic) drain plug on the right side venturi was missing some paint and I could turn it by hand. From this, I concluded that they'd at least opened it up and looked at it.

The (aluminum) drain plug on the left side venturi had been painted over and was on good and tight. I don't think it's been off for 30 years. I removed the plug and cleaned it up.

I didn't have a flashlight to look inside for mud/dead bugs/etc. What's next? Bottle brush? Does it matter if the plugs are metal or plastic?
 
What's next?
Did the previous shops perform a leak check of the complete vac system?
Does each venturi power their own set of instruments?
What instruments are vac powered? P/Ns?
What size are the 2 venturi?
What's the reading on the indicator and is it steady or does it fluctuate?
 
Did the previous shops perform a leak check of the complete vac system?
Don't know.
Does each venturi power their own set of instruments?
Don't know, but there's only one vac gauge.
What instruments are vac powered? P/Ns?
AI & DG.
What size are the 2 venturi?
Not sure. Does this help?
IMG_E1096.JPG
What's the reading on the indicator and is it steady or does it fluctuate?
In flight, it reads steady at 3.5 or 4 or so. The green arc is 4.5-5.5.
 
Last edited:
There are at least 2 types of vacuum filters.

One “Central Filter“ that filters all incoming air.

There are individual filters in old “AN Gyros”.

You can have BOTH in the same aircraft.
 
Don't know.
Have you replaced any vac indicators since you owned the aircraft?
Is this problem "new" or been a feature of the aircraft since you bought it?
Without a known good system tough are to figure out what could be at fault. My guess is that there have been a few one-off mods to the vac system over the years.
Not sure. Does this help?
What are the approx length and diameter of both venturi?
Can you see how each venturi is connected to the system?
With the dimensions I might be able to figure much vac they pull. If you’re not using the old style AN indicators could be you have a system unbalance between the venturi tubes.

Once you post the replies from above might be able to give you a route to follow.
 
Have you replaced any vac indicators since you owned the aircraft?
Is this problem "new" or been a feature of the aircraft since you bought it?
No vac indicators have been replaced on my watch, but this one just tested good at annual last month.
I've owned it since 2018, the problem first appeared 2021.

What are the approx length and diameter of both venturi?
Maybe 2-3" around and about a foot long. Look for cessna venturi on ebay aviation for better pics. Guessing p/n AN5807-1.

In any case, it looks like nobody has actually pulled the venturis themselves off. Assuming there are no obvious obstructions or contaminants by the drains, I can take a look at the fittings that screw into the venturis and figure out the overall plumbing topology.
 
Our 1960 Cessna 150 had two venturis, one to the DG, the other to the AI and the vacuum guage. The AI is the critical instrument, thus the vac guage. The two systems are completely separate to assure that one vacuum failure does not kill both devices. Magman mentions multiple types of filters, and locations. If you have original or rebuilt original types, the filters are integral, on the back of the devices. More modern devices have external filters, and more complicated plumbing than Cessna did back then.

The filter may be missing on the AI, resulting in less pressure drop and higher flow than the venturi can provide. The integral filters are on the rear of the instrument, and usually held in place by a large snap ring, or a screwed in place aluminum ring. Typically, it is a pack of two metal screens with a cloth pad between them. Cessna and most manufacturers in those days installed new military surplus instruments in their production planes.

Using the camera and flash feature of your phone, you should be able to see if the filter is there, and the type.

There may be a pressure regulator, but if there is a filter missing, the flow may get the pressure too low to regulate. If you replace a missing filter, and have a regulator, and it is set at max, the vacuum may be too high, and over speed the turbine.
 
@kaiser is pretty knowledgeable about venturis last time at Gaston’s I believe you flew an airplane with one.
 
Maybe 2-3" around and about a foot long. Look for cessna venturi on ebay aviation for better pics.
If I had to guess the larger of the two is a Super Venturi which should alone be enough to power both indicators. But we still need to know how each venturi is installed. Usually in your case you’d have one venturi per indicator.

If you don’t feel like looking behind the panel to see, grab a leaf blower and very carefully point it at the each venturi and see what comes alive in the cockpit. You can also use the “out” side of a shop vac to do the same.

I’ve seen some pretty messed up vac systems especially on an older aircraft like yours. Since you only have two instuments to power may want to look at a complete replumb and use the super v to power both?

But we can still T/S the system as is since it does give you 3.5-4 of vac.
 
FWIW, both of my venturis are the same size.
 
FWIW, both of my venturis are the same size.
Interesting. See if you can get the part numbers for your DG and AI. That seems like a lot of vacuum for 2 instruments unless you have the older style. Can't offer much more till we see how your system is connected. Then we'll look at a leak check and go from there.
 
DG is a sigma tek 1U262-001-39. I don't know if I can get the AI P/N without a trip to the plane.
 
DG is a sigma tek 1U262-001-39.
Thats definitely a newer style indicator.
Is the low vac value simply an indication concern, or do you see a change in the instrument performance at different airspeeds and aircraft attitudes?
 
It's purely an indication concern.
 
It's purely an indication concern.
And you said the shop had checked the accuracy of the vac gauge?
Do you know how they did this?

Still would like to know how the system is plumbed when you get a chance.
 
And you said the shop had checked the accuracy of the vac gauge?
Do you know how they did this?
They said they checked the gauge, but I don't know how.

The specs (attached) say it should pull 5.6" at 225mph. My plane is half that speed.

I haven't had the chance to look at the plumbing, but I did do a little poking around.

Running a bottle brush into what I thought was a drain did not reveal any obvious obstruction or contamination.

Here's a photo I scraped from eBay, with an arrow pointing to the slot through which the vacuum is drawn. I did notice the slot looked significantly narrower on the left venturi (the one that's reading low) than the right.
datgap.jpg
 

Attachments

  • Venturi_lg_spec_1024x1024.jpg
    Venturi_lg_spec_1024x1024.jpg
    192.9 KB · Views: 5
  • 9_Altimeters_Rate_of_Climb_Venturi_Tubes_17_953bc673-5e48-49e7-b0af-5304944dbb2e_1024x1024.jpg
    9_Altimeters_Rate_of_Climb_Venturi_Tubes_17_953bc673-5e48-49e7-b0af-5304944dbb2e_1024x1024.jpg
    147.5 KB · Views: 5
They said they checked the gauge, but I don't know how.
Since you're not having an obvious performance issue with your gyros, my initial check would be to see if the gauge is inaccurate or leaks internally, or there's a system leak. FYI: be careful of probing with that brush if you are unsure of where you are doing it.
I haven't had the chance to look at the plumbing,
In order to come up with a plan, we'll need to know this especially since you have 2 super venturi installed as noted above. Pics would be fine but even a crude written diagram of where each venturi line/hose goes to and how that system is connected. Without this we would merely be guessing and wasting time. I have several suspicions this may be a "routing" problem given the age of the aircraft and a few other things. But 1st need to know how those venturi are connected so I don't send you on a red-herring fishing trip.
 
Some more archaeology... The first time I squawked the low vac was in August 2021. At that time, they replaced some collapsed hoses... AND installed the Sigma Tek gyro.

Anecdata 1: I have read things online that suggest that modern gyros can require ~1" more suction than their older compatriots.
The specs (attached) say it should pull 5.6" at 225mph. My plane is half that speed.
Anecdata 2:
I figured that @AKiss20 and/or @Capt. Geoffrey Thorpe would have answered this at some point, and I was right:


So, if I'm reading right, half the speed should give the square root of the pressure differential, or... 2.36"?
 
:yeahthat:
Sigh. I knew I shouldn't have stopped after a masters...
 
I have read things online that suggest that modern gyros can require ~1" more suction than their older compatriots.
In my experience, where I found the main difference to be between the newer TSO gyros and the old AN spec gyros other than their size, was with their efficiency. Regardless, even though the TSO specs out a higher suction requirement, most newer gyros will run at a lower rate with no issues. The old clunkers needed every bit of vacuum to keep going.
 
The pressure differential scales as the velocity squared so half the velocity will produce a quarter of the pressure differential or 5.6” / 4 = 1.4”
We're way off track here. Those venturis are what we used to know as 8" venturis. That's not their length; that's the static suction pressure they can make. Once an instrument starts letting air into it, that will drop some.
Aircraft Spruce offers a 9" venturi for homebuilts. They have a good blurb about venturi suction on that page. Read it. https://www.aircraftspruce.com/catalog/inpages/venturi3.php It is claimed that it can make 6" to 7" at 75 MPH. It would make 9" at 100 MPH. The vacuum instruments need 4.6" to 5.4" Hg.

An old vacuum turn-and-bank was often driven with a 2" venturi. https://www.aircraftspruce.com/catalog/inpages/venturi1.php?clickkey=96537 It was used where the T&B was the only gyro. Basic airplanes.

Edit: The whole point of a venturi is to accelerate the air through itself to generate far more suction that would be possible by just sticking a plain tube straight out the side of the fuselage. That venturi takes the 100 MPH airflow and runs it up way beyond that at the narrowest point, where the pressure is at its lowest and where we let the instrument air into it. The venturi uses convergent and divergent ducts to do this:

1710880300461.png

The physics of it:

1710880478325.png

...and

1710880539730.png

Not intuitive, but true nonetheless.
 
Last edited:
That’s exactly what my derivation is. It’s a constant stagnation pressure (isentropic and no work performed) area reduction. I took it as a given that the geometry was not changing, just the aircraft speed (and again I’m ignoring prop effects which may be significant, but I disclosed as much in my original post linked to). Given that assumption set, you get my result. The geometry specific term isn’t even relevant if you have a reference pressure differential for a given speed. Then it’s just simple scaling as I did.
 
Last edited:
@Bell206, the plumbing is as @Magman and @geezer suggested; one venturi per instrument, central filter, gauge hung off the AI.

Code:
L venturi -----+      +- R venturi
               |      |
               v      v
               AI    DG
              |  |   |
              |  |   |
gauge <-------+  |   |
                 |   |
                 +---+
                   |
filter <-----------+

As you can see below, the hose to the gauge was mushed on by less than one barb. Jackpot, or so I thought. I pushed the hose onto the elbow and snugged up the clamp... and it still read 4" in flight.

Judging by its color, the elbow to the gauge was replaced at annual. If there's enough hose, I can try swapping the vacuum sources and/or moving the gauge to the DG...

IMG_0222.jpg
 
Last edited:
Looks like someone cut those hoses to length with an axe.

There are usually two ports on the vacuum gauge. One to an instrument, the other to the line from the filter. That way, it measures the actual differential pressure on the instrument, and allows for the drag of the filter. A decreasing differential suggests a clogging filter.
 
I don’t think I said that!

Several ways you can plumb the Venturis.

I have teed 2 of them together and have 1 relief valve.

They can also be connected using a case as a junction.

Important =

Inlet hose goes to filter.

Vacuum hose goes to Venturi / Relief Valve
 
I only saw one hose going to the gauge. I'll try replacing the filter.

At least some of it is plumbed with fuel hose, which... bothers me.
 
Just in case you decide to replumb; you may want

to consider the fittings. Preferred vacuum fittings do not have an

abrupt 90 degree bend. Instead they are radiused and allow air to

flow smoothly around the bend. And they are $$$.

You do not want to pull existing hose off. Cut it instead.

There may be filter in the INLET of the upper unit.
 
I don't love the teflon tape, either.
 
one venturi per instrument, central filter, gauge hung off the AI.
Is there any record of an engine vacuum pump ever installed?

Regardless, given this has been an ongoing issue, at it next annual or extended downtime, you may be time and money ahead to simply remove the system and fix it on the bench. In my mind there's no reason why one of your super venturi shouldn't power both indicators.

That said, usually when adding a 2nd venturi to the same system I prefer to see both venturi connected in parallel then collectively draw the combined vac through the indicators vs the way the plumbing is now. Throw in plastic fittings and other stated issues and you may just have a leaky/inefficient system. Hence the reason to fix it on the bench. If you want to still piecemeal this fix, I'd start with a proper leak check and verify the vac gauge accuracy before doing anything except change the filter if it hadn't been changed in a while.
 
I only saw one hose going to the gauge. I'll try replacing the filter.

At least some of it is plumbed with fuel hose, which... bothers me.
If the filter is dirty, with your setup, the vacuum would read high, as the lack of flow would allow the venturi to generate more suction. Plumbed properly it reads differential, and as airflow decreases through a dirty filter, the inlet and outlet pressures get closer together and the reading falls.

Fuel hose might be ok and might not. You might have a hose whose liner is pulling loose under vacuum and collapsing and restricting the the flow. That would lower the reading. Taking the hose off and looking down it won't see that, either. It will have recovered.

IIRC, it's MIL-5593 hose you use for vacuum. MIL-6000 is for fuel.
 
Answers:
* No engine-driven vacuum pump ever.
* Vacuum filter has not been changed on my watch (5 years), as far as I know.

Questions:

1. Plastic fittings bad, teflon tape bad. If I replace with metal fittings, do I want loctite 545? I know you shouldn't need it with NPT, but should and do are sometimes different...

2. Sharp 90 degree bends bad. I'm inclined to replace with straight fittings where able. I imagine the 90 degree fittings aren't guaranteed to 90 where you want them to anyway.

3. Gauge itself is misplumbed (if so, how did it ever work correctly, in 2021?). Assuming there's a vent fitting on the gauge I didn't see, I should be able to tee it to the filter.
 
1. Plastic fittings bad, teflon tape bad. If I replace with metal fittings, do I want loctite 545?
No. I usually follow what the indicator OEM recommends. For example, some OEMs actually recommend only PTFE pipe thread tape on fittings.
2. Sharp 90 degree bends bad. I'm inclined to replace with straight fittings where able. I imagine the 90 degree fittings aren't guaranteed to 90 where you want them to anyway.
Every install is different. I’m not a fan of plastic (Nylon) fittings at the indicator as they can be over-torqued/crack/leak over time. As mentioned, any reductions in the amount of 90 deg direction changes does allow the system to function better. However, sometimes it boils down to the space available and what you have to work with that dictates whether you can go straight, 45, 90, metal, or plastic.
3. Gauge itself is misplumbed (if so, how did it ever work correctly, in 2021?). Assuming there's a vent fitting on the gauge I didn't see, I should be able to tee it to the filter.
We need to put things into context. I don’t recall that 140s originally came with a vacuum indicator. So its not technically “misplumbed” but simply of someone’s design based on whatever at the time. If you want to redesign the system based on a standard, perhaps get with your mechanic and see which way he would prefer to go.

FWIW: Trying to make your existing system work properly is one thing. But sometimes trying to “upgrade” the system to something more proper may give your mechanic or IA some heartburn. If you came to me, I’d rip out the existing system, and replumb a copy of a similar Cessna vac system. Now whether someone views that as a major or minor alteration…. I'll leave it to them.;)
 
1. Plastic fittings bad, teflon tape bad. If I replace with metal fittings, do I want loctite 545? I know you shouldn't need it with NPT, but should and do are sometimes different...
From a Cessna manual:

1711418365757.png

And on the vacuum pump's fittings, NOTHING at all, as per the vacuum pump manufacturers.

2. Sharp 90 degree bends bad. I'm inclined to replace with straight fittings where able. I imagine the 90 degree fittings aren't guaranteed to 90 where you want them to anyway.
Got to watch that the controls don't foul the hoses, and with straight fittings the hoses might be in the way. They can snag the controls and make the flight way too exciting.
 
Trying to make your existing system work properly is one thing. But sometimes trying to “upgrade” the system to something more proper may give your mechanic or IA some heartburn. If you came to me, I’d rip out the existing system, and replumb a copy of a similar Cessna vac system.
I just want it to be 1) working 2) done correctly. It's frustrating that it's been to four different shops at this point. I'm happy to do the work myself as long as the avionics guy at my field will sign it off.

From a Cessna manual:

All instruments (gages and indicators), requiring a thread seal or lubricant, shall be installed using teflon tape on male fittings only. This tape is available through the Cessna Service Parts Center.
Did they have nylon fittings in 1950? Teflon on nylon seems slippery, which is maybe why the existing fittings feel loose to the touch...

Got to watch that the controls don't foul the hoses, and with straight fittings the hoses might be in the way. They can snag the controls and make the flight way too exciting.
Oh yes, that has been at the forefront of my mind.
 
Last edited:
Regardless of fitting type the gyros it appears you have did not exist yet.

Your’s fits a 3 1/8 in hole which is same as asi, roc and alt.

The then popular “ AN Gyros” were rather large with a bigger hole

for the AH and a smaller hole for the DG.

IIRC they did not need as much vacuum as the later “ Pictorial Presentation”

units.
 
Did they have nylon fittings in 1950? Teflon on nylon seems slippery, which is maybe why the existing fittings feel loose to the touch...
No nylon fittings back then. All aluminum. The original fittings in your airplane would have been aluminum, and maybe the tubing was, too. I've found aluminum vacuum tubing in mid-'60s Cessnas. Nylon fittings have thicker walls and so would pass less air. Even pitot-static fittings and tubing were aluminum until the late '60s or so, when nylon was substituted. Air movement with pitot-static instruments is tiny, so smaller internal diameters work fine.
 
If I switch to aluminum elbows, how do you clock them so they point in the right direction, and still torque them properly?
 
If I switch to aluminum elbows, how do you clock them so they point in the right direction, and still torque them properly?
That gets interesting. It helps to have a stock of them on hand. But they also don't need to be all that tight, either. Pipe thread, under vacuum pressures, isn't going to lose significant air to leakage, especially with teflon tape on it. You might have to leave a fitting just a tad loose rather than tighten it so much that you split the pipe boss on the instrument, and tie its hose to something nearby so it doesn't rotate either way.

The debate on pipe thread in light airplanes has been going on a long time. For just about anything in the airplane, the pipe thread should have been switched to a straight thread with a locknut a long time ago, with an O-ring to seal it. SAE, JIC and some MS fittings are examples.

1711560820423.png
1711560860115.png

Large airplanes have been using this stuff for over 60 years. I regularly encountered it on Lockheed L-188 Electras built in the late 1950s. No jamming in inconvenient positions, no thread sealants. Orient that fitting in any direction at all and snug up the locknut, and it's done. The O-ring rides on an unthreaded section of the fitting and is compressed into a chamfer around the port in the component.

1711561236657.png
 
Back
Top