uAvionix AV-Mag locations

Domenick

En-Route
PoA Supporter
Joined
Sep 11, 2019
Messages
2,886
Display Name
Domenick
We have a number of folks here who have installed (or had installed) AV-Mags for their AV-30s. I have been unable to find the AV-Mag installation documentation on uAvionix's website. Anyone have a link?

I know the AV-Mag must be installed away from potential interference. Where have a fixed-gear (added post-post) Cherokee owners been installing the AV-Mag?
 
Last edited:
AV-Mag installation instructions are in the AV-30 installation manual - https://uavionix.com/downloads/AV-30-C/3.0.1/AV-30-C Installation Manual UAV-1003947-001 Rev P.pdf

To find a good location, get an inexpensive hiking compass. Hold the compass where you want to install the magnetometer. Have someone turn on the lights, move the controls, transmit on the radios, extend the flaps, etc. If the compass needle deflects during any of those things it's not a good place for a magnetometer.

Unlike some mags that require custom brackets and can only be mounted in one orientation, the AV-Mag can be mounted in many orientations - flat, on its side, upside down. Mounted vertically on the last rib inside a wingtip is pretty common for Pipers.
 
Last edited:
It usually goes in a wingtip, either L or R. The AV30 setup has a screen that shows you how much EMI/deviation it is getting. You can use any orientation, but it does matter and is also set in the menus. Also remember to turn everything on (including running the engine) during calibration to ensure it's calibrated in the same EMI environment it will have during flight.
 
AV-Mag installation instructions are in the AV-30 installation manual - https://uavionix.com/downloads/AV-30-C/3.0.1/AV-30-C Installation Manual UAV-1003947-001 Rev P.pdf

To find a good location, get an inexpensive hiking compass. Hold the compass where you want to install the magnetometer. Have someone turn on the lights, move the controls, transmit on the radios, extend the flaps, etc. If the compass needle deflects during any of those things it's not a good place for a magnetometer.

Unlike some mags that require custom brackets and can only be mounted in one orientation, the AV-Mag can be mounted in many orientations - flat, on its side, upside down. Mounted vertically on the last rib inside a wingtip is pretty common for Pipers.


Well looky there. They added it to the Certified install instructions in Feb 2023. Thanks for the update. I’ll update my library and check for other updates.
 
I have it installed in the fuselage of my Decathlon, about a foot above and right of the battery. Works excellent.

The installation menu on the AV-30 has a function to measure interference. You can run cable to the general location and then move it around to refine before mounting.

They don't seem overly sensitive. As long as you get it away from the panel and any really noisy signals like old school strobes, it should be fine.
 
... Unlike some mags that require custom brackets and can only be mounted in one orientation, the AV-Mag can be mounted in many orientations - flat, on its side, upside down. Mounted vertically on the last rib inside a wingtip is pretty common for Pipers.
How hard is it to thread the cabling out there? I've taken all the inspections covers off at every annual inspection. Threading the cable does not seem difficult, but are there any problem spots which would be helpful to know before hand? Piper Warrior II (P-28-161).
 
Last edited:

So many questions:
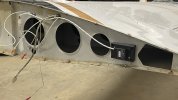
1. I cannot visualize where in the wing this location is. Is this in the wingtip, or in the wing, inboard of the tip?
2. Are those brass screws coming from outside the aircraft skin?
3. What is that surface the AV-MAG is mounted on? It looks brown. Is that aluminum or fiberglass?
 
How hard is it to thread the cabling out there? I've taken all the inspections covers off at every annual inspection. Threading the cable does not seem difficult, but are there any problem spots which would be helpful to know before hand? Piper Warrior II (P-28-161).
To run the wire in a Cherokee wing you’ll need to remove the 70 screws on the tank then slide the tank forward about 3 inches. This will give you access to the area behind the tank so that you can run your 3-conductor shielded cable through there and out to the wingtip.
 
So many questions:
1. I cannot visualize where in the wing this location is. Is this in the wingtip, or in the wing, inboard of the tip?
2. Are those brass screws coming from outside the aircraft skin?
3. What is that surface the AV-MAG is mounted on? It looks brown. Is that aluminum or fiberglass?
3. dirt/dust or dusty dirty corrosion treatment
 
3. dirt/dust or dusty dirty corrosion treatment
Ah, yes. Now that I have my wingtip off I can see exactly where he mounted it. I'm surprised he drilled holes in the skin to mount the Av-mag rather than mounting it to a rib.
 
How hard is it to thread the cabling out there? I've taken all the inspections covers off at every annual inspection. Threading the cable does not seem difficult, but are there any problem spots which would be helpful to know before hand? Piper Warrior II (P-28-161).
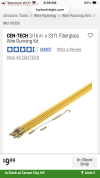
I have a Warrior II as well and it’s not hard to thread wires out to the wingtips. It helps to use those fiberglass rods for running Romex (cheap at Harbor Freight), starting from outboard working in, grabbing and pulling via the inspection ports. As I recall it’s a little tricky getting them around the back of the fuel tank but not too hard.

The magnetometer for my 275 is mounted on an easily made bracket mounted inside the outermost stringer on the right (just inside the removable wingtip). I think it was easier to drill a suitable hole in the fuselage to the wing space rather than try to use the holes for fuel sender, lights, etc. to thread the wire but I had a connector on the end that needed to be fed.
I was unable to run a wire behind my fuel tank (Piper Arrow) without sliding the tank back. The wiring running through the grommets was packed too tight to get a fiberglass wire-fishing rod through. The existing wiring included the nav lights, strobes, and wingtip landing light, fuel sender, PLUS the gear wiring (up and down limit switches). Maybe it could be done without sliding the tank back in a fixed-gear Cherokee, but it's not that big of a deal to slide the tank back.
 
I ended up putting the AV-MAG in the left wing tip. I 3D-printed a mounting block with a 7° angle to account for the dihedral of the wing.

2025-09-07_20-34-39_997.jpeg
 
I was unable to run a wire behind my fuel tank (Piper Arrow) without sliding the tank back. The wiring running through the grommets was packed too tight to get a fiberglass wire-fishing rod through. The existing wiring included the nav lights, strobes, and wingtip landing light, fuel sender, PLUS the gear wiring (up and down limit switches). Maybe it could be done without sliding the tank back in a fixed-gear Cherokee, but it's not that big of a deal to slide the tank back.
I honestly don’t remember it being that hard but mine is fixed gear.

I did look and now notice there are “front” and “rear” inspection panels. I probably used the rear ones and took off the wheel pant to manipulate things. And as for the sticks, yeah, they helped get it to the wheel area pretty well but after that I had to go by hand as I recall. I may be wrong on some of this.
You may be able to go behind the spar on the fixed-gear models. The wheel well on the Arrows prevents that, so you’re stuck running the wires in front of the spar but behind the fuel tank.
 
You may be able to go behind the spar on the fixed-gear models. The wheel well on the Arrows prevents that, so you’re stuck running the wires in front of the spar but behind the fuel tank.
While true, don’t forget the OP involved a Warrior like mine (I remember from past postings that’s what he flies)
 
I was unable to run a wire behind my fuel tank (Piper Arrow) without sliding the tank back. The wiring running through the grommets was packed too tight to get a fiberglass wire-fishing rod through. The existing wiring included the nav lights, strobes, and wingtip landing light, fuel sender, PLUS the gear wiring (up and down limit switches). Maybe it could be done without sliding the tank back in a fixed-gear Cherokee, but it's not that big of a deal to slide the tank back.
Hi pburger, did you have to disconnect the fuel line or wiring in order to slide the tank back an inch or so? Did you drain the tank first? It would be great if I could just slide the tank back far enough to slip my hand down there and run the wire. Thanks in advance. Ed.
 
Hi pburger, did you have to disconnect the fuel line or wiring in order to slide the tank back an inch or so? Did you drain the tank first? It would be great if I could just slide the tank back far enough to slip my hand down there and run the wire. Thanks in advance. Ed.
There is a slotted pass-through for the fuel line which allows you to slide the tank back a couple of inches. I was able to run the wire without disconnecting the fuel lines. You should have enough room to run the wires and secure them in place.

[However - the A&P who was supervising the work had me drain the tank so that he could remove the fuel line and replace it. He had the necessary hose and tools to make up a new line. He felt like it was a good time to do it since we already had all the tank screws out.]
Thanks! I was also curious if you re-used the old tank screws or put in new ones. I have heard differing opinions if you should or should not. My screws were replaced in the past with structural stainless so I'm hoping they come out easy and are ok to put back in.
 
Thanks! I was also curious if you re-used the old tank screws or put in new ones. I have heard differing opinions if you should or should not. My screws were replaced in the past with structural stainless so I'm hoping they come out easy and are ok to put back in.
We went with all new screws, even though I had structural stainless in there already. I had one nut plate on the spar that was stripped. My A&P replaced it. We also dipped each screw in corrosion X before installing them.
 
We went with all new screws, even though I had structural stainless in there already. I had one nut plate on the spar that was stripped. My A&P replaced it. We also dipped each screw in corrosion X before installing them.
Did you order the tank screw kit from Spruce or did you source the screws from somewhere else?
 
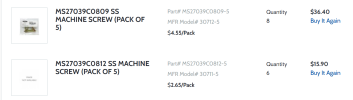
I bought the screws in 5-packs from Spruce. Much cheaper than paying someone to put them in a bag. For each tank (25 gal) you need 40 of the longer screws and 30 of the shorter ones. This was just for the left tank. This was a year ago, so the price may have gone up a bit.

1788973535348.png
 
Thanks. Yes the price went up a bit. $77.22 on spruce if purhased in 5-packs or $96.95 for the "kit". Found the kit at KNOTS2U for $60.19.
 
The more experience I get, the less I like stainless fasteners. Pretty shocking to see what stainless steel will do to aluminum in a high-galvanic environment. Much easier to munge screw heads too.

Not saying that applies to this discussion, just making a general observation.
 
I have a Warrior II as well and it’s not hard to thread wires out to the wingtips. It helps to use those fiberglass rods for running Romex (cheap at Harbor Freight), starting from outboard working in, grabbing and pulling via the inspection ports. As I recall it’s a little tricky getting them around the back of the fuel tank but not too hard.

The magnetometer for my 275 is mounted on an easily made bracket mounted inside the outermost stringer on the right (just inside the removable wingtip). I think it was easier to drill a suitable hole in the fuselage to the wing space rather than try to use the holes for fuel sender, lights, etc. to thread the wire but I had a connector on the end that needed to be fed.
I am about to start the same task , installing aG5 Dg/HSI in my Beechcraft sundowner and I bought it from AS with a pre-made harness, gave them all the distances from wing tip to fuselage and to under the avionics bay etc.
I already inspected fuselage to wing space were all the wires from landing lights, fuel sender, Nav etc come thru and will probably have to drill a separate bigger hole…..the only issue is the connector to the magnetometer to be fed thru is about 3/4 “ wide! I don’t want to disassemble the connector off the wires to make A smaller hole so as not to disturb them from the factory assembly; in your opinion will a bigger hole with an appropriate grommet size be ok?

I sent Garmin an email about the possibility of installing the magnetometer in the fuselage tail for ease of installation and they replied back that probably in that area there will be much interference from battery, multiple cables and rods , the two comm antennas etc, they would not recommend it!
Thanks
 

Attachments

  • Image_2026-09-09 08_31_35_360.jpeg
    Image_2026-09-09 08_31_35_360.jpeg
    181.5 KB · Views: 6
I have a Warrior II as well and it’s not hard to thread wires out to the wingtips. It helps to use those fiberglass rods for running Romex (cheap at Harbor Freight), starting from outboard working in, grabbing and pulling via the inspection ports. As I recall it’s a little tricky getting them around the back of the fuel tank but not too hard.

The magnetometer for my 275 is mounted on an easily made bracket mounted inside the outermost stringer on the right (just inside the removable wingtip). I think it was easier to drill a suitable hole in the fuselage to the wing space rather than try to use the holes for fuel sender, lights, etc. to thread the wire but I had a connector on the end that needed to be fed.
Thanks for the heads up on how to pull the wires thru the wing, do you have a specific name or picture of those fiberglass rods from harbor freight?
Thanks
 
Thanks for the heads up on how to pull the wires thru the wing, do you have a specific name or picture of those fiberglass rods from harbor freight?
Thanks
These guys:
IMG_0792.png
SKU for those in particular is 65326.

Amazon may have similar ones.

Again, I couldn’t get the rods all the way from wingtip to cabin but they helped a lot. It wasn’t too tough getting around the fuel tank, as I recall, but the rods didn’t do that part.
 
These guys:
View attachment 154925
SKU for those in particular is 65326.

Amazon may have similar ones.

Again, I couldn’t get the rods all the way from wingtip to cabin but they helped a lot. It wasn’t too tough getting around the fuel tank, as I recall, but the rods didn’t do that part.
Thank you, I really appreciate it!
 
These guys:
View attachment 154925
SKU for those in particular is 65326.

Amazon may have similar ones.

Again, I couldn’t get the rods all the way from wingtip to cabin but they helped a lot. It wasn’t too tough getting around the fuel tank, as I recall, but the rods didn’t do that part.
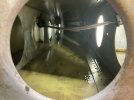
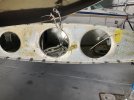
My fuel tanks in the Sundowner are to the front (wet wing) leaving some 6-7 inches aprox of clearance in the back to thread the cables….my IA is happy I found those tool extensions which I already bought at harbor freight, including a magnetic compass from Academy to identify the area of least interference……
 

Attachments

  • IMG_1606.jpeg
    IMG_1606.jpeg
    2.9 MB · Views: 6
  • IMG_1607.jpeg
    IMG_1607.jpeg
    3.8 MB · Views: 6
Back
Top