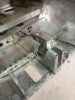
I noticed this on the belly today... could well have been there since I bought the plane two years ago. What is the best way to treat this... or should I do anything at all? I assume it is filiform corrosion but I guess it could be just a paint bubble.
The plane was in central Texas and now it is in Nevada... very low humidity here.
As you can see, it is not much bigger than a rivet head.
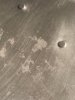
The picture you show is typical of filiform corrosion, that is what we see on small aircraft in our GA fleet.
What you show is very typical of what happens when the strippers and other chemicals get driven into the seams of the fuselage during a re-paint. now they creep out under the new layer of paint, and cause what you are seeing, this is the environment that the microbes love, it is their excrements that cause the acid that etches the aluminum.
First. Do not scrape the paint away, (Like has been suggested), use a small dab of epoxy stripper and remove about a dime sized area of paint. wash clean, wipe dry, that will allow you to see how deep the corrosion is.
Using a stainless steel platers brush remove the black corrosion products by a circular scrubbing motion and clean with a product called alum-prep sold at AS&S. continue that cycle until all black deposits are removed.
then wet with Aldine 1201 (from spruce also). then rinse and dry.
Once clean, and alodined, touch up with any paint you like.
Remember -- there is a very thin coating of pure aluminum over the base metal, you go scraping with any thing that is hard enough to remove paint and you will remove the aluminum layer and make your corrosion problem worse.
when you see his starting on your aircraft, it will soon get worse, keep a close eye on it. don't allow this to get ahead of of you.
When I see this on an annual inspection I get worried about how much corrosion is in the seam from which this spread.
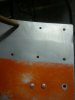
Your clean metal should look like this, the lower left corner of the picture, next to the access panel.


")