Things experienced folks observe

4RNB

Line Up and Wait
PoA Supporter
Joined
May 24, 2016
Messages
848
Display Name

Display name:
4RNB
Cowling is off, working on a problem. Shop owner made some comments on things I did not see and I guess others did not see. Will try to upload photos, curious what folks think. Fix now or squawk list?
 
He suggested I replace worn stuff to make new for better airflow control, cooling if engine. Said he would supervise if I did the work. Not sure I want my first rivet removal work to be in my freshly painted plane
 

Attachments

  • IMG_5418.jpeg
    IMG_5418.jpeg
    1.4 MB · Views: 108
  • IMG_5419.jpeg
    IMG_5419.jpeg
    1.4 MB · Views: 108
Near the oil cooler are these really sharp objects, suggested some silicone
 

Attachments

  • IMG_5421.jpeg
    IMG_5421.jpeg
    2.3 MB · Views: 100
Gaps on windshield cover should be sealed with something since the paint shop did not and left the gaps during new windshield instsll
 

Attachments

  • IMG_5426.jpeg
    IMG_5426.jpeg
    1.1 MB · Views: 51
  • IMG_5428.jpeg
    IMG_5428.jpeg
    1.1 MB · Views: 50
Scat tubing rubbing on a projection. Needs pulled off. Can I do this with a zip tie? Can I attach to spot shown on firewall? What is the best solution?
 

Attachments

  • IMG_5423.jpeg
    IMG_5423.jpeg
    1.6 MB · Views: 67
  • IMG_5424.jpeg
    IMG_5424.jpeg
    1.4 MB · Views: 67
Applications of a bit of sealant on screws will keep valve covers from coming off?
 

Attachments

  • IMG_5425.jpeg
    IMG_5425.jpeg
    1.5 MB · Views: 30
This area in contact with windshield too much and might rub through? Other side better but he still commented on it.
 

Attachments

  • IMG_5427.jpeg
    IMG_5427.jpeg
    1.4 MB · Views: 57
Front baffle hole suggests a screw should go here?
 

Attachments

  • IMG_5422.jpeg
    IMG_5422.jpeg
    1.8 MB · Views: 39
I know there is a small oil leak at a fitting for oil temp or pressure. He says he sees blue in area of photos suggesting fuel leak on 60 hr engine. Do you see blue? Seems like oil to me.

Edit -lower right corner of first photo 5415 has a bit of blue, need to go look again.
 

Attachments

  • IMG_5415.jpeg
    IMG_5415.jpeg
    1.8 MB · Views: 53
  • IMG_5416.jpeg
    IMG_5416.jpeg
    1.9 MB · Views: 52
  • IMG_5417.jpeg
    IMG_5417.jpeg
    1.6 MB · Views: 52
If I ever build a plane, I don't want this guy to look at it closely...he'd break my heart.
 
A neigbor was looking at my then new-to-me RV-8 with the cowling off, and pointed out very small gaps in the baffling. Too small to be consequential, I suggested. He said close the gaps with RTV and see what the difference is. Yep, CHTs dropped by 10-15 degrees under the same air temp, power setting and airspeed.
 
Seems like all doable little stuff that will pay dividends later.

I like to use old SCAT ducting with wire removed as a light duty

chafe pad. Practice rivet install and remove and go for it!
 
My annual is scheduled the first week of June. I'm getting some help with an alternator issue from a very busy shop, not sure how quickly they will get my plane. Alternator comes Monday, need a battery to alternator wire built to get airborne. I really understand the need for some of this, just waiting for AP help could be an issue. I'd hoped to hire someone to fly in and help with the alternator if this place has delays. I'd like to get that scat off, but not sure if I can/should DIY with 1/4 inch zip tie.
 
There are actually very few items the owner cannot do during an Annual Inspection.

The biggest being the actual signing of Inspection in the Records.

The IA must perform the Inspection; even if the Owner or A& P has done the same.

Not true with a Repair Station though.

My belief is that most Owners should strive to develop a relationship with a Tech

that will oversee their activities. Having all components, gaskets, wiring , etc

ready when the task is begun will make life easier for all.

All but the “Mechanically Declined “ should spend time with the Service and Part Manuals,

AC 43.13 -1 &2 and FAR 43. Knowing what has to get done and the constraints on the

overseeing agency can be enlightening.


Or sit, write checks and complain.
 
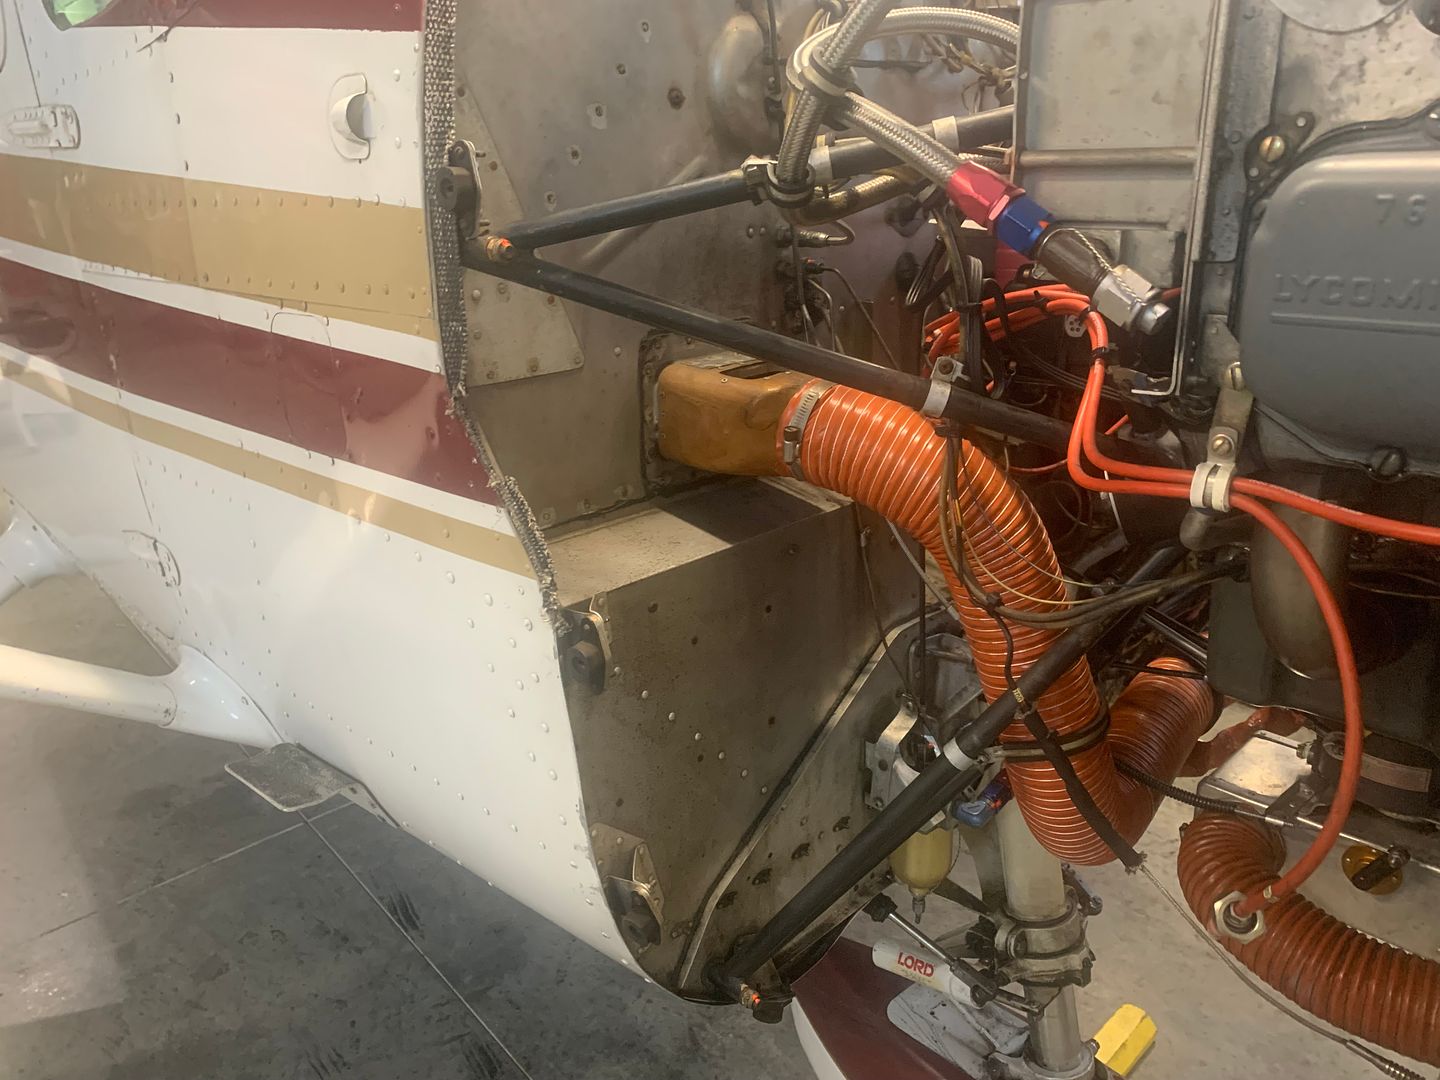
Yes, what Magman sed. Get copies of Service manual, and Parts catalog for your airplane. Money well spent. Also need an up to date copy of the AC43.13.1&.2. Study them. Keep them handy. And learn from your A&P/IA. You will eventually get to a point in your aircraft ownership where you will tell the A&P that you have a mx issue, and he/she will tell you to fix it, and call them back to inspect, and sign off. And Yes that falls under the "supervision necessary..." part of the FARs. But, to make it work, you must know, and adhere to, your limitations with a wrench. And be prepared for some things your mechanic will not allow you to do period. But he may allow you to observe, and be quiet. Then next time, he may allow you to assist, then next time he may allow you to do most of it while he watches you like a hawk. Then next time, he may tell you to do it by yourself. All depending on past performance.
Over the years, I've managed to "prove myself" to my mechanic/inspector. I'm he allows me to do whatever mx task my airplane needs, then call him to inspect and sign off on it. There are things that I will not do, Or at least not without him watching me, simply because I've not done it before, and it's a safety of flight issue. And there are some things that as an A&P he's allowed to do, but would rather send it out to a repair station.
 
He suggested I replace worn stuff to make new for better airflow control, cooling if engine. Said he would supervise if I did the work. Not sure I want my first rivet removal work to be in my freshly painted plane
No! Hell no not after the paint job!
It will be alright like that for now. Mine has been like that for 1200 hours now.
It does not run hot or cold.
That should have been done before the paint job. Don’t worry about it now unless you are going to fly your plane in extreme conditions.
 
Last edited:
Scat tubing rubbing on a projection. Needs pulled off. Can I do this with a zip tie? Can I attach to spot shown on firewall? What is the best solution?
A reasonable solution is to use a large blob of RTV to either create a standoff to keep the SCAT off the projection OR to glue the SCAT to the projection. Either will work to prevent rubbing.
 
Near the oil cooler are these really sharp objects, suggested some silicone
Those screws don’t look original to me nor do those loose tin nuts. I agree something about that is suspicious with that. IMO silicon is not the answer.
 
Last edited:
Your mechanic is doing you a favor.
Oh, I get that! I was amazed at the things he noticed that I and others had not.
Kind of like healthcare, where an experienced set of eyes sees things that new people can't pick up on
Or an experienced seamstress seeing issues with the handwork of another.
 
No! Hell no not after the paint job!
It will be alright like that for now. Mine has been like that for 1200 hours now.
It does not run hot or cold.
That should have been done before the paint job. Don’t worry about it now unless you are going to fly your plane in extreme conditions.
Yeah, it really would have been better if the paint shop did that, especially since I told them to do anything best needed to be done during painting.

I'd bought the Vans aircraft practice kits but never bought tools, now I think I will. Had a class with EAA that we changed and did not attend.
 
Yeah, it really would have been better if the paint shop did that, especially since I told them to do anything best needed to be done during painting.

I'd bought the Vans aircraft practice kits but never bought tools, now I think I will. Had a class with EAA that we changed and did not attend.
IMO that was stupid thing to mention after a fresh paint job. Like I said don't worry about it.
This is one side of mine, worn but does not cause my engine to run abnormal.
IMG_4143.JPG
 
Isn't that a seal to keep fire escaping from under the cowl, or is it just a rub strip?
 
Near the oil cooler are these really sharp objects, suggested some silicone
Shorter, blunt screws. The tinnerman nuts do not need pointy screws.
 
Applications of a bit of sealant on screws will keep valve covers from coming off?
Dab of nail polish will let you know if the screws have loosened.
 
Gaps on windshield cover should be sealed with something since the paint shop did not and left the gaps during new windshield instsll
Painters tape on both sides of gap. Apply a thin bead of silicone sealant. Remove tape.

On the other hand this gap is so small I ouwld just leave it unless you are in a cold climate and the cold air leakage is a problem in the cabin.
 
He suggested I replace worn stuff to make new for better airflow control, cooling if engine. Said he would supervise if I did the work. Not sure I want my first rivet removal work to be in my freshly painted plane
Correct me if I am wrong, but this is not on the pressurized plenum side? It appears to be between the firewall and the pressurized plenum.

If this is the case, this has little or nothing to do with engine cooling. There is really no benefit to "fixing" this, other than aesthetics.

I think your mechanic made a misstatement here.
 
Applications of a bit of sealant on screws will keep valve covers from coming off?
On my Lycoming, these screws all have a regular washer and a star lock washer which I believe is the correct way to deal with this. Check your engine parts manual.

Use a calibrated torque screwdriver to set the correct torque value. This is important to prevent leaks and/or setting the correct tension on the gaskets.

The standard Lycoming procedure is not the use of Loctite or other sealant.

I'm starting to question your mechanics knowledge...
 
On my lycoming, these screws all have a regular washer and a star lock washer which I believe is the correct way to deal with this. Check your engine parts manual. Pretty sure standard lycoming procedure is not the use of locktite or other sealant.
Thanks. I think he suggested the sealant go over top. But I've never heard of such a screw backing out.
 
Correct me if I am wrong, but this is not on the pressurized plenum side? It appears to be between the firewall and the pressurized plenum.

If this is the case, this has little or nothing to do with engine cooling. There is really no benefit to "fixing" this, other than aesthetics.

I think your mechanic made a misstatement here.
I'm not sure. I think the airflow comes in, goes through the engine, then exits down low. IF some was able to come up, not sure the impact, but the flow through the engine would likely be the same, especially with new good baffle. material behind the engine in contact with the top cowling.

It might just have been a cosmetic thing that could have been easily handled during painting. He did point out some cosmetic issues like a bit of paint missing on the hand bars-things you grab to jump up while fueling.
 
I know there is a small oil leak at a fitting for oil temp or pressure. He says he sees blue in area of photos suggesting fuel leak on 60 hr engine. Do you see blue? Seems like oil to me.

Edit -lower right corner of first photo 5415 has a bit of blue, need to go look again.
If this is a "new engine" in an older aircraft that tiny spot of residual fuel could easily have occurred during the install when a drop of fuel came out of the fuel or primer lines when reinstalling the engine. Such a tiny drop that exists no where else does not suggest an on-going fuel leak.
 
Painters tape on both sides of gap. Apply a thin bead of silicone sealant. Remove tape.

On the other hand this gap is so small I ouwld just leave it unless you are in a cold climate and the cold air leakage is a problem in the cabin.

Thanks. Which sealant specifically though?

He thought it could be a moisture issue.
 
If this is a "new engine" in an older aircraft that tiny spot of residual fuel could easily have occurred during the install when a drop of fuel came out of the fuel or primer lines when reinstalling the engine. Such a tiny drop that exists no where else does not suggest an on-going fuel leak.
Thanks. I'm gonna clean it up a bit today and see if the color persists.

My concern right now is to safely get in the air again shortly, happy to leave some of this for June with the shop that installed the engine.
 
Isn't that a seal to keep fire escaping from under the cowl, or is it just a rub strip?

Interesting! It was not presented that way. Is the orange baffling material sufficient for fire?
 
IMO that was stupid thing to mention after a fresh paint job. Like I said don't worry about it.
This is one side of mine, worn but does not cause my engine to run abnormal.
IMG_4143.JPG
Thanks, he was complimentary also, but those comments don't make good copy or help me to learn.
 
Thanks. I think he suggested the sealant go over top. But I've never heard of such a screw backing out.
So this would be a witness marker? Or is he really suggesting this is a way to keep this from leaking? If it to keep from leaking (which it can do if the gasket is broken, or incorrect torque) this does not make any sense. It is just as likely to leak anywhere along the bottom of the rocker cover.

Smearing a bunch of sealant over the screws is not a recommended Lycoming procedure. The Lycoming standard procedures work when done properly. Using Alaska backcountry fixes is not the way to maintain your aircraft.

Is your mechanic a licensed A&P? Honestly, I think you need a new A&P.
 
This area in contact with windshield too much and might rub through? Other side better but he still commented on it.
I beleive this is what my windcreen was sealed with when new. You can use as many strips stacked on top of each other if need be to seal the fairing to the windscreen and the wing.
(edited)_IMG_4214.png

It is not hard to remove the fairing and seal with this stuff, just as long as the screws are not dicked up.
(edited)_IMG_4215.png

Evidence of it on my plane.
IMG_1229.JPG

IMG_0621.JPG

IMG_0599.JPG

IMG_0604.JPG
 
Back
Top