Need help with mods to hangar trusses

Kiddo's Driver

Pattern Altitude
Joined
Oct 5, 2013
Messages
1,927
Location
Somewhere in the Southeast
Display Name
Jim
I have access to a wooden framed hangar that is open on the front, plenty wide for my 32 foot wing span and has lots of room inside. The issue is that it was built to hold the owners various Cherokees & Comanches that he owned over the years. I have a Socata Tampico (TB9). It is 10' 6" at the tail. Comanches are about 7' 6" at the tail. The bottom of the roof trusses are 9' up.

Does anyone know where I can find drawing to use as a guide to modify the trusses to allow the tail to fit. I'm thinking a 2 foot wide by 2 foot tall opening would be enough. The plan is to modify just enough of them to allow me to pull the plane in nose first, plus a little extra in case I need to raise the nose to work on the front gear/tire.

Any links to companies or drawings would be appreciated.

1/21/2015 EDIT: Shocker, Wikipedia was off on this number. They said 10' 6". The Pilot's Information Manual says that it is 9' 10". The ceiling ended up being 9' 6" inches, so I only ended up having to lower the tail by >4 inches.

Jim
 
Last edited:
They are structural. You can't just cut the bottom member. Maybe replace the first couple trusses with shorter ones and buttress up the ends of the roofline somehow. There are companies that do nothing but make trusses and they should have a structural engineer on staff. I would call one of them and have them make something custom, maybe.
 
They are structural. You can't just cut the bottom member. Maybe replace the first couple trusses with shorter ones and buttress up the ends of the roofline somehow. There are companies that do nothing but make trusses and they should have a structural engineer on staff. I would call one of them and have them make something custom, maybe.

Completely understand and agree. I'm looking for recommendations on companies that do this.

Jim
 
Modifying trusses is tricky DIY business without consulting an engineer. Is there a truss manufacturer locally you can talk to, and maybe have him run ideas on his software?

I have had some success using 1/8" sheet steel cut to dimension and sistered to various components to strengthen clear span, but it was in consultation with a guy whe designed roof structures.
 
build a small ramp for your nosewheel to back up onto
 
build a small ramp for your nosewheel to back up onto

I was kicking around the idea of a tub full of concrete on wheel to connect to the tail to pull down the tail/lift the nose. I will add the ramp idea to the list. :)

Modifying trusses is tricky DIY business without consulting an engineer. Is there a truss manufacturer locally you can talk to, and maybe have him run ideas on his software?

I am new to the Wichita area and will have to Googlefu my way to the answer unless there is someone here with any personal experience.

Jim
 
Last edited:
Is member in tension or compression? Easy fix, just need to know which way to go with the stress.
 
Any Amish community near you? They are first class when it comes to this type construction. I watched them repairing a hangar. They are real pros.
 
Like John replied, the trusses are structural. They are engineered to carry the design load over the span without sagging and losing strength. That being said there are potential remedies which could "possibly be done and still maintain the original designed load carrying ability. This will have to be done with a structural engineer who can calculate the change in load points and determine whether or not the bottom section of the truss can be modified. Once the roof is tied into the trusses the whole section becomes much stronger but whether or not the lower truss can be changed will depend upon several factors. These will obviously include the local building codes as well as the design of the webbing.
In my hangar the outer ends of my trusses were strengthened by sandwiching doubler plates of plywood at the attachment points where the hangar door lifting points take the load. The plywood plates are large triangles (approx. 4' x 4') and are located on the trusses where the lifting load takes place + the trusses before and after that point. This stiffens up the structure considerably and I've never seen any deformation during use. My hangar has survived several hurricanes without damage (other than lost shingles) where others in the same neighborhood have lost doors in the same storms.
Remember that any unauthorized modifications could cause insurance problems in the event of a catastrophic event and may result in an expensive life lesson.
On the other hand, there are newer building materials and techniques coming out each day which certainly may allow you to make the changes that you're looking for! "Microllams" are used for trusses now where solid boards where used in the past and have much greater load carrying capacity than the boards which they replaced. See http://www.reference.com/motif/business/microlam-beam-span for info on these and see if maybe a local engineer can take a look and see if this may be an answer in the right direction. You might be able to add these above the existing trusses and possibly remove your lower web? I don't know whether or not that's an option but it's possibly worth discussing with an expert. Before you hire an engineer have as many of the measurements in hand and hopefully the original drawings of the hangar so that you don't have to pay extra for some of the legwork which you can do yourself.
Good luck with your quest: I've seen it before and it's a valid pursuit and I hope that it works out for you. It seems like the hangar is never quite big enough and the mission fills it quickly! (Have you ever heard anyone complain that "My hanga'rs just too big!)
 
Another option that might work is to replace them with scissor trusses of the same load capacity or double them if they are less. It would be a custom deal by the truss supplier but they would supply the structural calcs for the building permit. You would basically install the new trusses on the inside next to the old ones, then yank the old ones out. You would probably have to put some sort of removable block out above the door to cover the V space.
 
Jack the roof up. Extend the supports. Sit it back down.
 
Another option that might work is to replace them with scissor trusses of the same load capacity or double them if they are less. It would be a custom deal by the truss supplier but they would supply the structural calcs for the building permit. You would basically install the new trusses on the inside next to the old ones, then yank the old ones out. You would probably have to put some sort of removable block out above the door to cover the V space.

I wasn't familiar with scissor trusses. That is probably the ticket.
 
build a small ramp for your nosewheel to back up onto

The "ramp" would have to extend into the taxi way as the tail needs to go down as it enters the hangar... Unless you pull the plane in nose first..


. Better and cheaper option is to get a tug that lifts the front wheel... 6" up should lower the tail 18" or so.. IMHO..

As others have said... Trusses are engineered and cutting them will result is a failure of the structure...
 
I'm looking for recommendations on companies that do this.
Look in your local Yellow Pages (or Google) for companies in your area that do structural repairs to houses and barns (you being in Kansas, I'll bet there are plenty of wood-frame barns). Local home builders (that's outfits that build homes, not people who build airplanes at home :D) may be able to help with referrals if nothing else. Your local Home Depot may also have some ideas of who to call.
 
Is member in tension or compression? Easy fix, just need to know which way to go with the stress.

Not intuitively a silly question but it's a bit funny when ya think about it. Bottom of a truss has to be in tension. Compression would do funny things in terms of deflection across the span.

Treat the "notch" like a door opening in a structural wall - it'll take adding a new bottom chord two feet above the original which will have to cover more than the notch opening and probably doubling the angle braces between the new bottom chord and old bottom chord. After all the new wood is in place the "notch" can be removed. Yes, get a structural guy to size the new bottom chord and specify installation hardware (nails/screws/bolts).
 
The local truss supplier probably outsources the calcs to a structural and would be a good bet for a referral to one.

It might be worth your while to run the idea past a civil or structural that specializes in residential remodels. They do that sort of stuff all the time.
 
The truss shop we use could do these calcs in seconds...

Builder's First Source is a great resource as they have in-house truss shops...

The local truss supplier probably outsources the calcs to a structural and would be a good bet for a referral to one.

It might be worth your while to run the idea past a civil or structural that specializes in residential remodels. They do that sort of stuff all the time.
 
Not intuitively a silly question but it's a bit funny when ya think about it. Bottom of a truss has to be in tension. Compression would do funny things in terms of deflection across the span.

Treat the "notch" like a door opening in a structural wall - it'll take adding a new bottom chord two feet above the original which will have to cover more than the notch opening and probably doubling the angle braces between the new bottom chord and old bottom chord. After all the new wood is in place the "notch" can be removed. Yes, get a structural guy to size the new bottom chord and specify installation hardware (nails/screws/bolts).

It's been a while since I did the maths for truss design, and I didn't bother drawing out the T and C members. My problem now is finding a solder paste that can be used on a chip where there's only .006" between the pads.
 
Last edited:
It's been a while since I did the maths for truss design, and I didn't bother drawing out the T and C members. My problem now is finding a solder paste that can be used on a chip where there's only .006" between the pads.

Ouch, sounds like an excellent opportunity to generate many quality control problems...
 
Ouch, sounds like an excellent opportunity to generate many quality control problems...

That's what happens when engineers don't actually consider the assembly process.
 
The "ramp" would have to extend into the taxi way as the tail needs to go down as it enters the hangar... Unless you pull the plane in nose first..
The plan is nose first. It is not a T hanger, so no issues with nose first. No issues with a long ramp anyway. The hanger comes with the house I am renting on an airport. Just me on three acres of land.

Better and cheaper option is to get a tug that lifts the front wheel... 6" up should lower the tail 18" or so.. IMHO..
I just happen to have one of these. It came with the plane. It is a York electric pallet jack with a nose wheel attachment. I don't know how high it lifts, but 6 inches is possible. I don't know how far that will drop the tail, but will find out. The issue is that it is in the back of my truck and I need a fork lift or something to get it out! I've got a lead on how to do it. The landscaper next door has a bobcat. If I can get him to lift the heavy end I can drive the truck out from under it.

The math says I need 13.7 inches of lift at the nose wheel to lower the front tip of the verticle stablizer by 24 inches.
I need 10.3 inches to get 18 inches, but that would be zero clearance.

I seriously doubt the pallet jack will lift it that far.

I could modify the pallet jack to make a raised platform that I could strap the nose wheel into for bringing the plane into the hanger. I would have to use a bucket-O-cement to pull the tail down, move the pallet jack into place, remove the bucket-O-cement, strap the nose wheel into place, and then I would be free to position the plane any way I wanted to.

Jim
 
Last edited:
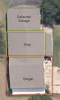
Raising the roof is kind of out of the question. See attached photo for clarification.

I will be out there tonight so I will see if I can take some measurements. I move in on Saturday.

I just realized that I now have a hangar and a shop. I guess I can hang out my shingle and finally get to use my LSRM-A! Dang, I need to go to the Rotax classes now...

Jim
 

Attachments

  • Hangar complex.png
    Hangar complex.png
    210.2 KB · Views: 63
Last edited:
The truss shop we use could do these calcs in seconds...

Builder's First Source is a great resource as they have in-house truss shops...

The structural calcs themselves are a no brainer with software, and not super time consuming even if you have to do them by hand. The bigger deal is coming up with a system and an assembly sequence that can be "dropped in place" as much as possible, and detailing the drawings as such. That part of it might be more than the truss shop's in-house engineer will deal with, at least as a free inclusion with the package.
 
Is member in tension or compression? Easy fix, just need to know which way to go with the stress.

I used to draft truss stress diagrams in a previous life. It's all done by computer now.

I even retired my slide rule.
 
Not intuitively a silly question but it's a bit funny when ya think about it. Bottom of a truss has to be in tension. Compression would do funny things in terms of deflection across the span.

Not necessarily, think of a box truss, which is used on floor supports and flat roofs. There is an equally long upper and lower member, one in tension and one in compression. The one in tension just has to be designed as such with buckling being the limiting factor. They tend to be oversized, and wider to deal with lateral buckling.
 
Clark is right about the bottom chord being in tension, but it is all about how much tension that determines what you can and can't do to it.
 
I used to draft truss stress diagrams in a previous life. It's all done by computer now.

I even retired my slide rule.

I was in structural steel design for a while.
 
You can always dig up the floor and make it 2 feet below grade. That's how the railroads "raised" the tops of their tunnels years ago.
 
You can always dig up the floor and make it 2 feet below grade. That's how the railroads "raised" the tops of their tunnels years ago.

Maybe if it's on a piered foundation, which I highly doubt if it's a wooden hangar.
 
Hi Jim.

If the roof is pitched one way, you should be able to install one or two built-up beams next to the trusses and then remove the trusses if you want. You would need to be sure to cross brace the beams, and the beams need to be sized for the loading you will be putting on them. You could do this with wood. That would be my suggestion. You could also replace the trusses with bar joists, but that would probably cost more. Not being sure what the roof looks like, it is difficult to suggest anything more. Take a few pictures.
 
No pics, the ceiling is in the way. I remeasured and it is 9' 6", so a little taller than I thought. The width of the trusses is about 42 feet.

I got the pallet jack out of the truck bed. It lifts the tire 4.75 inches so not much help there. My guess is that this will drop the tail about 8.5 inches. I need it to drop at least 18 inches.

FYI, I found the name plate on the pallet jack. 550 pounds without batteries, 850 pounds with batteries! I knew it was heavy!

Jim
 
Having all sorts of trusses in my house and hangar, I vote for calling a truss manufacturer and ordering a new truss with a higher center section rather than trying to kludge a mod to the existing one.

Yeah, it's all done with computers these days. When I had to lower my hangar roof so I could fit an egress window in the bedroom that overlooks it, they just punched in the new information and came up with a new design.
 
The electric pallet jack solution was used here to get a Cessna 340 tail in the door of a hangar where it had room once it was inside.
 
The electric pallet jack solution was used here to get a Cessna 340 tail in the door of a hangar where it had room once it was inside.

That is the part that makes me nervous about this hangar. It would have to stay on the pallet jack. I would have to design it so that the nose wheel is strapped in so that it COULD NOT come loose.

I guess the other idea is to leave the tail hanging out and build a forebay over it.

Hummm...I wonder how much it would be to add 6 feet onto the front of the hangar? I may have to look into this. I could add the 6 feet with engineered trusses that have the same external dimensions, but have a vaulted internal structure.

Jim
 
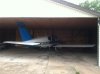
It fits!!!
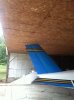
With all wheels on the ground it just clears the ceiling, maybe 3 inches. Of course that means that if the front strut goes flat it will damage the tail...

The 10' 6" number must come from the highest value you could get with the worst combination of variables. Main tires full with the main struts fully extended, front tire flat with front strut flat -> 10' 6".

The belt & suspenders side of me makes me keep the pallet jack attached to the nose wheel, jack fully lifted, with a 5 inch tall block of wood under the jack forks. That way if the front strut deflates the tail will not hit. If the pallet jack looses hydraulic pressure and drops, it will only drop 1/2 inch to the block of wood. Belt & suspenders.
 

Attachments

  • Plane in Hangar.jpeg
    Plane in Hangar.jpeg
    91.3 KB · Views: 28
  • Tail with all tires on the ground.jpeg
    Tail with all tires on the ground.jpeg
    90.1 KB · Views: 28
If it were mine, I would fashion a piece of high density foam to slip over the top of the vertical stabilizer after it's in the hangar; this way, in the event of an untimely nose strut decompression, the contact between the tail and the ceiling would be gentle and non-damaging.
 
Back
Top