SkyHog
Touchdown! Greaser!
- Joined
- Feb 23, 2005
- Messages
- 18,431
- Location
- Castle Rock, CO
- Display Name
Display name:
Everything Offends Me
.....
Last edited:
")
So, I've studied the plans intently, and decided to finally get going and start building.
I started by snapping a chalk line across my wood table for a reference for the top longeron (just learned how to say that word correctly!). I then put screws down to hold the longeron in place. I then learned that screws are a bad idea, so I pulled them and put nails down instead.
I carefully measured the length of the cross beams and marked those on the table. I placed the nails across the bottom so that I'd have a jig for the bottom longeron.
Then the fun part. I took the bottom piece and drenched it with the hose for a good 10 minutes (I have no pool, so I hoped it'd work). After it was good and drenched, I fit the bottom longeron around the nails and left it to sit and dry. Unfortunately, I can't do anymore until it is completely dried. I needed a break anyways!
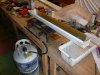
here's some pics!
1) The first attempt at jigging with screws...oops.
2) A close up of the screw jigs
3) The wood is bent and put into place
4) And the new, nail jigs
Nick, you should make a "steam box" for bending wood. Get a length of hot water PVC large enough to put the largest piece of wood that you need to bend in. You make a couple of cross horses so it tilts up at about 20* from end to end. You put a cap on the top end that has an opening in the lower 1/4 and a cap on the lower end that will accept your steam source. For small projects a tea kettle with a hose is good enough, larger projects I rig a pressure cooker. Inside the pipe itself, you want to place a few little pieces so the wood doesn't sit full length on the pvc.
And as an added bone-us when you're done bending wood, you can easily convert it to a still.Nick, you should make a "steam box" for bending wood. Get a length of hot water PVC large enough to put the largest piece of wood that you need to bend in. You make a couple of cross horses so it tilts up at about 20* from end to end. You put a cap on the top end that has an opening in the lower 1/4 and a cap on the lower end that will accept your steam source. For small projects a tea kettle with a hose is good enough, larger projects I rig a pressure cooker. Inside the pipe itself, you want to place a few little pieces so the wood doesn't sit full length on the pvc.

The plans specifically said nails. Dunno why. lol. Is steam a better way to bend wood?
Can you blame them for pulling out? Look at how he markets his other sponsors: the coffe cup logo is half turned away from the camera; the Stanley tape measure logo is hidden and probably upside down anyway; and the pack of Camels is upside down.Missing the Dr. Pepper cans
Nick, you should make a "steam box" for bending wood. Get a length of hot water PVC large enough to put the largest piece of wood that you need to bend in. You make a couple of cross horses so it tilts up at about 20* from end to end. You put a cap on the top end that has an opening in the lower 1/4 and a cap on the lower end that will accept your steam source. For small projects a tea kettle with a hose is good enough, larger projects I rig a pressure cooker. Inside the pipe itself, you want to place a few little pieces so the wood doesn't sit full length on the pvc.
I use a similar set up for wood plank when I model ship build in the winter. You have to bend a lot of wood and it makes life better than just trying to strong arm it around. I found that out the hard way and it took a fair amount of wood putty to fix the problems I created by doing that.
The pics are of the boat I am currently trying to build. Planking is done in two layers just like it would be done on the actually vessel. The under planks are think pine and the over planks are a thinner mohangany.
Very impressive build up there Scott.
Scott, my fingers are too big to do that!!!
-Skip
Scott, my fingers are too big to do that!!!
-Skip

RE: webcam frame of rightside of fuselage, timestamped, 2007-04-02, 00:58:56
Did the planes illustrate how to construct the joint between the perpendicular brace (blue writing pen on top of it) and the diagonal brace?
I see the gluing surface is all end grain against long grain. I think I would have "let in" the diag brace into the perpendicular to give more end grain to end grain.
I agree about the tendency to weaken, but consider the joint already is weak due to the mating of the gluing surfaces. There are a few other factors but you, as boatbuilder, know.Should be OK, if he's using gussets....as they will take up any strain.
Letting in, tends to weaken the "let" piece, by reducing its cross section, instead of strengthening the joint
Briefly, letting in is to remove material from each piece to allow a change in the mating angle.What exactly is "letting in" anyways, I don't get that one.
Briefly, letting in is to remove material from each piece to allow a change in the mating angle.
Look at the joint as shown. You have long (due to cut angle) end grain (diag brace) mated across a straight glue line to straight grain (perpendicular brace). The joint is in shear and IMO relies too much on glue strength.
Consider how you could change that glue line to allow for more end grain to end grain. You would have to lessen the angle of the cut line of the diag brace and remove some material fro the perpendiular. Keep in mind the glue line need not be a straight line. The subject is joinery. Keep in mind the more complex the joint, the more difficult and/or time consuming.
The reasons for so many different joints is for optimium design strength of the assembly and to allow the builder to take advantage of the strengths inherent in the material. End grain to straight grain across a straight glue line is a weak joint. While that is a true statement, perhaps it doesn't matter as much in light plane construction and that I'm overly concerned.
I agree about the tendency to weaken, but consider the joint already is weak due to the mating of the gluing surfaces. There are a few other factors but you, as boatbuilder, know.
Are you saying gussets should allow for an otherwise weak joint?
I think Nick has decided that metal is more to his liking.Then the fun part. I took the bottom piece and drenched it with the hose for a good 10 minutes (I have no pool, so I hoped it'd work). After it was good and drenched, I fit the bottom longeron around the nails and left it to sit and dry. Unfortunately, I can't do anymore until it is completely dried. I needed a break anyways!
Hi Nick,
In the future if you don't want to go through the trouble of a steam box, you may want to buy a 2" tube of pvc, glue an end cap on one end and fill it with water. If you soak the wood over night it bends easily, but it also takes another night to dry. But it does beat the heck out of standing there with a hose.
lou
hehe, no. I think I had approximately 150 hours in when I screwed the pooch and cried myself to sleep.

Why, did the pooch leave you afterwards?
Okay, does this qualify as the oldest resurrected thread?
 I feel like I missed something...