Greebo
N9017H - C172M (1976)
- Joined
- Feb 11, 2005
- Messages
- 10,976
- Location
- Baltimore, MD
- Display Name
Display name:
Retired Evil Overlord
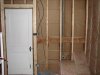
My wife and I are becoming avid DIYers, and right now we're in the middle of a remodel of a small room upstairs which during its lifespan has been a bedroom and a kitchen.
We are nearly done with mudding and taping and are about ready to paint, and then we'll be turning our attention to the floor.
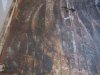
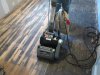
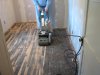
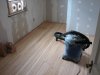
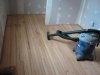
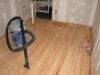
We first considered putting in a swiftlock laminate floor, but we've been looking at the original, 66 year old hardwood, and think it may be salvagable if we can clean it and sand it and then treat it properly.
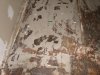
Stuck to the floor, however, is old rosin paper that was put down under the vinyl floor that was installed when the room became a kitchen. The paper is very old and was glued down, not tacked. Removing it is a pain, but we can scrape it up, however its a very slow and tedious process.
I think we can speed the process by soaking the paper with a mild soap solution, and then scrape it up after a couple of minutes.
Any experience or thoughts on the subject?
Also I'm thinking if we're going to sand and stain and seal the floor, we should do that before painting, and then protect the floor while we paint.
Thanks for the input in advance!
We are nearly done with mudding and taping and are about ready to paint, and then we'll be turning our attention to the floor.
We first considered putting in a swiftlock laminate floor, but we've been looking at the original, 66 year old hardwood, and think it may be salvagable if we can clean it and sand it and then treat it properly.
Stuck to the floor, however, is old rosin paper that was put down under the vinyl floor that was installed when the room became a kitchen. The paper is very old and was glued down, not tacked. Removing it is a pain, but we can scrape it up, however its a very slow and tedious process.
I think we can speed the process by soaking the paper with a mild soap solution, and then scrape it up after a couple of minutes.
Any experience or thoughts on the subject?
Also I'm thinking if we're going to sand and stain and seal the floor, we should do that before painting, and then protect the floor while we paint.
Thanks for the input in advance!

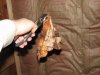
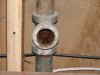
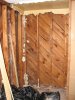
 matched with strawberry wall paper and blue curtians. And as far as the house is concerned that the bad part... the ulgy part was the wire splices without junction boxes in at least 3 rooms so far and the 1/2" notches taken out of a few studs so they could make an alcove for the refrigrator under the stairs.