Exhaust repair

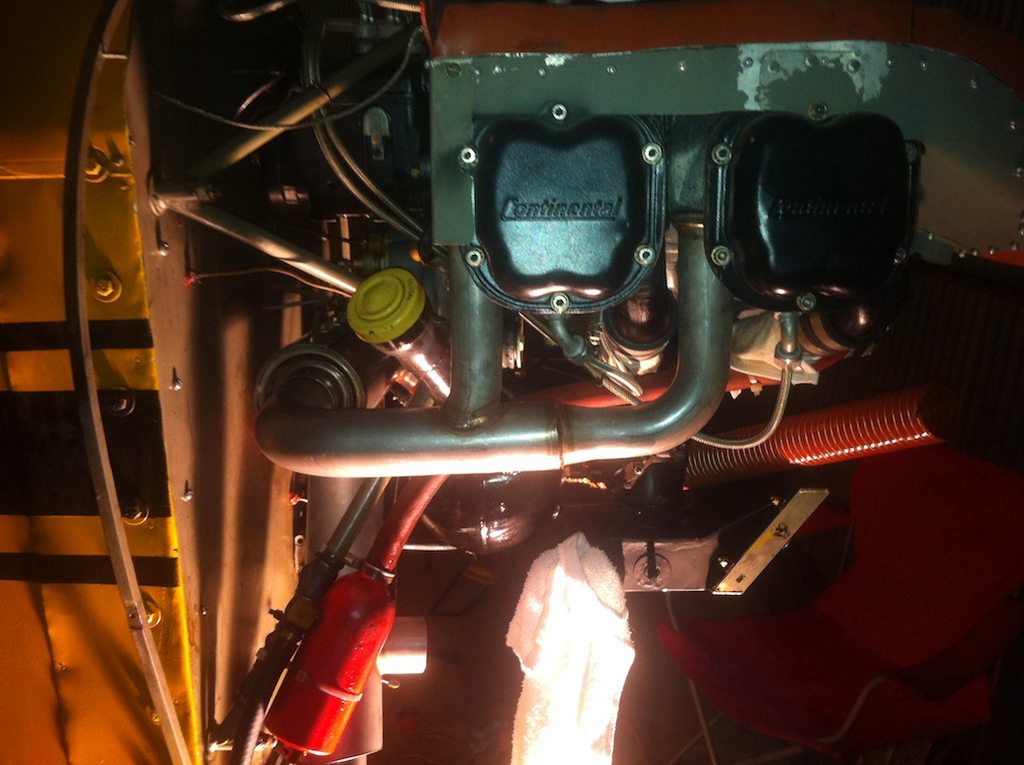
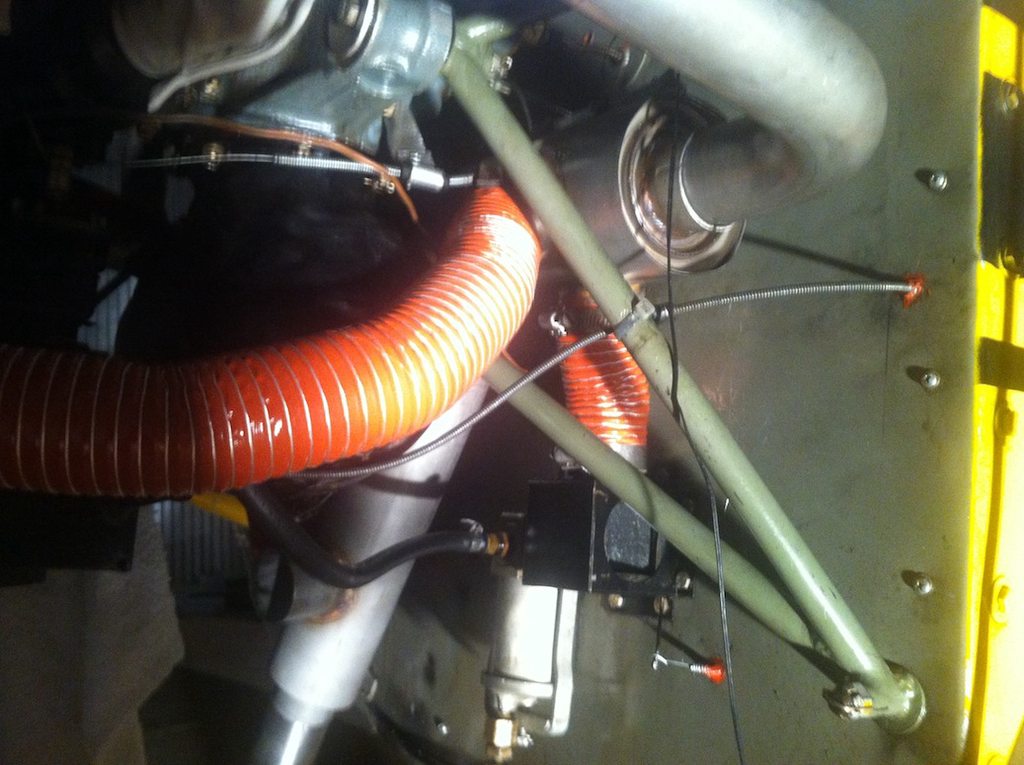
I found that angled hemostats were the best tool for working the scat over the duct. The low profile of the jaws combined with the ability to grip and tug lightly and then move, re-grip and do it again, and the ability to remove my fingers from the loops and move the tool without releasing its grip made the difference for part of the circumference. Real mechanics may have a better tool for this stuff.
Leave the white string on, place a piece of masking tape over it to hold it in place until you get a clamp over it. always capture the wire under the clamp. or it will move and ruin the tube.
 
Build a Plenum duct to feed lateral/diagonal to a NACA duct in the side/front of the cowl. Easiest way to do it is to use spray foam and construction paper/poster board to make the basic forms. Once you have the foam final shaped and sanded you can fiberglass over it to create the duct then melt out the foam with a solvent. You may have to make some sheet metal heat shields on standoffs near a pipe, but high temp resins handle 500+*. You could build the whole thing of sheetmetal, but I think you'll get better heating easier making a composite duct, I have a feeling you're gonna want that heater to work really well this winter.

I really like this idea and methodology.
 
For the past 40 years there was an ad in Trade-a-Pain from a place that made custom scat tubing, with very nice end connections.

Can't find it this morning!
 
The reason you are having troubles, is you have the piper style muffler on a continental engine, it was not designed to clear the oil tank, because Lycoming does not have a tank like that.

Could you explain further? I have a Continental engine with a Piper J3 exhaust system. This is the same setup that would be on a J3.
 
Leave the white string on, place a piece of masking tape over it to hold it in place until you get a clamp over it. always capture the wire under the clamp. or it will move and ruin the tube.

Tom..... Are you reading the instructions off a Tampax box?:dunno::D..

Jus kiddin...... Calm down..:wink2:
 
Looking at this pic, I assume the intake port /pipe is the one pointed at the oil tank ? http://i.imgur.com/DzIlw.jpg..

If so I would shorten it to about half its length.. All you need to secure the scat tubing on it is about 3/4" or so. Just enough for the clamp to squeeze down on the scat hose....... It a perfect world that fitting should have been clocked 20 degrees further downward....

I don't think you need to send it back to be shortened though,,,, get a NEW hacksaw blade and shorten it in your shop.. A die grinder with a cut off wheel will do the deed too.. Just remember, stainless steel is pretty tough material to work with. The welds do look pretty nice.:yes:.

Of course they ought to for 1500 smackers.:eek:
Thanks, not sure why it didn't dawn on me to just hacksaw it. I talked to Dawley about it today and we settled on doing that instead of sending it back. The guy who made it did say he made them longer because he thought it'd be better that way.

I do not have a die grinder -- but that is indeed what Dawley said they generally do, since hacksaw will take a lot more time.
 
Having recently watched both methods being used on a wingtip repair, my vote is for the grinder if I'm the one charged with doing the shortening.

Thanks, not sure why it didn't dawn on me to just hacksaw it. I talked to Dawley about it today and we settled on doing that instead of sending it back. The guy who made it did say he made them longer because he thought it'd be better that way.

I do not have a die grinder -- but that is indeed what Dawley said they generally do, since hacksaw will take a lot more time.
 
Could you explain further? I have a Continental engine with a Piper J3 exhaust system. This is the same setup that would be on a J3.

And Piper used that style on the whole 28 series with a Lycoming engines and many companies make the heater muff like they did on yours.

It's too long and hits the oil tank. this is not the J3 muffler, they had the pancake style under the cylinders with no heater. You have the super cub style with the heater behind the engine, which is the Lycoming style
 

Attachments

  • DSCN2103.jpg
    DSCN2103.jpg
    220.7 KB · Views: 10
And Piper used that style on the whole 28 series with a Lycoming engines and many companies make the heater muff like they did on yours.

It's too long and hits the oil tank. this is not the J3 muffler, they had the pancake style under the cylinders with no heater. You have the super cub style with the heater behind the engine, which is the Lycoming style
All I know is that every company that builds a "J3 Cub" exhaust for a certified J3 Cub has the same exhaust as me. I see no one selling a J3 exhaust different then what I had.

http://www.aircraftspruce.com/catalog/appages/piperj3exhaust.php
 
sounds like a great excuse to buy a die grinder
 
sounds like a great excuse to buy a die grinder
Normally that is exactly what I'd do...we'll see..I've burned through about all the money I can possibly afford to burn through, plus a few more thousand. So at this point I'm willing to put the effort into hack sawing.
 
Or rent one or pay a mech at some shop $10 to whack it off at the mark.

sure but with my solution, in 10 years when he needs it again, he can spend 2 hrs wandering around the house wondering where he put that die grinder.
 
At some age 2 hours is the expected time for such event. Trust me on that/

sure but with my solution, in 10 years when he needs it again, he can spend 2 hrs wandering around the house wondering where he put that die grinder.
 
sure but with my solution, in 10 years when he needs it again, he can spend 2 hrs wandering around the house wondering where he put that die grinder.
Like the $600 or so dollars I have into my:
-30 lb tank of R-134A that I've used once
-AC manifold gauges that I've used once
-AC Vacuum pump that I've used once
-Refrigerant scale that I've used once
 
Like the $600 or so dollars I have into my:
-30 lb tank of R-134A that I've used once
-AC manifold gauges that I've used once
-AC Vacuum pump that I've used once
-Refrigerant scale that I've used once

hey bring all that crap down here, my Alero needs some A/C work.
 
You will tear the stainless with a hack saw.

do this

Huh..:dunno::dunno:

1 New fine toothed hacksaw blade + cutting fluid + slow strokes + medium pressure = A very nice cut....:yes:

That is, if it is a , 304, 316 or 321 alloy system..
 
Harbor Freight. The tool will only last one job, so you won't be tempted to keep it lost somewhere in the garage. Haha.
 
"It's out here somewhere... Or down in the storage in the basement... Or..."

yvuhegyn.jpg
 
Huh..:dunno::dunno:

1 New fine toothed hacksaw blade + cutting fluid + slow strokes + medium pressure = A very nice cut....:yes:

That is, if it is a , 304, 316 or 321 alloy system..

I do believe it will be Hastaloy (sp) X a stainless derivative that is better for high heat applications.
 
I do believe it will be Hastaloy (sp) X a stainless derivative that is better for high heat applications.

The only thing better then 321, is Inconel.... Maybe that's what they call "Hastaloy" in your neck of the woods...
 
I used a Dremel with a cutoff wheel for a lot of the cuts in this (stainless) system:

SAM_0735.JPG


Probably used a hacksaw on a couple, but I don't recall for sure.
 
Last edited:
I have a dremel but forgot it. I just used a hacksaw and it worked just fine, made a nice clean cut. Not like it needs to be perfect since a hose is going over it anyways. More time was spent on here talking about a hacksaw not working then it took to actually make the cuts with the hacksaw (just a few minutes).

Hopefully the exhaust clamps show up tomorrow so that I can figure out where to drill the holes for the pegs. I also need to drill holes for screws to hold the pipe heat shroud onto the muffler heat shroud.

After all that I need to get the cowling back on (replacing some of the hardware) and the prop back on. I'll pressure test first with my shop vac, then start it up and hope it doesn't leak. It shouldn't leak...looked good and I used new gaskets and exhaust nuts.

Pictures of where I stand right now:
9oGcVh.jpg

QlG32h.jpg

c1Xio.jpg

Thlt8h.jpg

GJlnDh.jpg

zETiYh.jpg

fpFHKh.jpg

Z1eY1h.jpg

lX2LDh.jpg
 
Last edited:
Anyone ever said anything about that control cable tie-wrapped to the engine mount? I'd prefer an Adel clamp there. Rubber to metal. I think that's what they're called anyway...

Engine mounts aren't cheap and tie-wraps love to gather dirt and grind on metal poles under vibration. Then rust takes over. Or so I've heard. Seen some photos too. Our mechanic here says he doesn't see that problem ever, since we're so dry. Corrosion in general is hard to come by here usually. But there... Dunno.

Plus, tie-wraps get brittle and break. That I do know for sure. ;)

No comments other than that.

Exhaust looks "ooh, shiny." That's about the extent of my exhaust system knowledge. :)
 

Attachments

  • DSCN2948.JPG
    DSCN2948.JPG
    217.1 KB · Views: 43
Anyone ever said anything about that control cable tie-wrapped to the engine mount? I'd prefer an Adel clamp there. Rubber to metal. I think that's what they're called anyway...

Engine mounts aren't cheap and tie-wraps love to gather dirt and grind on metal poles under vibration. Then rust takes over. Or so I've heard. Seen some photos too. Our mechanic here says he doesn't see that problem ever, since we're so dry. Corrosion in general is hard to come by here usually. But there... Dunno.

Plus, tie-wraps get brittle and break. That I do know for sure. ;)

No comments other than that.

Exhaust looks "ooh, shiny." That's about the extent of my exhaust system knowledge. :)
Good point, I'll take a closer look tomorrow and will fix.
 
here is what the damage looks like.

That is an aluminum tube..... Not steel......

I agree, Zip Ties do get brittle and that's why I change the ones on my plane every few years... So far absolutely NO signs of them sawing into any surface they are wrapped around.. My biggest problem is finding new ones the correct color, I like mine color coordinated ya know.;)

Ps. I have seen Adel clamps abrade into surfaces because of dirt/grime under the rubber so even those are not bulletproof. Don't let that myth lull you into a warm, fuzzy feeling that they won't.
 
That is an aluminum tube..... Not steel......

You're right, and they will cut steel just as fast.

I agree, Zip Ties do get brittle and that's why I change the ones on my plane every few years... So far absolutely NO signs of them sawing into any surface they are wrapped around.. My biggest problem is finding new ones the correct color, I like mine color coordinated ya know.;)

Ps. I have seen Adel clamps abrade into surfaces because of dirt/grime under the rubber so even those are not bulletproof. Don't let that myth lull you into a warm, fuzzy feeling that they won't.

When they are installed correctly they will not. Use the proper size and correct positioning and they will stay in place and not move, no movement, no cutting action.
 
That is an aluminum tube..... Not steel......

I agree, Zip Ties do get brittle and that's why I change the ones on my plane every few years... So far absolutely NO signs of them sawing into any surface they are wrapped around..

I've seen them cut into the steel tubing of an engine mount, just like in Tom's picture.

In Jesse's picture, the wrap has the cable sheath against the tubing. Might be damage from that.

Dan
 
I've seen them cut into the steel tubing of an engine mount, just like in Tom's picture.

In Jesse's picture, the wrap has the cable sheath against the tubing. Might be damage from that.

Dan

Spot tie doesn't seem to do this, it must be the wax that has a sealing quality that keeps the dust from getting under it to do the damage.
 
Like the $600 or so dollars I have into my:
-30 lb tank of R-134A that I've used once
-AC manifold gauges that I've used once
-AC Vacuum pump that I've used once
-Refrigerant scale that I've used once

I told you could you just drive out to my house and use all of those items (except for the scale - I never bother with those) that are sitting in my garage. I've used them at least 5 times. And now that my house is closer, that means you can come out more easily.
 
Did some test flying today -- the CO monitor was *NOT* going off which is a nice change. I had the heat on full blast the entire time and I was burning up. Heat defiantly works good.

It seems as though the carb heat might not work as well during run-up as it used to. I can get about a 125 rpm drop at cruise power/speed...but hardly anyhting at runup. I am pretty sure it worked better before. Not sure how much of a drop you really should have on a A75..will need to investigate.
 
I told you could you just drive out to my house and use all of those items (except for the scale - I never bother with those) that are sitting in my garage. I've used them at least 5 times. And now that my house is closer, that means you can come out more easily.

It would have cost me just about the same amount of money in gas to drive there plus all the time :)
 
Back
Top