You are using an out of date browser. It may not display this or other websites correctly.
You should upgrade or use an alternative browser.
You should upgrade or use an alternative browser.
DIY Plane Interior
- Thread starter OkieAviator
- Start date
Kiddo's Driver
Pattern Altitude
- Joined
- Oct 5, 2013
- Messages
- 1,500
- Location
- Somewhere in the Southeast
- Display Name
Display name:
Jim
If you want to strip the paint i found something that works well at WalMart. Rustoleum makes "Aircraft Paint Remover". WalMart sells a spray paint sized aerosol can for about $8. I sprayed some on the bottom of my oil pan to remove the paint for a Reiff heater install. I came back 8 minutes later and wiped the paint off with a rag. (Followed by a soaking of purple power, then LOTS of water to make sure everything was rinsed away.)
That will leave you with a clean surface that you can scuff with scothc brite pads or some sand paper prior to primer/paint.
Jim
That will leave you with a clean surface that you can scuff with scothc brite pads or some sand paper prior to primer/paint.
Jim
OkieAviator
Pattern Altitude
- Joined
- Aug 17, 2014
- Messages
- 1,859
- Display Name
Display name:
OkieAviator
I came back 8 minutes later and wiped the paint off with a rag. (Followed by a soaking of purple power, then LOTS of water to make sure everything was rinsed away.)
I have a fear that I'll somehow fail to wash all the stripper off and that there will be a problem in the future. After talking to Dodd at Airtex I'm going to clean it well and use a self etching primer and then top coat it.
While taking pictures of my plane pieces this afternoon two more questions arose. I'm going to need to replace the visor and vents. Anyone have experience with Ventubes?
What about Rosen sunvisors?
Last edited:
Rosen visors are the gold standard, and priced like it. Love mine, but am awfully glad the previous owner installed them. ")
They also have a new rail system for visors and accessory mounts (like cameras, ipads, etc) so check into that in addition to the standard visor product.
They also have a new rail system for visors and accessory mounts (like cameras, ipads, etc) so check into that in addition to the standard visor product.
JHW
En-Route
use a stainless wire wheel brush on the aluminum if you want. It won't harm anythingOkay that's good to know. So on the Steel seat frames I can do this but not on the door jams or any aluminum?
Is there a practical way to sand it to rough the old paint up enough to paint over it or should I do the 8 part process outlined int he article?
iflyvfr
Pattern Altitude
Be sure to paint further back than you think u need to when doing the door frames down by your feet & toward the FW/ rudders
Kiddo's Driver
Pattern Altitude
- Joined
- Oct 5, 2013
- Messages
- 1,500
- Location
- Somewhere in the Southeast
- Display Name
Display name:
Jim
use a stainless wire wheel brush on the aluminum if you want. It won't harm anything
It won't transfer ferrous material, but it is harder than aluminum.
JHW
En-Route
that's the point. a soft (small bristle) stainless wire wheel is the most efficient way to polish up corroded spots during paint prepIt won't transfer ferrous material, but it is harder than aluminum.
OkieAviator
Pattern Altitude
- Joined
- Aug 17, 2014
- Messages
- 1,859
- Display Name
Display name:
OkieAviator
Thanks for all the tips. I ended up using a combination of stainless wheels and scotch brite pads to clean up the doors. Then I applied several thin coats of self etching primer followed by 5 or so top coats of Krylon White Gloss (The guy who painted the exterior said it's a decent match.) Finished up with a full set of new seals and I'm happy with the results.
Now all that's left is to put the seats back in and fly it while I wait on the Plane Plastics and Airtex order to ship!
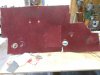
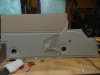
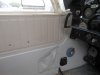
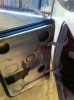
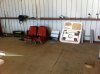
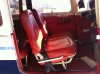
Edit: Added some pictures. One shows the baggage door with new seals. Painted the Jam and hinges. All red will be covered with Carpet or plastic. Next is the inside of one of the doors... Also my original red seats which will be going back in for now.
Now all that's left is to put the seats back in and fly it while I wait on the Plane Plastics and Airtex order to ship!
Edit: Added some pictures. One shows the baggage door with new seals. Painted the Jam and hinges. All red will be covered with Carpet or plastic. Next is the inside of one of the doors... Also my original red seats which will be going back in for now.
Attachments
Last edited:
OkieAviator
Pattern Altitude
- Joined
- Aug 17, 2014
- Messages
- 1,859
- Display Name
Display name:
OkieAviator
Looking for a source of replacement custom placards. This plane has a 10 hour old Penn Yan 180 conversion (O-360-A4A). With that it also has the flap limiter to 30 degrees. So per the documentation the gross weight has been increased to 2550 and all Vspeeds are different. Also I don't believe you can get your W&B within a Utility category or at least I'm not going to try any spins in it.
While I'm at it I also plan to get a new Baggage compartment and N# label. Thanks
While I'm at it I also plan to get a new Baggage compartment and N# label. Thanks
OkieAviator
Pattern Altitude
- Joined
- Aug 17, 2014
- Messages
- 1,859
- Display Name
Display name:
OkieAviator
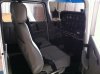
Over two months later I'm almost done. I have 5 pieces of trim I need to install and paint and then a few detail items to finish everything up. To finish up this thread in case anyone searches in the future I wanted to give a quick write up on how everything went.
Budget-wise it ended up being about $7400. That was about $3000 in Trim pieces and materials from Plane Plastics and $3200 or so in panel covering and seats from Airtex and $1200 in miscellaneous which includes parts, paint, placards and new door seals throughout.
The plastics were probably the most challenging to fit in. Takes a lot of time, they're not perfect but they look 1000 times better than before. I painted using SEM shake can so they'll scratch easy but they're easy to repaint if there's an issue. I did waste one piece and ordered a piece I didn't need but no other issues outside of that. Window beading was odd to mess with, I ended up just painting it and installing it. I also installed new Ventubes and an Air Flow enhancement kit, will need to wait until the Summer to see how effective that is. I installed a 'hush kit' as well, but since I only had 5 hours in the plane before I installed it I'm not sure how well it works.
I was dreading redoing the seats. However the Airtex part was extremely easy to use. Just needed to breakdown my old seats, clean and paint and install using the pictures they sent me as reference. Had some issues with the grommets because mine were falling apart but ended up just gluing some nylon washers to the top of them to make sure they won't fall apart. Not sure if that's legal but hope the Airplane police don't find out. The fit and everything is good and like the trim it's not perfect but it's nice.
In the end I've learned a lot about my plane and my planes in general. I also uncovered a number of items that were over looked because it hadn't been flying. There was a gas leak on the cross-feed that was covered with old plastic, the stall horn was broke and random other things like lights and what not. Random stuff like painting the doorjams, installing new seals, armrest refirbs took more time than I thought and things like the seats went much faster than I anticipated.
I'm not great with pictures but I snapped this one the other day that shows the difference between before and after.
Attachments
sferguson524
Pattern Altitude
Looks great!
MickYoumans
Cleared for Takeoff
- Joined
- Jan 26, 2012
- Messages
- 1,334
- Location
- 2J5 / KBXG - Georgia
- Display Name
Display name:
MickYoumans
Wow, the new interior looks a million times better than the old red crap. Looks like you went with the same Airtex grey interior I used. Looks nice!
iflyvfr
Pattern Altitude
My Cessna seats came with the holes to accept headrest posts (many do I'm told) and they are a standard width apart. I found a circa 1980's Toyota in a junk yard, pulled the headrests, stripped them to the plastic & voila!  I think I paid $25 for the four.
I think I paid $25 for the four.bluerooster
Pattern Altitude
- Joined
- Nov 28, 2011
- Messages
- 2,072
- Display Name
Display name:
shorty
Doing my own interior, as I can't afford to hire it done. Burn test is easy, and following that which is written in FAA code is also pretty simple.
I used leather, as it meets burn cert requirements, and smells good. Side panels are done, and seats will get done as soon as Dad get's done playing with it, and I get it back.
I used leather, as it meets burn cert requirements, and smells good. Side panels are done, and seats will get done as soon as Dad get's done playing with it, and I get it back.