DIY Plane Interior

OkieAviator

Pattern Altitude
Joined
Aug 17, 2014
Messages
1,859
Display Name

Display name:
OkieAviator
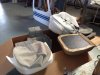
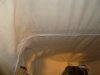
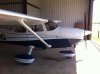
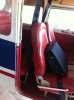
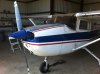
I recently became the proud 50% owner in a 1977 172N. The plane has a 180 conversion with about 10 hours on it, we just got it painted last month and now it's in the Avionics shop getting a nice radio/gps, ads-b upgrade.

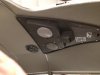
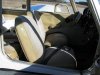
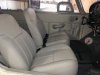
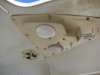
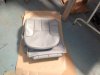
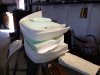
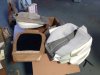
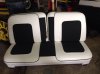
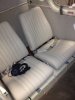
Only think left that's going to need attention is the interior. We're on the fence between hiring someone to do it or doing it ourselves using parts from places like PlanePlastics and AirTex.

My concern is that this is more difficult than it looks. If you're fairly handy is this a doable task or is this something left up to the professionals? I did the wiring on a car restoration project while another guy did the interior and I just remembered that he was having issues with the fabric bunching and rippling.

Thoughts?
 
Here's some pictures of the plane. Before and after of paint and a quick shot of interior.
 

Attachments

  • IMG_0954.JPG
    IMG_0954.JPG
    1.4 MB · Views: 269
  • IMG_0884.JPG
    IMG_0884.JPG
    842.5 KB · Views: 322
  • IMG_0861.JPG
    IMG_0861.JPG
    1.6 MB · Views: 269
Here's something I posted a while ago.

If you want first class work, DO NOT use a aviation upholstry shop
If you want to save money, DO NOT use a aviation upholstery shop

Quote:

Long and short,

Read this

http://www.avweb.com/news/maint/182839-1.html?redirected=1

Find a hot rod shop, check out the rod sites like jalopy journal.

http://www.jalopyjournal.com/forum/...int-bodywork-by-miguel-of-the-lifters.773620/

Find out what materials you need, how much of it and order it yourself, send a sample in for the burn cert (no big deal)

I have never seen a aviation upholstery shop turn out a product that has straight stitching, or detail like a rod and custom shop, which is funny considering the huge price difference.
 

Attachments

  • image.jpg
    image.jpg
    760.2 KB · Views: 285
Last edited:
James331 - Those links aren't working but I believe I read that post a few days ago. I remember that picture and something about the piping and stitching, also something about a $25 certification fee.

What about the quality of things from places like Airtex?
 
Here's something I posted a while ago.

If you want first class work, DO NOT use a aviation upholstry shop
If you want to save money, DO NOT use a aviation upholstery shop

Its interesting you say that. There are a few Cessna owners that might disagree with you on Cessna Pilots Association, who got pretty new headliners from a cut rate place that did a nice job. About 5 years down the road an IA found heavy corrosion on the upper door frame under the new headliner. They suspect that over application of fire retardants made these headliners very corrosive. The other owners haven't commented yet.

http://www.airmod.com/articles/index.htm

These guys have plenty of information regarding corrosion.
 
James331 - Those links aren't working but I believe I read that post a few days ago. I remember that picture and something about the piping and stitching, also something about a $25 certification fee.

What about the quality of things from places like Airtex?


Fixed the links.

Airtex is a precanned interior, your customization choices and material selection is limited to say the least.

Price wise its about the same, or cheaper to get a hotrod shop custom job.

It's just a time thing, ordering airtex and dumping it off at airport with a "upholstry" shop is easier, but it will cost more and not look nearly as a nice.

There are merits on both side, personally I wouldn't debate anything other than a rod and custom shop, the AV shops don't offer the materiel, craftsmanship, or value that I look for.

As for the corrosion? I'm not sure what that has to due with aviation vs hotrods, they both can get corrosion, I've seen plenty of 20+ yr old rod and custom work that hasn't caused an issue for metal. You can find crap shops on ether side of the fence, that's why I said so send your materials off for the burn cert, and pick your own materials.

Auto flame resistant foam and leather ain't going to corrode anything.
 
Last edited:
It's not that difficult IMO to R&R an interior and either refinish the existing pieces, or take the seats to a hot rod shop. I plan to do exactly that and build some super-duper seats with memory foam and ample support to my specs using a local shop and my materials. You can get nice carpet cut and bound at a hot rod shop too.

Fitting new plastics can be very tedious due to lots of trim and fit iterations. Not difficult, just tedious.
 
We just finished our Comanche. We did the disassembly/reassembly and took the seats, side panels, etc to an auto place. Got the headliner from Airtex and installed it ourselves. Pretty pleased with the result...

You just need to make sure your materials are burn tested. Either buy "aircraft" materials, or send your materials to the burn testing lab for certification.
 
50dd8ed420a9743ae6af46d8a2376cab.jpg


Here's a shot of the (nearly) finished project. Waiting on the armrest.
 
That Comanche looks very nice.

Could you ball park what that cost for the seats, panels and carpet, materials and labor?

Thanks,
Dan
 
Overall cost was $12k. That was with removing and re-installing the interior components ourselves.

That included $1k for all new oxygen jacks since ours were 1967 vintage and some leaked. It also included re-chroming many of the "shiny bits", new headliner, carpet. Totally new seat belts. All of the "touchable" areas are some pretty expensive "aviation grade" leather with matching vinyl on other areas.

I don't have the itemized costs in front of me. My partner (who is retired) did all the dealings with the automotive shop. He's also quite handy. I am NOT handy, but I just showed up and did what he said (ie scrape this glue off the wheel-well, unscrew this, glue that, etc.)

It wasn't rocket science and we did it probably with about 4 days of our own labor.
 
That Comanche looks great! I'm going to do some more research and try to put together a project BOM to get an idea of what I'm looking at. As James pointed out I don't really want the plane to look generic, but then I don't want to overspend on the interior... a balance in between is what I'll look for.
 
I gutted my interior and put < $1500 into it, seats, side panels, carpet. The seats and carpets were done by a local hot rod place. I started out to get real leather on the seats but some of the new fake leathers are so nice, I went with that to save weight and hot-stickiness as well as cost.

I made my own interior panels. I hate the "padded cubicle" look, I wanted flat walls. I dropped the beech wavy-aluminum side panel material in favor of composite "yard sale sign" material like is used in some piper side panels, and glued the fabric directly to it with no padding.

I can't get past what some people spend on interiors. It's one thing to chase a Lindy at OSH, but my airplane like is just a daily driver, nothing special.

It doesn't have to cost a lot of money to have something that might not be a lexus but is certainly very presentable.
 

Attachments

  • front.jpg
    front.jpg
    270.7 KB · Views: 586
  • back seats.jpg
    back seats.jpg
    66.4 KB · Views: 556
I can't get past what some people spend on interiors. It's one thing to chase a Lindy at OSH, but my airplane like is just a daily driver, nothing special.
My view also. Having grown up in Phoenix, and burned my legs on car seats in the summer, I'm not interested in leather.
It doesn't have to cost a lot of money to have something that might not be a lexus but is certainly very presentable.

Airplane: 1969 cherokee 180

I went the AirTex route back in 2011 while the engine was being overhauled. I had redone the door many years before and discovered that the material was either no longer available or upped to the premium category, don't remember which. Talked to Dodd at OSH, he made a call and determined they still had the material I liked. ($2600 including the door from years ago)

I did not replace the carpet (next year's project) nor the headliner (excellent shape considering 40+ yr old) so it was only the seats & sides & back wall.

After gutting the 40+ yr old crappy insulation (happy happy day! oh frabjous day!) I had the local A&P remove the aluminum battery cables and replace them with Bogart copper (which had been sitting on my shelf for almost 10 years). Then I put 1 inch sound deadening foam (FAA approved) everywhere below the windows. Pulled back half the headliner, did the same. (Foam - about $100)

Took the old seats & new seat covers to the local auto shop, in 2 days I had new seats. I wish I had asked them to remove the old paint on the frame and repaint, but completely forgot about it. ($350 for all 4 seats) If you've done any furniture work, you could probably do the seats yourself but in a cherokee, the bottoms are a real pain while the backs are literally slide-on slip covers with velcro fastening.

Time-consuming to do it right but it looks pretty good, considering I did all the side panels with little more than an electric screwdriver and very sharp carpet knife. And an electric carving knife for the foam insulation.

If you go the foam route, DO NOT GET the version with adhesive on one side. It'll stick all by itself when wedged into place then covered with the panels. I speak from experience....
 
Last edited:
I am not overly handy or mechanical so I did the grunt labor. My experience was that once you get into it, you find things like corrosion to fix, speaker inop, vents, or whatever. The DIY route is a lot of work, but it is rewarding.

I could not have done it myself, I just don't have that kind of make-it-work gene I guess. Fortunately I have a talented engineer friend who could figure things out. I sent the seats and the armrests out and let Dodd do them. Found headrests and sent them out too. Meanwhile I sourced components, bought everything needed, cleaned and alodined panels, disassembled stuff, etc.

My experience with a couple of automotive shops was they either balked at running afoul of the feds or charged exorbitant prices for mediocre work. YMMV. Here's a before of my 66G model (note the door sills)
aCYfV8
6325581217_6b0b4a6672_z.jpg

And two afters: 6380442359_5317f1fc50_z.jpg 6380442643_65e79608e5_z.jpg The armrests were my favorite upgrade compared to the old elbow pads. I probably spent 3x the previous poster, but I went with everything and I had the interior painted with the good stuff.
 
Just about every corporate jet crew seat I've ever seen was fuzzy sheep skin type and NOT slick/hot/bald leather. These aircraft have air conditioning. That speaks volumes to me driving an un-airconditioned airplane.

The cushion on my daily driver wheelchair is foam wrapped in a plastic bag with a very thin cotton/polyester fabric over that, and its still not very comfortable in regards to heat.
 
After gutting the 40+ yr old crappy insulation (happy happy day! oh frabjous day!) I had the local A&P remove the aluminum battery cables and replace them with Bogart copper (which had been sitting on my shelf for almost 10 years). Then I put 1 inch sound deadening foam (FAA approved) everywhere below the windows. Pulled back half the headliner, did the same. (Foam - about $100)

Do you feel this change in insulation lead to a noticeable reduction in noise in the cabin?
 
I want Dan's Comanche so bad, it hurts! :)

Personally, I would go with the auto upholstery , simply based on price / options. I know I'll get what I want that way, and will just send the samples off. :)
 
\__[Ô]__/;1568505 said:
Do you feel this change in insulation lead to a noticeable reduction in noise in the cabin?

Definitely. Plus it keeps things from rattling, vibration, and improves temperature in winter. was caught at the airport today during the storm. Massive hail, high winds, etc. The hangar has the typical metal roof, 4 in of foam then another layer of metal. Very noisy with hail. Incredibly noisy. Impossible to hear anyone talk (had the FM radio on the table tuned to local station for weather reports). Got into the cherokee, shut the door and side window. Definitely quieter.

But remember the noise in our spam cans comes from the front - engine and prop noise.
 
We've done Airtex on a couple of planes: headliner and carpets for my Navion, and helped a friend do the entire plane on her 170. It looks good, though not custom and isn't too difficult. They provide decent phone support when you get stuck.

That being said, I had a custom interior done by an auto upholstery shop under the supervision of my mechanic. Getting FAA approved fabrics/materials (if that is even required for your aircraft) isn't difficult. They sent me a huge box of swatches and samples to look through.
 
We're on the fence between hiring someone to do it or doing it ourselves using parts from places like PlanePlastics and AirTex.
This past annual we had to gut the interior of my plane to do the control cable and linkages inspection. After having to spend the labor for them to take the interior out, it did not make sense to me to put my old crappy interior components back in. I went the AirTex route because it was easy to order a complete kit for my airplane and have it shipped to the maintenance shop. My mechanics brother does interior work on cars and installed the AirTex components for me. Here are a couple of before and after pictures. Feel free to PM me if you have any questions I can help you with.
 

Attachments

  • Headliner Console - After.jpg
    Headliner Console - After.jpg
    100.4 KB · Views: 423
  • Seats from Door - Before.jpg
    Seats from Door - Before.jpg
    137.6 KB · Views: 406
  • Seats from Door - After.jpg
    Seats from Door - After.jpg
    96.3 KB · Views: 453
  • Headliner Console - Before.jpg
    Headliner Console - Before.jpg
    80.8 KB · Views: 394
Here are a few more "out of the box" pictures of the seat components. The seats came with all new foam and the foam was already attached to the seat material.
 

Attachments

  • IMG_0634.jpg
    IMG_0634.jpg
    120.5 KB · Views: 312
  • IMG_0635.jpg
    IMG_0635.jpg
    84.9 KB · Views: 290
  • IMG_0636.jpg
    IMG_0636.jpg
    95.2 KB · Views: 298
  • IMG_0638.jpg
    IMG_0638.jpg
    104.4 KB · Views: 280
Last edited:
What did the Airtex stuff cost?
 
This past annual we had to gut the interior of my plane to do the control cable and linkages inspection. After having to spend the labor for them to take the interior out, it did not make sense to me to put my old crappy interior components back in. I went the AirTex route because it was easy to order a complete kit for my airplane and have it shipped to the maintenance shop. My mechanics brother does interior work on cars and installed the AirTex components for me. Here are a couple of before and after pictures. Feel free to PM me if you have any questions I can help you with.

it is amazing what a new interior does to the curb appeal of a plane. Looks really nice in the pics.
 
Mick, that's an awesome upgrade. Airtex ain't bad (my pix are above) and Dodd will talk your ear off. I actually recorded my conversations with him so I could replay them to my buddy who was helping me.

For the OP, some of the 172s use steel bows in the ceiling to hold the fabric headliners. Mine were all rusty, so I used steel wool to clean them up. Then I painted them with Rustoleum and finished by covering them in a sheath of tough shrink-tube. Here's one about to go in as we worked the headliner.

Hopefully this is helpful to other 172 owners and the next owner will appreciate the effort one day. :)
 

Attachments

  • P1010882s.jpg
    P1010882s.jpg
    152.1 KB · Views: 235
it is amazing what a new interior does to the curb appeal of a plane. Looks really nice in the pics.
The 'after' pictures do a good job representing what the plane looks like now after the upgrade. The 'before' pictures actually look a little better than it really was. You can easily see the discoloration in the ceiling and how bad my plastic console was in the ceiling. My old seats were in fair condition, but the pilot seat was separating across the top which does not show in the old picture.
 
Mick, that's an awesome upgrade. Airtex ain't bad (my pix are above) and Dodd will talk your ear off. I actually recorded my conversations with him so I could replay them to my buddy who was helping me.

For the OP, some of the 172s use steel bows in the ceiling to hold the fabric headliners. Mine were all rusty, so I used steel wool to clean them up. Then I painted them with Rustoleum and finished by covering them in a sheath of tough shrink-tube. Here's one about to go in as we worked the headliner.
I too spent a fair amount of time on the phone with Dodd up front before placing my order to ensure I would be getting everything I needed for the complete package change out. Fortunately my ceiling bows were in pretty good shape and only required minor cleaning. The original headliner in my plane was vinyl. Other than the bad discoloration, it was still in good shape. It was more substantial than the cloth replacement headliner so we kept the old headliner and glued the new cloth headliner to the old. I am so glad we did that. My ceiling turned out great. The interior guy that helped me with the installation was afraid we woud develop sags over time using just the AirTex cloth.

I also replaced all of my plexiglass too. From the inside my plane looks new. The only thing I have left to do for my restoration is get a good paint job. I installed new radios last fall and overhauled the engine back to 0 SMOH this spring.

iflyvfr, your airplane turned out awesome too. Sounds like you had the luxury of being able to send your seats to Dodd for them to do the work. I really like your interior.
 
Last edited:
I'm sitting with my plane partner this weekend to talk about the interior among other things. I read a ton of those Airmod.com articles which were very informative. Especially about corrosion control. I imagine that will take a bit but be worth it in the end.
 
Yes, it will be time consuming, but you'll do far more work and a far better job than a shop trying to just get it out the door. No one cares about your plane as much as you!
 
...My concern is that this is more difficult than it looks...

That's kind of a subjective call based on how easy you think it "looks" but in general the answer would be yes. You should at least be aware that these aftermarket parts (and even the OEM parts) are going to require some trim and fit work, they aren't going to just snap in or screw on right out of the box so if you're not sure how to do that you're going to have to find out.

Upholstery and especially headliners also require more work that what you probably are imagining. They don't just slip on or pin up and you'd be wrong to think that you can easily install a 172 headliner for the first time, with no prior experience, and have it come out as good as if it had been installed by an experienced professional.

Not to say that you can't do it or make it acceptable, it's just going to take time and patience to achieve that. Given that investment of time it might be a financial wash meaning, not really worth it unless you're just dying to do it yourself and think you might enjoy doing it.
 
That's a good looking Cessna:thumbsup:
I had a '66 172 that had Airtex interior when I bought it. It was very nice looking and was extremely easy to keep clean and extremely durable.
I owned the plane almost 8 years and it looked as good when I sold it as when I bought it.
I helped a friend do his interior in his 172. He used a local shop for the material and covering. It was a long, tedious process but not overly complicated. His plane was not in as good condition as yours appears though.
Good luck!
 
Thanks for the great feedback. If I can get my interior to look as good as MickYoumans's 172 then I'll be happy.

I'm going to combine products from Plane Plastics and AirTex. I'm sure I'll spend some time on the phone to make sure I get the project laid out right before pulling the trigger on it. Throw in corrosion control, door jam and plastic painting it should lead to a fantastic winter project!
 
I'm getting ready to start this project and have been doing some project planning and material list making which prompted further questions. I wanted to get some input on questions I had on certain steps.

* Painting of door jams and insides of doors - I read through this article and had intended to follow it. For Aluminium there are about 7 steps before you apply top coat. I had a friend who does a lot of car refinishing come over and look at the plane. He said he would just steel wheel the sections I want to paint to rough it up, clean it really well and then apply the paint. Thought for the little amount required that it won't show imperfections or chip. Thoughts?

* Plastics - I'm getting replacement plastics from Plane Plastics. I also plan to paint each piece with a SEM that matches Airtex 'Mica' color. Questions I have on this, should I replace every piece even if the original is intact? Most originals are cracked but there's at least a few salvageable pieces.

* Interior - Going with a full set of wall panels, seats, carpet from Airtex. Doing the vinyl option. I also plan to paint the rudder pedals and seat frames during this step. I can buy sound proofing material as well, looks like you cut to fit and just place it behind each panel and maybe the floor? Is this worth doing? The 0-360-A4A doesn't sound overly loud and I wear a heat set so I'm not sure. Airtex also mentioned I would need Seat Wraping for the frame... What is that?

* Details - I will need to refinish the door handles and strap grommets as well. They're a chipped chrome look right now and I will paint them black. Anything strange about doing this or will I paint them the same way as the jams? I'm assuming they're aluminum.
 
* Painting of door jams and insides of doors - I read through this article and had intended to follow it. For Aluminium there are about 7 steps before you apply top coat. I had a friend who does a lot of car refinishing come over and look at the plane. He said he would just steel wheel the sections I want to paint to rough it up, clean it really well and then apply the paint. Thought for the little amount required that it won't show imperfections or chip. Thoughts?

Do not do this. Steel wire wheels and steel wool on aluminum will cause galvanic corrosion later due to the dissimilar metals as the materials can transfer.
 
Do not do this. Steel wire wheels and steel wool on aluminum will cause galvanic corrosion later due to the dissimilar metals as the materials can transfer.

Okay that's good to know. So on the Steel seat frames I can do this but not on the door jams or any aluminum?

Is there a practical way to sand it to rough the old paint up enough to paint over it or should I do the 8 part process outlined int he article?
 
Back
Top