Cessna 182 yokes

Redneckpilot

Pre-Flight
Joined
Sep 27, 2014
Messages
70
Location
"First in Flight"
Display Name

Display name:
Redneckpilot
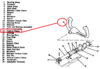
I decided to replace the original yokes on my 182 as they are the “closed loop” style with a set of newer ram’s horn style.
My plane is ‘65 H model and the yokes I am trying to install are from a ‘68 L model.

The issue is the mounting holes in the new yokes are indexed slightly different from the original yokes. The result is with the ailerons in neutral position the new yoke is about 20 degrees off to starboard.
My question is is there a way to index the tube so that the new yokes are positioned correctly?
I’m imagining the sprocket being pinned through the control tube under the panel?

Has anyone ran into this?
Any help is appreciated.

This first pic is with the ailerons neutral
13345B42-F43D-466C-969A-8B43B634B600.jpeg

Second pic is with the new yoke in the neutral position the ailerons are deflected port
BF4ED4E3-E6D7-4249-ADBD-C3AF976AA58D.jpeg
 
Last edited:
The biggest issue is the legality. The parts catalog for your airplane doesn't show that part number of control wheel. Who is signing off on this? It's not owner maintenance.

The alignment is a big job and involves adjusting the entire aileron control system as per the maintenance manual. I have found dozens of airplanes with their systems far out of rig due to uninformed adjustments,
 
My question is is there a way to index the tube so that the new yokes are positioned correctly?
If you want a plug and play solution, look for a online parts manual and look at the aircraft serial number splits between control style. I've never seen a 182 swap but have swapped control wheels between a 170 and 172 with no alignment issue. Also look to other models as some wheels were used between models. And if I recall some control wheels had a replaceable adapter between the wheel and the tube assembly which may give you a solution. I can't get a manual to load right now. What is you serial number? All else fails there's a possibility to reindex that adapter or the control wheel. I wouldn't mess with the tube assembly personally. Regardless, you'll still need an A&P sign off as this is a alteration vs a simple parts replacement.
 
Well I think we may have figured out a solution today upon further investigation.
I’ll update after next weekend.

Regarding the serial number split, mine is right at 100 before the split to the ram’s horn style.
Strangely enough a hangar neighbor had another 182 yoke and it was indexed differently from either of the ones I have.
I would never have guessed there to be so much variation on such a simple part between airplanes made within a couple of years of each other. But I should know better after messing with these things 26 years!
There is a second piece or I guess you could call it an adapter, on these but that piece is riveted to the yoke itself.
 
Strangely enough a hangar neighbor had another 182 yoke and it was indexed differently from either of the ones I have.
There is a second piece or I guess you could call it an adapter, on these but that piece is riveted to the yoke itself.

upload_2022-11-7_9-49-18.png

upload_2022-11-7_9-58-38.png


upload_2022-11-7_9-59-45.png

Accurate terminology in flying is important. As it is in maintenance. You order a "yoke" from Cessna and you'll get that big welded-up tubing thing as shown in the second picture. Your vintage of 182 likely doesn't even have a "yoke." It has an entirely different system like the first picture, using telescoping tubing instead of a yoke.

Pedantic, I know. But we get all agitated when some journalist talks about the engine "stalling" and causing a crash, after some pilot told them that the airplane stalled on takeoff. We don't want to sound like that.

At least, I don't.
 

Attachments

  • upload_2022-11-7_9-48-44.png
    upload_2022-11-7_9-48-44.png
    53.4 KB · Views: 11
View attachment 112130

View attachment 112132


View attachment 112133

Accurate terminology in flying is important. As it is in maintenance. You order a "yoke" from Cessna and you'll get that big welded-up tubing thing as shown in the second picture. Your vintage of 182 likely doesn't even have a "yoke." It has an entirely different system like the first picture, using telescoping tubing instead of a yoke.

Pedantic, I know. But we get all agitated when some journalist talks about the engine "stalling" and causing a crash, after some pilot told them that the airplane stalled on takeoff. We don't want to sound like that.

At least, I don't.

I drive people nuts over what they think might be minute. Specificity matters!
 
Been there, done that. My solution was to simply drill and tap new holes in the adapter piece to accept the yoke in the new orientation. Mine was off about 30 degrees, so there was sufficient room for a new set of holes. If you know someone with a lathe, this would be a very easy part to replicate and then you'd only have the one set of holes, but I'm not that picky.

I will let others argue about the legality. I'm keeping the old set in case the FAA man ever comes knocking. Only three screws to swap them back. My original ones were plastic, and these are known to snap at the worst possible moment. The metal ones are a significant safety upgrade in my mind, and a large portion of the fleet has been upgraded one way or another.

C.
 
View attachment 112130

View attachment 112132


View attachment 112133

Accurate terminology in flying is important. As it is in maintenance. You order a "yoke" from Cessna and you'll get that big welded-up tubing thing as shown in the second picture. Your vintage of 182 likely doesn't even have a "yoke." It has an entirely different system like the first picture, using telescoping tubing instead of a yoke.

Pedantic, I know. But we get all agitated when some journalist talks about the engine "stalling" and causing a crash, after some pilot told them that the airplane stalled on takeoff. We don't want to sound like that.

At least, I don't.
You are correct Dan.
Noted.

Thanks for sharing your knowledge.
 
Been there, done that. My solution was to simply drill and tap new holes in the adapter piece to accept the yoke in the new orientation. Mine was off about 30 degrees, so there was sufficient room for a new set of holes. If you know someone with a lathe, this would be a very easy part to replicate and then you'd only have the one set of holes, but I'm not that picky.

I will let others argue about the legality. I'm keeping the old set in case the FAA man ever comes knocking. Only three screws to swap them back. My original ones were plastic, and these are known to snap at the worst possible moment. The metal ones are a significant safety upgrade in my mind, and a large portion of the fleet has been upgraded one way or another.

C.
My first reaction was to drill new holes into the control wheel as well, but the holes would have been too close together and with this being such a critical part.
Had they been further apart or spaced evenly I would have probably went that route.

After looking at the service manual and conferring with my I/A, unless we come up with something else I think we will go behind or underneath the panel, clamp or block the cables short of each sprocket that the chains ride on, then loosen the turnbuckle in the cable until there is enough slack in the chain to allow rotating the control tube enough to rotate the sprocket one tooth. The sprocket has 12 teeth so each tooth should be worth about 30 degrees. (12x30=360)
This should index the tube where it needs to be to allow the control wheel to align correctly without affecting the rigging too much.
Once both sides have been indexed, tighten the turnbuckle and check the cable tension.
If there is any minor adjustment necessary at that point it should be possible to adjust at the ailerons without danger of limiting the travel on either side.

Simple…..
 
Simple…..
Nope. Not based on what I have found so many times.

There are two turnbuckles involved there. The upper one is a stinker to get at. Have fun. And you'll need to adjust both to get the wheels levelled.

Adjusting the ailerons is a long and involved process. Getting it wrong means that the stops on each side start limiting the travel of both ailerons. Again, the manual has the procedure. It's the worst system to rig in the whole airplane.
 
Last edited:
Accurate terminology in flying is important. As it is in maintenance. You order a "yoke" from Cessna and you'll get that big welded-up tubing thing as shown in the second picture. Your vintage of 182 likely doesn't even have a "yoke." It has an entirely different system like the first picture, using telescoping tubing instead of a yoke.

I've been flying my whole life and until today I thought some planes had sticks and the rest all had yokes... I can still learn!
 
Nope. Not based on what I have found so many times.

There are two turnbuckles involved there. The upper one is a stinker to get at. Have fun. And you'll need to adjust both to get the wheels levelled.

Adjusting the ailerons is a long and involved process. Getting it wrong means that the stops on each side start limiting the travel of both ailerons. Again, the manual has the procedure. It's the worst system to rig in the whole airplane.
Dan I think your sarcasm meter may be broken:)

Yeah I’m not looking forward to the task for sure.
 
I think we will go behind or underneath the panel,
One thing you may want to do before diving under the panel is first check the rigging you have now. Pin/secure the controls as called for in the MM and check all the control linkage for proper install per your aircraft S/N. As mentioned above this is a pain and in some cases you need to hold your mouth right. Plus there tends to be more aircraft out there that aren't rigged properly vs on the money. Part of the problem is there can be several variants in the linkage dimensions based on S/N. If you're lucky you might find it out of rig and when corrected everything works? But at least it will give you a start reference in case something goes amiss.
 
One thing you may want to do before diving under the panel is first check the rigging you have now. Pin/secure the controls as called for in the MM and check all the control linkage for proper install per your aircraft S/N. As mentioned above this is a pain and in some cases you need to hold your mouth right. Plus there tends to be more aircraft out there that aren't rigged properly vs on the money. Part of the problem is there can be several variants in the linkage dimensions based on S/N. If you're lucky you might find it out of rig and when corrected everything works? But at least it will give you a start reference in case something goes amiss.
Good advice.
 
I'm the odd one out, I love my "closed loop" whatever and detest the replacement "rams horn" with the big square center.

Well FWIW, the 'big square center' style didn't come along until the mid 70s. The earlier rams horn style is quite nice, IMHO. Is your loop style metal or plastic? Plastic ones are an accident waiting to happen. Metal ones are a different story.

C.
 
@camorton metal. Those epoxy ones will crack. No thank you! The late 60's horn is ok, bit Mooney like.
 
I also have an H with the bowtie control wheel or 'closed loop'. Some of the covering is missing on the left hand side, it's sticky and gross so I want them gone. @Redneckpilot where did you find your rams horn style, Wentworth or similar? I had the Avions in my 172 previously and they are nice if not a bit spendy. Anyone know if there are other alternatives beyond used or Avion Research?

I called and left a VM with Avion to talk thru this issue of the crooked control wheel. If the extra up front expense helps me avoid what you're about to go through it sounds worth it to me.
 
I'd save the old ones for the next owner. Someone like me might prefer to refurbish the older ones for a more vintage look. My only big beef with a lot of those older ones is the lack of, or jankyness of, the PTT switch

edit: but I hear you about sticky and gross. Yuk!
 
Strip the yokes and paint, or powder coat. My closed loop on my 53 cleaned up nicely.
 
I also have an H with the bowtie control wheel or 'closed loop'. Some of the covering is missing on the left hand side, it's sticky and gross so I want them gone. @Redneckpilot where did you find your rams horn style, Wentworth or similar? I had the Avions in my 172 previously and they are nice if not a bit spendy. Anyone know if there are other alternatives beyond used or Avion Research?

I called and left a VM with Avion to talk thru this issue of the crooked control wheel. If the extra up front expense helps me avoid what you're about to go through it sounds worth it to me.
I found these at Reclaimed Aeroparts in Ontario.
He had another set when I purchased these a couple of weeks ago.

I like the Avions but the price was more than I wanted to part with.
I may wish I had just bit the bullet by the time I’m done with these.
 
I found these at Reclaimed Aeroparts in Ontario.
He had another set when I purchased these a couple of weeks ago.

I like the Avions but the price was more than I wanted to part with.
I may wish I had just bit the bullet by the time I’m done with these.

Thanks and good luck. Please let us know how you make out.
 
Success!!!
It took us most of the day but the new (to me) control wheels are installed.

Our original plan of loosening the turnbuckles underneath the panel to allow the control tubes to be indexed proved not necessary.
As it turned out the way it was rigged I was all the way out of chain on the sprockets when turning right.
We were able to do all of the adjusting with the turnbuckles in the wings at the ailerons.
This was a double advantage. It allowed the chains behind the panel to be centered on the sprockets while indexing the control tubes to level the control wheels.
We lucked out on that as this allowed us to improve the rigging.

I also took this opportunity to replace a couple of inop ring lights in my panel. Now I need to get my PTT switches installed.
I think it turned out pretty good.
upload_2022-11-13_21-55-27.jpeg
 
Last edited:
Success!!!
We lucked out on that as this allowed us to improve the rigging.
Yup. Many airplanes out of rig. Was the rigging done in accordance with the service manual, getting the bellcrank stop slots centered at the stop post, and adjusting the pushrod to align the aileron's inboard corner with the fully retracted flap? All turnbuckles with no more than three threads showing outside the barrel? If not, things are still off.
 
All procedures performed IAW Cessna service manual for Cessna100 series aircraft.

We didn’t bother fooling with putting on that pesky wire stuff they had on them adjuster things up in the wings though. That was gonna be too much trouble and run us late gettin back to catch rasslin on the TV.:D


I’m not really serious about that last part…..
 
I can see this thread is going to cost me money. I was not aware of the Avion yokes. I have Cessna yokes now on the 182, but they were not original.

The question is whether to put switches on the right yoke. Would it be advisable to put AP disconnect on the copilot's side?
 
Would it be advisable to put AP disconnect on the copilot's side?
I wouldn't. Some passenger might fool with that stuff when you're not watching, and you could find yourself way off course somewhere. And busting an altitude.
 
I wouldn't. Some passenger might fool with that stuff when you're not watching, and you could find yourself way off course somewhere. And busting an altitude.
I was thinking about that. What I also thought was I could put a multi pole single through switch on the panel and run all the switched wires through it. One position on the switch would be Yoke Switches On, and the other Yoke Switches off.

I think I need a PTT on both yokes, and I want SWAP switch because my audio panel supports swapping between COM1 and COM2 with a momentary switch. So on the left grip will be PTT, AP disco, and on the right grip of each yoke will be the SWAP switch.

The switch will control whether the switched on the right yoke are active or inactive.
 
Last edited:
We put C130 control yokes on the T-50, (All the partners worked at Lockheed, and had big lunch boxes) those things had all kinds of switches to be used for whatever. PTT, swap, elect trim, Nav switching, etc.
 
I called Avion Research and eventually an older gentleman's voice came on the recorder saying to leave a message and they would call me back. That was almost a week ago. Josh from Aviation101 alluded 'finally' getting his while doing the recent panel upgrade on N80991. But they do look nice:
Skip to 1:30 to see them.
 
Been there, done that. My solution was to simply drill and tap new holes in the adapter piece to accept the yoke in the new orientation. Mine was off about 30 degrees, so there was sufficient room for a new set of holes. If you know someone with a lathe, this would be a very easy part to replicate and then you'd only have the one set of holes, but I'm not that picky.

I will let others argue about the legality. I'm keeping the old set in case the FAA man ever comes knocking. Only three screws to swap them back. My original ones were plastic, and these are known to snap at the worst possible moment. The metal ones are a significant safety upgrade in my mind, and a large portion of the fleet has been upgraded one way or another.

C.
Hey Camorton
Im in the exact same situation, how has your fix worked out?
it may not be ideal, but anything is better than having your yoke snap right after crossing a cliff and starting to flare...
not fun - trust me
thanks
 
My solution has worked fine for me. YMMV, of course. Found it a lot easier to drill the new holes in the adapter by removing it from the yoke. It is held in by two long rivets. I did not have a replacement set of these, so I used AN bolts and locknuts. Depending on the tools you have available, you may not need to remove the adapter from the yoke, I just found it easier to drill and tap more accurately this way.

C.
 
Back
Top