My Cessna 170 rebuild thread. XPMODS

malichite

Pre-Flight
Joined
Jul 12, 2021
Messages
30
Display Name

Display name:
malichite
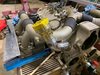
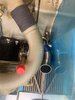
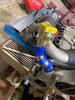
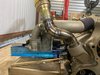
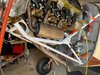
Hi. I'm new here. Cessna 170 owner in the PNW. Wanted to start a thread here to share my current project. I purchased this 170 from a friend. It's a 1953 Cessna 170b with tons of upgrades already. Horton STOL, gap seals, pull handles, 1 piece windshield, baggage door, pponk gear boxes blah blah blah. We call her Beige Betty. Not long after getting her, the project took off. 60901834176__70A67C3A-E207-4D8D-AF42-5435D2777DEB.JPG Anyways, I hope you enjoy.
 
About 5 months after getting her, the engine gave up the ghost. Wrist pin was walking out and making metal, one trashed piston, cam shaft was wearing on the first lobe, stuck valve, on and on and on...So this started the big build. Off came the engine and mount getting ready for an upgrade.

131251343_10221552410617544_6121367357256930365_n.jpg 131251343_10221552413377613_2580358332325021353_n.jpg 131286563_10221552410217534_1029563759292862208_n.jpg 131293964_10221552412617594_2798346745218507242_n.jpg 61768409734__5F263730-7247-494B-845F-1017DD92FC27.JPG IMG_6559.jpg
 
Last edited:
Moving up on the fuel system. From the header tank, we need to add a return line to get the fuel back up to the tanks. We repurpose the wing root vent lines to be return lines. After a bunch of work, we have all that in. Here you can also see the header tank located down in there. After all this is complete, we will need to get the tanks pulled, and get new vent lines added outboard. The new vent setup will work like newer 172s with the vent line coming from the bottom of the wing located behind the wing strut.

131406655_10221567830923042_6338483803388288366_n.jpg 131472177_10221567830003019_1038030859739076046_n.jpg 131502724_10221567831283051_214761689218433023_n.jpg 131633467_10221567829202999_5033417847693108821_n.jpg
 
Moving outboard we get the wing vents installed. Here is the first one in the wing. Once complete, make a template to match the holes for the other side. Dont forget the other wing needs to be a mirror image. Little note so I dont screw it up.

139608288_10221821245338244_396123218299053875_n.jpg 139718556_10221821243018186_604383827066677383_n.jpg 139997119_10221821245858257_4239878697240248643_n.jpg 186508013_10222752203371613_8629595939647525995_n.jpg 188192961_10222752202531592_3794074080604198990_n.jpg
 
With the new engine, we are required to have fuel pressure and manifold pressure gauges added. Where to put them?

140052826_10221822031037886_9088836215676606854_n.jpg

I have an idea! Lets order a JPI900 and make a new panel!

131529755_10221553377201708_4408102378128654731_n.jpg
130551113_10221553377681720_3358500107442530894_n (1).jpg
131372344_10221553377441714_2160240379845988927_n.jpg

That looks like more space. Now, how to cut holes into the panel. Here I 3d printed a few jigs so I could use my router and a flush cut bit. Think it worked out pretty well.

139468761_10221803267488809_147044624912439306_n.jpg 139508876_10221803269888869_1119979743177622696_n.jpg 139463500_10221806906419780_1788329033678379486_n.jpg
139862381_10221821243618201_3236595654339106690_n.jpg

Quick little clip of how the router works for cutting out the holes.


Now we wait for JPI to get through their backorder queue.
 
While we wait for that to show up, we are most likely going to have a CG problem. We are also not going to be able to fit enough into the airplane to take advantage of the new power, so seems like we can kill get two birds stoned at the same time or something something something. Behind the baggage bulkhead we have our strobe and ELT. About 4 1/2ish lbs. If we take that whole assembly, rotate it 180* and move it back one bay, thats a decent arm for that weight. It will also get that mess out of our way to add the extended baggage. Lets get at it! First thing first, make new support bracket to match the current one. It's tiny back there, better send in the girlfriend.

152825365_10222144367896106_7386191364592847471_n.jpg

Once that's all worked out, lets drill some holes in the airplane again.

153742936_10222136739705406_3668203103945056437_n.jpg

Add some nut plates

154547300_10222143526595074_869934699433265297_n.jpg

and get back in there to do some riveting.

154273098_10222144367056085_1758844835934878372_n.jpg 154154829_10222144367296091_7950659138907598838_n.jpg

Now we can get all that stuff mounted again.

181788239_10222617786331271_2523161885979284262_n.jpg 171847440_10222468262033257_5791322541181860591_n.jpg

Also, taught her how to lace wire. I should go in and inspect her work. Or maybe take a nap.

158761659_10222225649168087_5045876734274757403_n.jpg

Last, after a few more holes and nutplates, install it. Next we need to figure out what to do about that headliner

184706455_10222674546110230_4925948906797713002_n.jpg
 
The rear battery STC puts it where the floor of the extended baggage is unfortunately. I think we will be ok on balance. If not, it seems like a great reason to get a baby bush wheel and maybe add built in oxygen behind the extended baggage.
 
Now with the back of the airplane worked out, lets turn our attention back to the front. Before we get too deep, we need to see how the cowling fits. With this STC, some airplanes will have interference with the induction system. The STC allows the induction system to be flipped if this is the case. Lets roll the dice and see.

131275808_10221552538900751_4117609839530465128_n.jpg 131293964_10221552541580818_3127049628584717900_n.jpg 131431281_10221552539500766_6323126461670121118_n.jpg 131733918_10221552539100756_6699304826176038833_n.jpg

Well crap. No big deal, unbolt it all and turn it around right?

131270875_10221552552861100_8730828605847292667_n.jpg

Well crap, that doesn't fix. Time do do some more modifying. The oil fill tube interferes with the induction tube now.
 

Attachments

  • 130262155_10221552553461115_5476634521741524122_n.jpg
    130262155_10221552553461115_5476634521741524122_n.jpg
    232.6 KB · Views: 20
  • 131217149_10221552553941127_4921864513299427475_n.jpg
    131217149_10221552553941127_4921864513299427475_n.jpg
    193 KB · Views: 18
  • 131235599_10221552554821149_6824308376780314165_n.jpg
    131235599_10221552554821149_6824308376780314165_n.jpg
    236.6 KB · Views: 16
  • 131294194_10221552556261185_3815652431263893586_n.jpg
    131294194_10221552556261185_3815652431263893586_n.jpg
    200.7 KB · Views: 15
  • 131297689_10221552556501191_7514079054217713292_n.jpg
    131297689_10221552556501191_7514079054217713292_n.jpg
    202.9 KB · Views: 15
Lets put a bend in that. After a little work and some welding, the oil fill neck fits around the induction tube.

130262155_10221552553461115_5476634521741524122_n.jpg 131235599_10221552554821149_6824308376780314165_n.jpg 131294194_10221552556261185_3815652431263893586_n.jpg 131297689_10221552556501191_7514079054217713292_n.jpg 131300106_10221552555701171_2395248073565448159_n.jpg 131311922_10221552555421164_5146804472827942028_n.jpg
 
Lets see how that cowling fits now with the induction rotated 180* Looks like it fits much better. We had to cut the ends of the induction tubes off as well to get them to fit, but fits great now. (This is all called out in the STC)

131317778_10221557984236881_5942710234769094219_n.jpg 131401596_10221557987436961_5759859857296925476_n.jpg
 
Now that induction is worked out, onto the exhaust. The exhaust for this STC calls to cut off the flanges of the original O-300 exhaust and weld on IO-360 flanges. Seems simple, straight and straight forward. A selling point maybe even? Yah no, this is an absolute mess. We managed to get it all in there but everything is insanely tight. I'm not super thrilled about it but for the short term it will work until I come up with something better. All and all I'm not that upset though. It exits exactly where it did originally so will help keep the sleeper look.

139441323_10221813710429876_8694895629080248711_n.jpeg 162823697_10222331895584181_3759011545036068144_n.jpeg 163563318_10222331895344175_2542887521996772612_n.jpeg 163588338_10222331895824187_994100439324917868_n.jpeg 208325470_10223013950035116_1251748694564727190_n.jpeg
 

Attachments

  • 209419567_10223013950555129_3803033721931478528_n.jpeg
    209419567_10223013950555129_3803033721931478528_n.jpeg
    266.3 KB · Views: 6
Sorry been a ton of posts to get caught up to current state. This is where we are at now finally. The rest of that was the preceding 6 months.

JPI arrived finally, time to get onto fuel lines and wiring. Lots more lacing and logistics to work out.

157026478_10222204370916144_62645854141063243_n.jpeg

159461067_10222281454723191_187684144263217814_n.jpeg
160556578_10222281368001023_8931479941342657108_n.jpeg

158199181_10222219617497299_6208647393695506992_n.jpeg
158396299_10222219618217317_6424607340147465139_n.jpeg
161280998_10222290682113870_810764884488290569_n.jpeg

158366471_10222219617737305_4547792735853891296_n.jpeg

212001496_10223022558410320_7484043409341964043_n.jpeg
 
I think that mostly catches up where I am at now. I'm hoping to complete getting the wiring back up under the panel this week and try to get the panel firewall back closed up and complete for good. All that will be left then is firewall forward.
 
This is becoming my favourite thread. Love the way you write, the pics are awesome and it just looks like ya'll are having fun putting all this together. Respect for the pic with the cold CL, too. :)
 
This is becoming my favourite thread. Love the way you write, the pics are awesome and it just looks like ya'll are having fun putting all this together. Respect for the pic with the cold CL, too. :)
CL? You mean the old civic hatch?
 
CL? You mean the old civic hatch?

Ha no.. Le Silver Bullet.... good after a hot day flying or after performing airframe/engine work....
 
Last edited:
d'oh that's what I meant... after performing the work... lol not during. Or while supervising.... :)

So many wires with that JPI.... we are thinking about the 830 when our engine requires the inevitable OH.
 
It is a lot, but not that terrible. They send the harness all terminated at the instrument side and everything is labeled very well. I just made sure to group everything into bundles (Right side cht/egt, left side cht/egt, 3 pressure transducers...) and then ran them where they needed to be.
 
Got the wiring complete on the right side of the engine. Also finished getting the last fuel lines made. Just need to get them bundled up. Also getting the last of the panel side wiring complete. Starting to smell like a first start soon.

IMG_3328.jpeg IMG_3593.jpeg IMG_3607.jpeg
 
CHTs and EGTs wired up on the left side, fuel flow, oil pressure wired up. Still need to secure the wiring on those. Also need to figure out routing for the upper plug wires still. 99% of the wiring now complete inside as well. The punch list is getting pretty short.

IMG_3780.jpeg
 
That battery box looks like a tight fit to install battery ? Or is it just the angle picture taken from ?

Like the build , it's interesting to follow.
 
I think it's the picture. It is tight, but I can get it in and out in a couple min.
 
What is the installed weight of the engine vs the old O-300?
 
The constant speed prop is where most of the weight gain happens, and it happens all the way forward. But it’s not too difficult to manage. The Hawk XP is a great performer on a platform originally made for the 0-300.
 
Not sure on final weight yet. Doing W&B this week. Im hoping the 4+ish lbs we moved almost to the tail will help contract and weight of the prop.
 
First start done! IA came down yesterday and inspected everything. Couple minor things to wrap up and we are ready to fly. Paperwork getting filled out now and hopefully we will be in the air by the end of the week.

 
Excellent set of photos. Just be sure to label and file in some order so they'll be use to you later.
 
Back
Top