Calibrating a fuel gauge

Timbeck2

Final Approach
Joined
Nov 4, 2015
Messages
9,167
Location
Vail, Arizona
Display Name

Display name:
Timbeck2
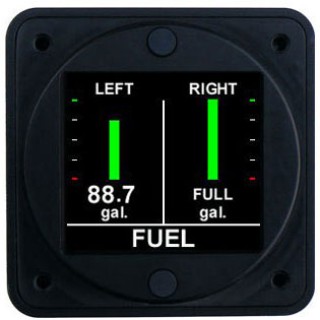
For some reason back in 1969, when they built my plane with the state of the art resistance style gauges that only have to be accurate when the tank is empty - they didn't really get into the colors as to when you should start getting concerned and when you need to land right now to refuel.

So I've got this fancy Aerospace Logic fuel gauge and one of the first steps in the calibration process is to input what level of fuel remaining to go yellow and what level to go red. My POH doesn't really cover this so I guess its a judgment call.

I'm thinking 9 gallons remaining should trigger the yellow and 5 should trigger a red. What do you intelligent and handsome peeps think?
 
Could go another way. Yellow below IFR reserve minimums, Red below VFR reserve minimums. At whatever average fuel burn you like to use.
 
@denverpilot touched on this. It depends on the fuel burn, and how much time you feel comfortable flying when you reach those yellow and and reserves that you set.
 
Could also just have the red come on at power up. Hahaha. How much do you trust it? :)
 
Considering I conservatively burn ~ 9 gph I'd say what is suggested is right at what I was thinking. This is per tank.
 
It’s your plane so your call. I wouldn’t want a fuel warning during normal ops. I’d just learn to ignore it. Seeing a yellow light with an hour per side would not interest me.
 
Not really a light, the color of the bar changes from green to yellow to red. It's programmable hence the question.

10-04432.jpg


And I couldn't find one with a color other than green but for comparison..

10-04465.jpg
 
I thought I was... until I removed the fuel selector valve. The old one leaked just enough to keep the engine loping along. I took it apart and it was very groovy - just like back in 1969 when it was installed at the factory and a human last touched it. Another one on order <cha ching> Hopefully, I'll be flying it next weekend.
 
Did your fancy new fuel gauge come with new fuel senders? If not they're not going to be any more accurate then the gauges that you have in front of you now, just prettier.
If you want accurate gauges that you can count on, you need to go with the CIES magnetic senders.
I would no more trust my life to a fuel gauge powered by resistive senders then I would play Russian Roulette.

Sent from my XT1585 using Tapatalk

He already got CEIS as as I know. Following this thread as I am planning to do the same at annual


Sent from my iPhone using Tapatalk
 
Yes, I have the Ceis digital senders and the aerospace logic digital gauge.
That should make a nice combination!

Sent from my XT1585 using Tapatalk
 
If you go with 9g and 5g, two reds mean 1hr flight remaining, right?

That's good for you to know, but it freaks passengers out! All red lights on the panel freak passengers out.

You may want to set the red lower. In reality you're probably going to start paying attention at the yellow, right?
 
You misunderstand the rules. There's no requirement for accuracy on fuel gauges at all.

The biggest issue is you have a shallow pan of fuel and a very limited travel on the float arm combined with all the other issues with using a simple resistor. As mentioned an electronic instrument can improve the accuracy of the display, but unless you solve the problems of the sender, you still have issues. The capacitive sensors can fix some of the issues but when it comes down to it, there are still a lot of errors to be had.
 
If you go with 9g and 5g, two reds mean 1hr flight remaining, right?

That's good for you to know, but it freaks passengers out! All red lights on the panel freak passengers out.

You may want to set the red lower. In reality you're probably going to start paying attention at the yellow, right?

I moved the gauge all the way over to the left so they can't see as well.
 
Yellow at 9 gallons per tank? For my PA28 that would be waaaay to conservative for me...that's 1:46 @ 9 gph of usable fuel left (18 gallons total = 16 usable gallons total / 9 gph). I think I would go with 6 or 7 gallons per tank yellow, 4 gallons per tank red. Even with just 4 gallons per tank to see red, that is still 10 minutes over VFR minimums for 2 red lights.
 
At the Mooney Owners Summit at Oshkosh there was a Q&A with Don Maxwell, the guru of Mooney maintenance. I asked him what I had to do for the fuel gauges to indicate if there's actually fuel in the aircraft. The response from the crowd suggested I wasn't alone in this query.

Of course it turns out to be money, though not as much as one would think.
 
Since I dip my tanks, calculate the time in my tanks and land plan to land with one hour in the tanks, I would think yellow when the engine is running and red with one hour remaining. I fly with the selector in both but if you are a tank switcher you could be on red in one tank and have two hours in the other. NOt sure how to handle that.
 
You misunderstand the rules. There's no requirement for accuracy on fuel gauges at all.

The biggest issue is you have a shallow pan of fuel and a very limited travel on the float arm combined with all the other issues with using a simple resistor. As mentioned an electronic instrument can improve the accuracy of the display, but unless you solve the problems of the sender, you still have issues. The capacitive sensors can fix some of the issues but when it comes down to it, there are still a lot of errors to be had.
Hadn't thought about this, Ron, and don't know if anybody has made the measurement as to whether there is a difference in dielectric constant between different octanes of fuel. I know we never had to worry about it with the Boeings as Jet-A is remarkably consistent around the world, but with true 87 octand autogas (not gasahol) I wonder of taking on a load of 100LL would make a difference to the capacitive sensors?

Not to mention 92UL if and when it ever comes on line.

Jim
 
Actually, the FAA and Transport Canada is concerned about this. In fact, they sequestered almost all the fuel supply in Canada recently over conductivity concerns.
 
Actually, the FAA and Transport Canada is concerned about this. In fact, they sequestered almost all the fuel supply in Canada recently over conductivity concerns.
Conductivity I can understand as a shorted capacitor isn't worth a tinker's dam, but I'm more interested in dielectric constant and how much it varies by octane.

Jim
 
Apparently not enough to make a TINKER'S DAM of difference to use your terms. The same capacitive sensor I'm looking at is spec'd for Diesel, Gasoline, Biofuels, Hydraulic oil, gear oil, motor oil, vegetable oil, synthetic ester oil, polyalphaolefin, polyglycol, ethylene glycol, water, and salt water. Apparently, conductivity isn't a big thing for this unit either.

My reference book shows that most of the hydrocarbons have constants around 2. Ethylene glycol on the other hand is up around 37. Water is up around 80.
 
I can't imagine different hydrocarbons would have different dielectric points until you start adding ions.
 
At the Mooney Owners Summit at Oshkosh there was a Q&A with Don Maxwell, the guru of Mooney maintenance. I asked him what I had to do for the fuel gauges to indicate if there's actually fuel in the aircraft. The response from the crowd suggested I wasn't alone in this query.

Of course it turns out to be money, though not as much as one would think.


Could you translate that please?

You asked what you had to do for the fuel gauges to indicate fuel and the answer was...money? Not as much as one would think?
 
Could you translate that please?

You asked what you had to do for the fuel gauges to indicate fuel and the answer was...money? Not as much as one would think?

What I want to do is fly over to O&N and have the senders cleaned up. Actually, what I really want to do is go there and get extra fuel bladders while I'm at it. The senders should only cost a couple hundred, but the bladders would be about $5K installed. An extra 10 gallons would help.
 
Welp, today's the day. Its 0440 or so, I've had one cup of coffee and I'm thinking the mono-tooth gals at the Waffle House need a customer before I start.

Off like a prom dress!
 
I can't imagine different hydrocarbons would have different dielectric points until you start adding ions.
Or polar groups and their location to create a dipole moment. Acetone has a greater dielectric constant (21) moment than 2-propanol (18). The current term for dielectric constant is relative permittivity.
 
Or polar groups and their location to create a dipole moment. Acetone has a greater dielectric constant (21) moment than 2-propanol (18). The current term for dielectric constant is relative permittivity.
Good point, I should have been clearer.
 
So an update if anyone decides to go this route: Calibrating the fuel gauge was the easy part, you just push a button or two, several times. Measuring out the fuel 2 gallons at a time for 25 gallons X 2 is the hard part. Of course the hard part includes removing the tanks and all that entails*, replacing the fuel and vent hoses and old senders. Installing the senders at the tank was easy enough and running an extra ground wire to the air frame was pretty simple. I have one more panel to install (I'm replacing the side panels from nasty cloth to cool leather to match the seats that were reupholstered two years ago) today and with any luck I'll fly it tomorrow morning before work. I'll have a new audio panel, new fuel selector valve, new beacon, new digital fuel gauge and senders, and new upholstery.

* removing the thousands (okay, not really but it feels like it) of screws holding the tanks in is like playing Operation - you never know when you'll strip a screw or snap it off. I got fairly lucky on the right wing with just one screw and I had to use an easy out on. The left side, not so lucky with seven screws needing the easy out and four of those snapped off. But with all the screws since the airplane was painted after the screws were installed, it took the paint with it so I had to touch up every screw hole with Rustoleum's version of Matterhorn white. (gloss white, paint + primer is a perfect match) I sprayed the paint in the can's cap and used an artist's brush to touch up the screw holes. It took a while but I like the results. Re-installing the tanks was a bit tricky since the new fuel hose has to be connected to the tank side prior to installation because there is no room to turn a wrench there. Attaching to the aircraft side is also a bit tricky because you have to bend the straight hose and screw it onto the aircraft side at the same time. Three hands would come in handy here. If you attach both sides of the fuel hose and then try to install the screws, you can't push the tank up far enough to make the screw holes line up.
 
I know you jest Nate but the same can be said with glass cockpit installation, which I'll never do on this airplane. It would be like putting a five dollar shine on a two dollar shoe. My goal was to accurately determine the fuel left in the tanks rather than an estimate based on a lot of factors..and I suck at math.
 
So an update if anyone decides to go this route: Calibrating the fuel gauge was the easy part, you just push a button or two, several times. Measuring out the fuel 2 gallons at a time for 25 gallons X 2 is the hard part. Of course the hard part includes removing the tanks and all that entails*, replacing the fuel and vent hoses and old senders. Installing the senders at the tank was easy enough and running an extra ground wire to the air frame was pretty simple. I have one more panel to install (I'm replacing the side panels from nasty cloth to cool leather to match the seats that were reupholstered two years ago) today and with any luck I'll fly it tomorrow morning before work. I'll have a new audio panel, new fuel selector valve, new beacon, new digital fuel gauge and senders, and new upholstery.

* removing the thousands (okay, not really but it feels like it) of screws holding the tanks in is like playing Operation - you never know when you'll strip a screw or snap it off. I got fairly lucky on the right wing with just one screw and I had to use an easy out on. The left side, not so lucky with seven screws needing the easy out and four of those snapped off. But with all the screws since the airplane was painted after the screws were installed, it took the paint with it so I had to touch up every screw hole with Rustoleum's version of Matterhorn white. (gloss white, paint + primer is a perfect match) I sprayed the paint in the can's cap and used an artist's brush to touch up the screw holes. It took a while but I like the results. Re-installing the tanks was a bit tricky since the new fuel hose has to be connected to the tank side prior to installation because there is no room to turn a wrench there. Attaching to the aircraft side is also a bit tricky because you have to bend the straight hose and screw it onto the aircraft side at the same time. Three hands would come in handy here. If you attach both sides of the fuel hose and then try to install the screws, you can't push the tank up far enough to make the screw holes line up.


Ever looked at a Citation X up close? The belly panels on that thing are held on by a zillion STAINLESS STEEL screws which gall very easily. If the previous installer set their screw gun on high speed expect a nightmare for the next guy that removes them. I liked throwing them all into a paper cup and hosing them with lube before installing them.
 
So an update if anyone decides to go this route: Calibrating the fuel gauge was the easy part, you just push a button or two, several times. Measuring out the fuel 2 gallons at a time for 25 gallons X 2 is the hard part. Of course the hard part includes removing the tanks and all that entails*, replacing the fuel and vent hoses and old senders. Installing the senders at the tank was easy enough and running an extra ground wire to the air frame was pretty simple. I have one more panel to install (I'm replacing the side panels from nasty cloth to cool leather to match the seats that were reupholstered two years ago) today and with any luck I'll fly it tomorrow morning before work. I'll have a new audio panel, new fuel selector valve, new beacon, new digital fuel gauge and senders, and new upholstery.

* removing the thousands (okay, not really but it feels like it) of screws holding the tanks in is like playing Operation - you never know when you'll strip a screw or snap it off. I got fairly lucky on the right wing with just one screw and I had to use an easy out on. The left side, not so lucky with seven screws needing the easy out and four of those snapped off. But with all the screws since the airplane was painted after the screws were installed, it took the paint with it so I had to touch up every screw hole with Rustoleum's version of Matterhorn white. (gloss white, paint + primer is a perfect match) I sprayed the paint in the can's cap and used an artist's brush to touch up the screw holes. It took a while but I like the results. Re-installing the tanks was a bit tricky since the new fuel hose has to be connected to the tank side prior to installation because there is no room to turn a wrench there. Attaching to the aircraft side is also a bit tricky because you have to bend the straight hose and screw it onto the aircraft side at the same time. Three hands would come in handy here. If you attach both sides of the fuel hose and then try to install the screws, you can't push the tank up far enough to make the screw holes line up.

Thanks for sharing this. About measuring 2 gallons at a time, what method did u use? I am thinking about putting the file in a 2 gal fuel jar and then pouring it in the tank. The manual says make sure the plane is level, not sure if they mean that the plane has to be leveled or just ball park not standing on a slope.


Sent from my iPhone using Tapatalk

I weighed 2 gallons at a time and dumped it via big funnel and 5 gallon bucket.

Should be able to level it using the leveling procedures for weighing the airplane.
 
I know you jest Nate but the same can be said with glass cockpit installation, which I'll never do on this airplane. It would be like putting a five dollar shine on a two dollar shoe. My goal was to accurately determine the fuel left in the tanks rather than an estimate based on a lot of factors..and I suck at math.

I hear ya. :)

Plus, in the end it’s yours and if you like something you do it.

Saw photos yesterday of a Schweitzer 233 with a glass panel... lol.

Your fuel gauges make a hell of a lot more sense than that!
 
Thanks for sharing this. About measuring 2 gallons at a time, what method did u use? I am thinking about putting the file in a 2 gal fuel jar and then pouring it in the tank. The manual says make sure the plane is level, not sure if they mean that the plane has to be leveled or just ball park not standing on a slope.


Sent from my iPhone using Tapatalk

I bought a 2 gallon fuel can at Walmart which in the sun, can be seen through enough to determine the fuel level up to the 2 gallon mark. I poured fuel from 5 gallon gas cans into the two gallon. It worked out because after you pour the two gallons into the tank you have to wait until it settles to push the calibrate button. While you're waiting you fill up the 2 gallon can again. My plane was pretty dead on level sitting in the hangar so I didn't have to use jacks to level it out.
 
Back
Top